How to configure a time service on Windows Server

This post describes how to configure the Time service on a Windows server as DC. Note: Fir VM please refer to this post: How to configure Time Services for a Domain Controller running on a VM

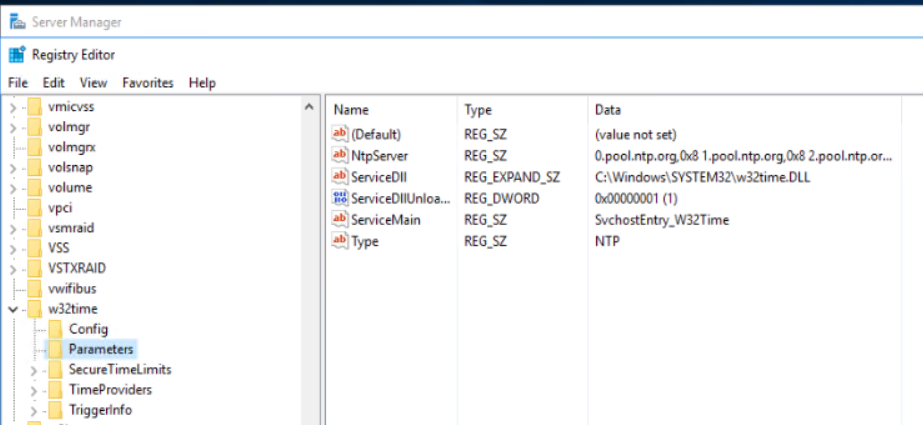
  1. Configure the server type to NTP by running regedit, and go to HKEY_LOCAL_MACHINE\SYSTEM\CurrentControlSet\Services\W32Time\Parameters. Make sure Type is NTP.

2. Set AnnounceFlags to 0x5 or 9xA in subkey: HKEY_LOCAL_MACHINE\SYSTEM\CurrentControlSet\Services\W32Time\Config

  • If an authoritative time server that is configured to use an AnnounceFlag value of 0x5 does not synchronize with an upstream time server, a client server may not correctly synchronize with the authoritative time server when the time synchronization between the authoritative time server and the upstream time server resumes. Therefore, if you have a poor network connection or other concerns that may cause time synchronization failure of the authoritative server to an upstream server, set the AnnounceFlag value to 0xA instead of to 0x5.
    • If an authoritative time server that is configured to use an AnnounceFlag value of 0x5 and to synchronize with an upstream time server at a fixed interval that is specified in SpecialPollInterval, a client server may not correctly synchronize with the authoritative time server after the authoritative time server restarts. Therefore, if you configure your authoritative time server to synchronize with an upstream NTP server at a fixed interval that is specified in SpecialPollInterval, set the AnnounceFlag value to 0xA instead of 0x5.

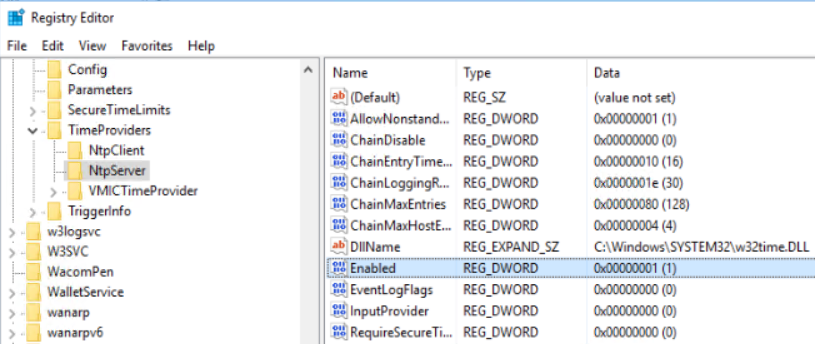
3. Enable NTPServer: Enabled value data is 1

HKEY_LOCAL_MACHINE\SYSTEM\CurrentControlSet\Services\W32Time\TimeProviders\NtpServer

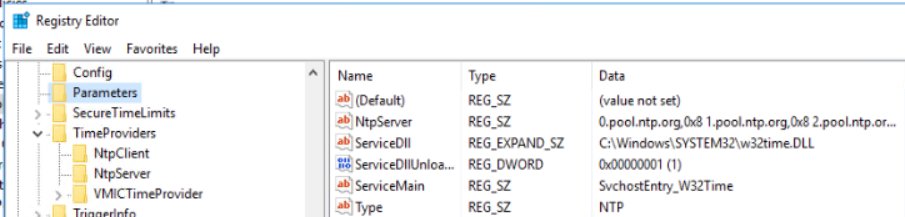
4. Specify the time sources: add pears in NtpServer

HKEY_LOCAL_MACHINE\SYSTEM\CurrentControlSet\Services\W32Time\Parameters

5. Configure the time correction settings: The default value of MaxPosPhaseCorrection and MaxNegPhaseCorrection is 48 hours

HKEY_LOCAL_MACHINE\SYSTEM\CurrentControlSet\Services\W32Time\Config

6. Close Registry Editor and run these commands:

net stop w32time && net start w32time

How to configure Time Services for a Domain Controller running on a VM

Configure time services for a DC running on a VM is different from physical server. Assuming the VM/DC time sync from the host machine is turned on in the Integration Services, please follow these steps.

  1. On your Domain Controller add the following registry key:

reg add HKLM\SYSTEM\CurrentControlSet\Services\W32Time\TimeProviders\VMICTimeProvider /v Enabled /t reg_dword /d 0

This ensures that the DC only syncs its time from the host OS when being restored from a saved state.

2. run these commands:

net stop w32time

w32tm /unregister

w32tm /register

Net start w32time


w32tm /config /update /manualpeerlist:”0.pool.ntp.org,0x8 1.pool.ntp.org,0x8 2.pool.ntp.org,0x8 3.pool.ntp.org,0x8″ /syncfromflags:MANUAL

w32tm /config /update

net stop w32time && net start w32time

w32tm /resync /rediscover

3. Run these commands to check and test the configuration:

w32tm /query /status

w32tm /query /source

w32tm /query /peers

w32tm /query /configuration

How to create a user account in Mac

  1. Click on Apple icon and then System Preferences…

2. Click open Users & Groups.

3. Click the lock to make change.

4. Click + to add a user.

5. Select new account type and enter the user info. Then click on Create User.

6. If you want to enable or disable Administrator check or uncheck Allow user to administer this computer.

Find out why Paloalto firewall denied some sessions

Situation: The client has P850 firewall. In reviewing the daily report, they find one computer were denied for some sessions. They want to know why.

Resolution: 1. Find the source IP address, for example 10.0.200.35 in our example.

2. Go to Monitor>Logs>URL Filtering.

3. Search: ( addr.src in 10.0.200.35 ) and ( action eq block-url )

4. it shows: category is games, Application is xbox-live, Action is block-url. It was blocked by Rule Trusted to Internet.

Options for Installing VMware ESXi 7

There are many options to install VMware ESXi 7.

  1. Interactive ESXi Installation which is recommended for small deployments of fewer than five hosts.  You boot the installer from a CD or DVD, a bootable USB device, or by PXE booting the installer from a location on the network. Then follow the prompts in the installation wizard to install ESXi to disk. 
  2. Scripted ESXi Installation which is an efficient way to deploy multiple ESXi hosts with an unattended installation. To configure multiple hosts with the same settings, create an installation script contains the host configuration settings. The installation script must be stored in a location that the host can access by HTTP, HTTPS, FTP, NFS, CDROM, or USB. 
  3. vSphere Auto Deploy ESXi Installation which is for vSphere 5.x and later provide several ways to install ESXi with vSphere Auto Deploy. vSphere Auto Deploy can provision hundreds of physical hosts with ESXi software. vCenter Server makes ESXi updates and patches available for download in the form of an image profile. The host configuration is provided in the form of a host profile. You can create host profiles by using the vSphere Client. You can create custom image profiles by using vSphere ESXi Image Builder.

VMware ESXi 7.0 hardware requirements

  • CPU: At least two CPU cores
  • BIOS: NX/XD bit to be enabled for the CPU in the BIOS.
  • 4GB RAM: Requires a minimum of 4 GB of physical RAM. Provide at least 8 GB of RAM to run virtual machines the more you have, the better.
  • Virtual Machines support: You’ll need enable Intel VT-x or AMD RVI on x64 CPU BIOS.
  • Network: One or more Gigabit or faster Ethernet controllers
  • Boot Device: 32 GB for USB, SD devices, and other device types such as HDD, SSD, or NVMe.
  • Storage: SCSI, SATA via supported storage controller.

How to unblock senders from Junk mail in Outlook

1. With the Outlook open, go to Junk Email folder.

2. Right click on the email you want to unblock and then select Junk>Never Block Sender.

3. If you don’t see the email you want to unblock, click on Junk E-mail Options.

4. Click on Blocked Senders. Highlight the Sender and then Remove

5. Click OK to save the settings.

Please view this step by step video: