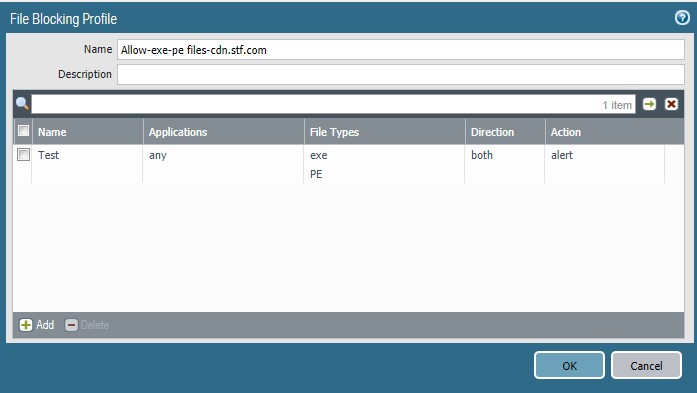
In a case your company would like to allow download an executable file from certain website, you can create a policy. Here is how.
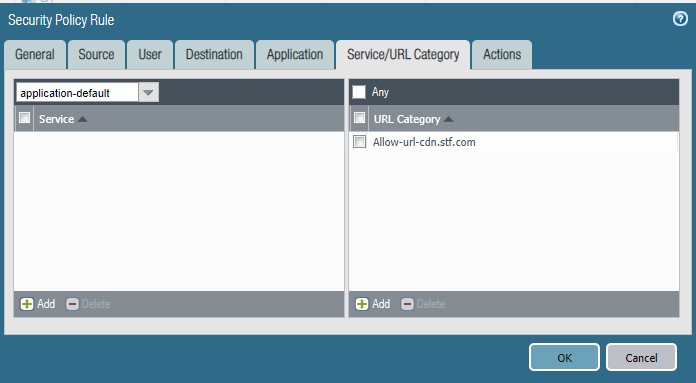
Go to Objects>Security Profiles>File Blocking, create an object, for example Allow-exe-pe-files-cdn.stf.com.
Note: you can add more files here in the future.
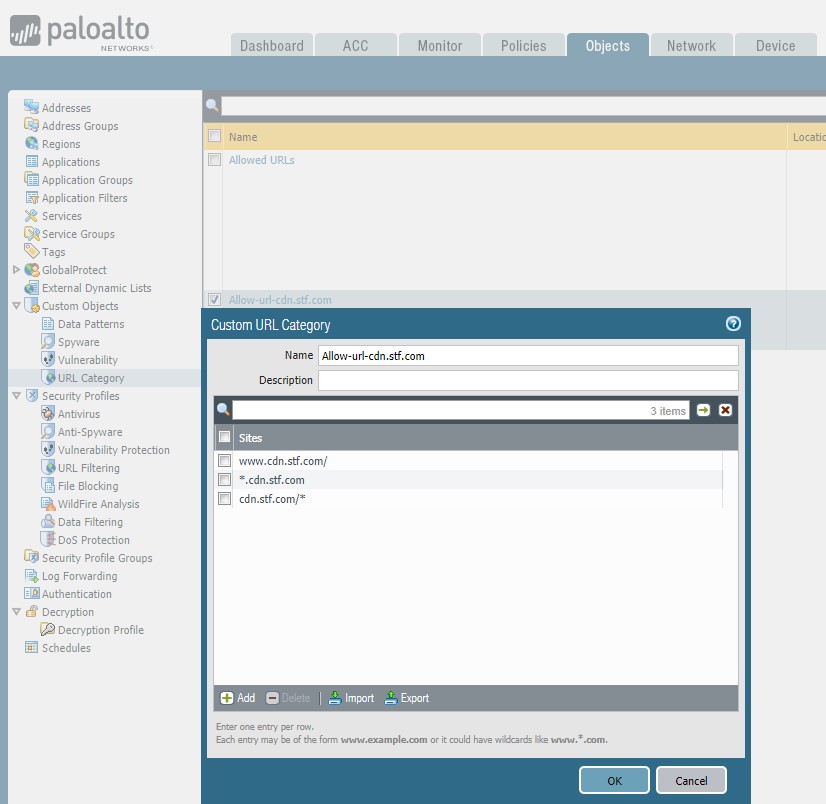
2. Go to Custom Objects>URL Category. Add an object, Allow-url-cdn.stf.com in our example.
Note: you can add more URL here in the future.
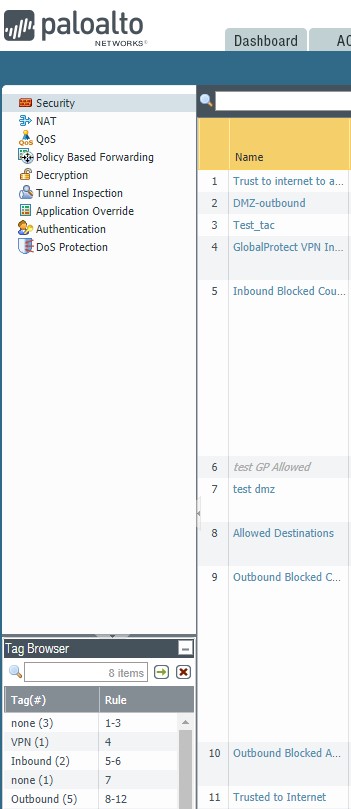
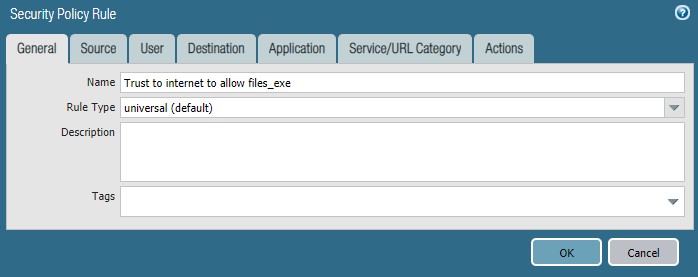
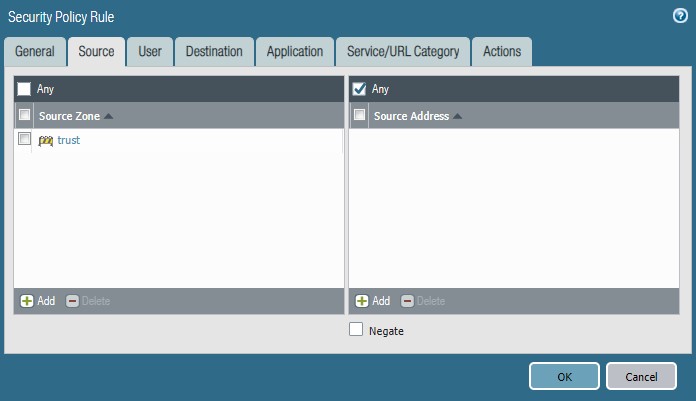
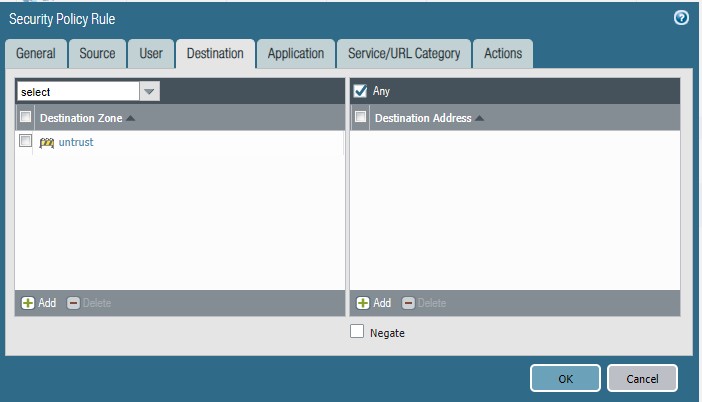
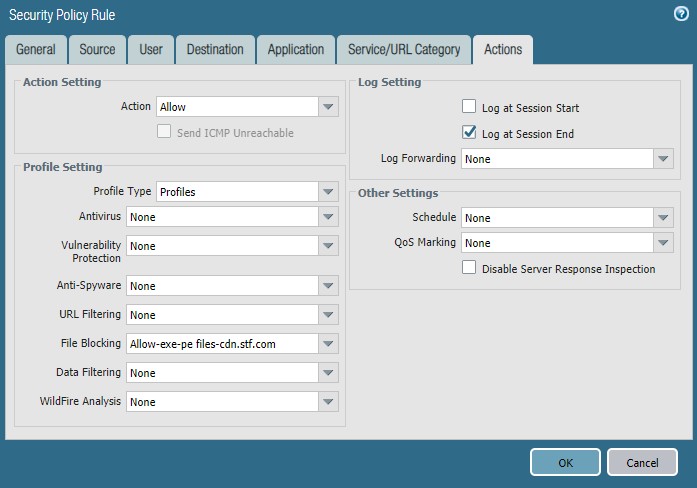
3. Create a policy under Security, Trust to Internet to allow file_exe in out case. This policy must be top of other policy “Trust to Internet” # 11. We can put Trust to Internet to allow file_exe on #10
The main difference are Remote Desktop Connection do most port redirection but Web client for example serial port, USB, and other device redirection such as clipboard, storage, printers, scanners, speakers.
Since running these command may need run as admin, You can use a shortcut that links to the batch file. Just go into properties for the shortcut and select advanced, then “run as administrator”.
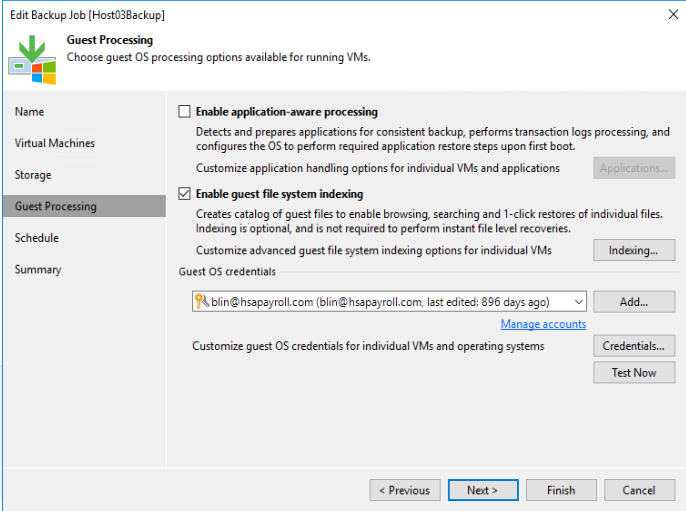
In this example, we will create a RDP Allocation Override policy.
Login Paloalto firewall web page.
Click Objects>Applications, and then Add.
Enter the Name under Configuration>General and other Properties such as networking as Category, remote-access as Subcategory, client-server as Technology.
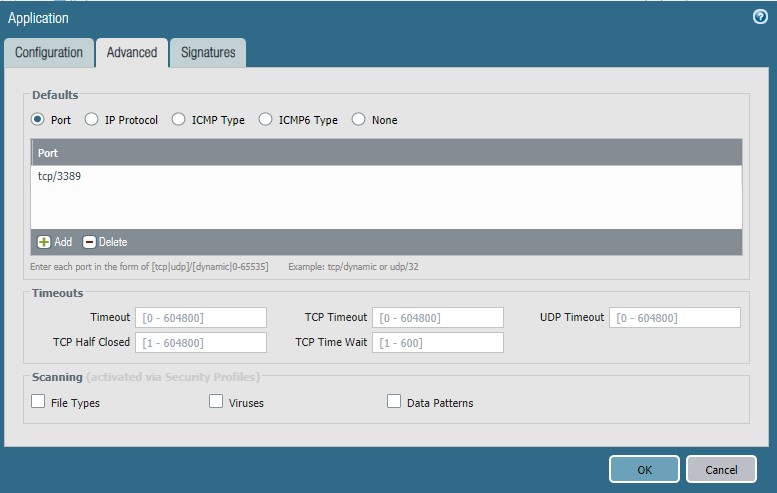
4. In Advanced, Enter the port number 3389 under Default>Port.
1. Call 800 950 5455: Please have your DVMAX ID ready when calling Tech Support:
2. Check the system requirement.
3. Do a full backup.
4. Download the DVMax new version software.
5. Installation process step:
Step 1: Export Users and Passwords
Login to DVMAX Client as the Administrator user.
From the Section menu, select General Management.
The General Management dialog opens. Click the Utilities tab.
Select the Set Passwords & Users and click OK. The Tool Box opens.
Click the Groups icon on the left side of the window to change to the Groups view.
Click on the Gear icon at the bottom right and choose Save Users and Groups.
The Save As dialog will open.
Select your Desktop, name the file passwords8 and click Save.
Close the Tool Box by clicking X in the window title bar.
Close the DVMAX. From the DVMAX menu, select Quit.
Step 2: Backup your DVMAX Data.
On DVMAX Server, go to File -> Backup.
When the Backup dialog appears, click the Backup button.
When the Backup is finished, Proceed to Step 3.
Step 3: Disable Log File
Click on the Maintenance Tab, then click on the Preferences button to configure your backup.
Click the Configuration tab.
Uncheck the Use Log File box. A dialog will ask you to confirm. Click Stop (You will reactive the log file after the upgrade)
Click OK to save the Backup settings
Go to the DVMAX DataFileFolder and either rename or delete the .Journal file
Windows typical path: C:/DVMAXDatabasefiles/DVMAXDatafileFolder
Step 4: Uninstall Existing DVMAX Software
Windows: If open, quit the DVMAX Server application
From the File pull-down, choose Quit
Go to Start -> Control Panel -> Add/Remove Programs or Programs and Features
Highlight DVMAX in the list and click Uninstall/Remove
Verify no residual files exist:
Navigate to C:/Program Files (x86)/
Locate the DVMAXProgramFiles75 (Could be named DVMAX Practice) folder (if it exists) and delete it.
Step 5: Install DVMAX Software
Locate the DVMAX installer (The current DVMAX installer is available for download from users.dvmax.com)
If you receive any errors during the installation process on Windows, cancel the install and right click the installer, then choose Run as Administrator.
Note: On Window, 64-Bit server is the only option.
Follow the Installer prompts, and be sure to install DVMAX Server. (Windows: Third option, Custom install (installs DVMAX Server))
Step 6: Launch DVMAX Server
Double click DVMAX Server on the Desktop.
At the first prompt, click OPEN to select a datafile.
Point DVMAX to your datafile and click Open. (your datafile will end in .4DD or .data)
Typical Path on Windows: C:DVMAXDatabaseFiles:DVMAXDataFolder OR D:DVMAXDatabaseFiles:DVMAXDataFolder *Be sure to check both the C: and D: drive if you have having trouble finding the datafile.
Typical Path on Macintosh: Documents: DVMAXDatabaseFiles:DVMAXDataFolder OR MacintoshHD:DVMAXDatabaseFiles:DVMAXDataFolder
The new DVMAX Server application will open and the data upgrade process will begin
Step 7: Memory Monitor
Windows
The memory monitor box is for informational purposes only. No additional configuration is necessary.
Step 8: Configure Backup
NOTE: If you are using the DVMAX Data Backup and Recovery service, please contact DVMAX Technical Support (800-950-5455) for final configuration of the service before configuring the backup.
We recommend the following configuration:
Click on the Maintenance Tab, then click on the Preferences button to configure your backup.
Change Automatic Backup to Daily.
Set the time (military format) for when your practice is least busiest or closed.
Click the Configuration tab.
In the Attachments area, click ‘Add File...’
Point to the location of your datafile folder and select the .4DIndx, 4DSyncData, .4DSyncHeader, and .Match files as attachments.
For the Backup Destination, click the ‘…’ button to the right.
Set the Backup Destination to your DVMAXBackupsFolder, typically located in:
C:/DVMAXDatabaseFiles/DVMAXBackupFolder on Windows Check the Use Log File box. A dialog will ask you where to save the Journal File. Save it in the same folder as your data, typically located in:
C:/DVMAXDatabaseFiles/DVMAXDataFolder on Windows Macintosh
Click the Backup & Restore tab.
Set the If Backup Fails choice to Retry at the Next Scheduled Date and Time, or any other option of your liking. If you set it to retry differently, make sure you check the box to Cancel the operation after a certain number of attempts to avoid endless backup attempts and failures.
Click OK to save the Backup settings – DVMAX will then perform it’s first backup
NOTE: The DVMAX Server does not automatically back up the DVMAXImagesFolder. If you are using the DVMAX Attachments/Imaging feature, that folder will need to be backed up separately/manually.
Step 9: Configure Cache
Go to the Edit menu (On Macintosh, go to File menu) and choose Database Settings.
Click on the Database icon. (4th icon across the top)
Click on the Memory tab.
Change the Maximum Size to a higher value, depending on your system.
If you’re running Windows 32-Bit Server, set the Maximum size below 1000 mb. (We recommend 700 MB)
If you’re running Windows 64-Bit Server, set the Maximum size to 3-4 GB, if you have the free memory.
If you’re running Macintosh Server, set the Maximum size to 1500 mb, if you have the free memory.
The other values listed on this page should be left at their defaults. Changing any other values could have an adverse affect on your system.
Quit and re-launch the DVMAX Server Application for these changes to take effect.
Step 10: Windows Only: Configure Windows Firewall
Depending on your setup, Windows Firewall might be active on your server. It is important to exclude DVMAX from Windows Firewall so that other computers can connect to DVMAX Server.
Choose Start -> Control Panel
Locate Windows Firewall and open it.
If you do NOT see it, locate ‘System & Security’ and Open it – then choose Windows Firewall from there.
On the left – if Windows Firewall is ON, choose ‘Allow a program through Windows Firewall’.
A list of Applications will appear. Click Browse at the bottom and point to DVMAX Server.
Step 11: Set DVMAX Server up as a Service (Windows) or Set DVMAX Server to Open at Login (Macintosh)
We recommend running the DVMAX Server application as a service on Windows servers. Complete documentation on how to configure DVMAX Server as a service can be found in our Running DVMAX Server Application as a Service document.
Step 12: Upgrade/Update DVMAX Client on Workstations
If you have a Windows server and/or Windows workstations, there are Windows security items that prevent the auto-update from working properly on Windows machines.
Windows
You must uninstall/remove previous versions of DVMAX Client before installing the most recent version
Login to DVMAX Client as the Administrator user (password will be blank) if you have not done so already.
From the Section menu, select General Management. The Management Functions dialog opens.
Click the Utilities tab.
Select Set Passwords & Users and click OK.
After selecting Set Passwords and Users, you will see the following alert:
You will be editing the Admin user so click, Stop Web Server. Users should not be logged into DVMAX at this time so stopping the web server should have no impact on other users. The web server will be restarted when closing out of the Users/Password window.
The Tool Box opens.
Click the Groups icon on the left side of the window to change to the Groups view.
Click on the Gear icon at the bottom right and choose Load Users and Passwords.
Click Desktop and select the Passwords8 file you saved before beginning your upgrade and click Open. Users and Passwords are loaded.
Click the Users icon on the left side of the screen.
If desired, select the Administrator user and click Edit to set a password for this user.
Enter the desired password, confirm the password, and click Change.
Click the X in the window title bar to close the Tool Box.
Quit DVMAX and restart the application before proceeding
Step 14: Verify Lab Setting (If using IDEXX Reference Lab)
Login to DVMAX Client as the Administrator user if you have not done so already.
From the File menu, select Preferences. The DVMAX Preferences dialog opens.
Click on Lab Result Setup
If the Use VC Agent Radio button is selected, choose Use VC4 Lab Services
If Use VC4 Lab Services is already selected, no further changes need to be made
Click OK to close the DVMAX Preferences window.
Step 15: Enable Replication Setting (If using Remote Processing Feature)
Log into DVMAX Client as Administrator
Click Section → Hold SHIFT → Click System Constants.
At the prompt, click I Understand
Click on the Functions tab
Click Execute method and type: rp_InitializeTables
Click OK.
The Program will enable REPLICATE as needed. It will take roughly 5-15 minutes, depending on the size of the data and the speed of the machine.
When the process is done, the progress dialog will disappear, and you will be able to close out of Advanced Settings.
No reboot of DVMAX is necessary.
Step 16: Toss Browser Cache on all Workstations
Firefox
In the top right corner, click the button with 3 horizontal lines, Click on History, then select Clear Recent History.
Change the Time range to Everything.
Click the Details Arrow and ensure Cache is checked.
Click Clear Now.
Safari
From the Safari drop down menu choose Reset Safari or Empty Cache.
Ensure all settings are selected and click Empty or Reset.
Chrome
In the top right corner, click the button with 3 horizontal lines, then choose Settings.
Scroll to the bottom and click the link “Show advanced Settings“
A section labeled “Privacy” will appear. Click the Clear browsing data button
Make sure you have set “Obliterate the following items from:” to “the beginning of time”.
Ensure empty the cache is selected.
Click Clear browsing data.
Internet Explorer
Click the Gear Icon or Tools menu, then choose Internet Options.
In the Browsing History section, click the Delete button.
Ensure the Temporary Internet files and Cookies and website Data are checked.
Click the Delete button.
Step 17: Optimal Settings on Workstations
Ensure optimal settings are configured on each workstation, including the server:
By design, the Maximum size of Outlook 2016 mailbox is 50 GB. Large mailboxes can take longer to open and search emails, even cause a problem.
Note: If you use a POP or IMAP account, all of your email account information, including your folders, email messages, contacts, calendar, and task information is stored in an Outlook Data File (.pst). If you use an Office 365, Exchange, or Outlook.com account, a copy of your mailbox is stored in an Offline Outlook Data File (.ost).
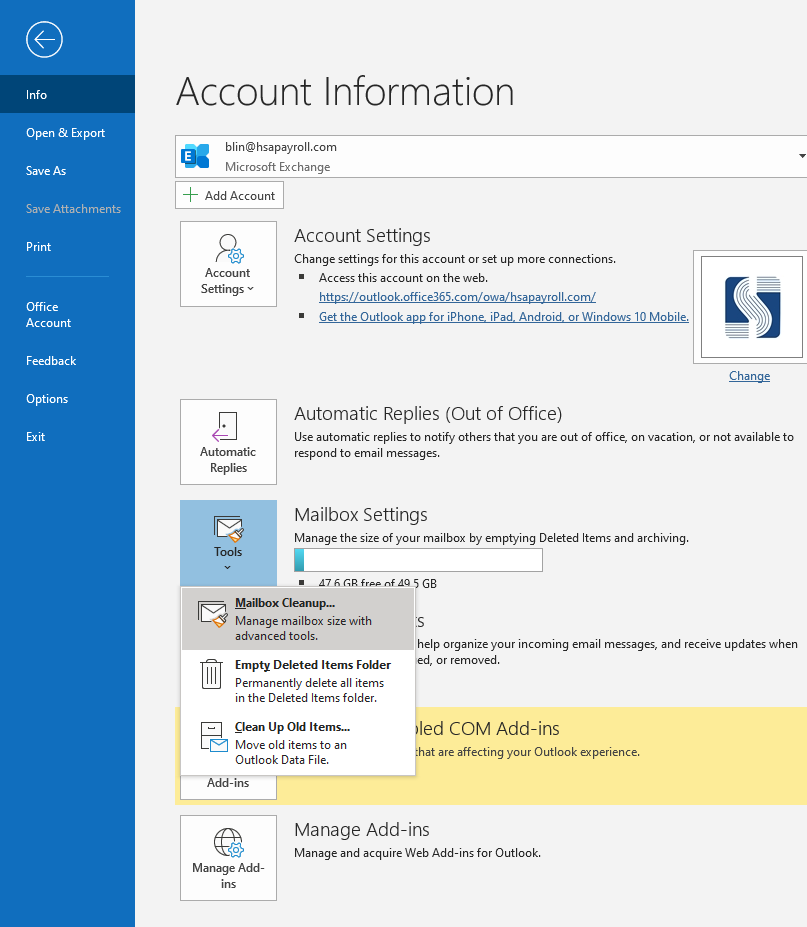
To reduce Outlook mailbox size, you can the Mailbox Cleanup tool. Here is how.
Click the File tab.
2. Click Tools > Mailbox Cleanup.
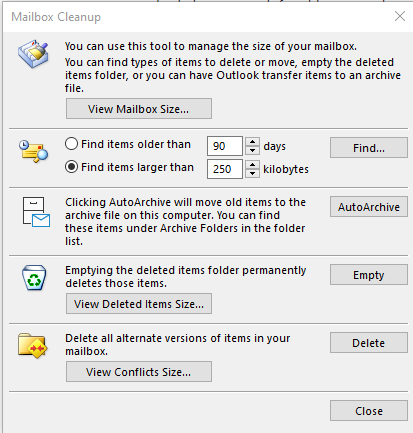
3. You have these options: View Mailbox Size, Find items older than, Find items larger than, View Deleted Items Size, Empty Deleted Items folder, View Conflicts Size, or Empty Conflicts to reduce the size of Outlook Data Files.
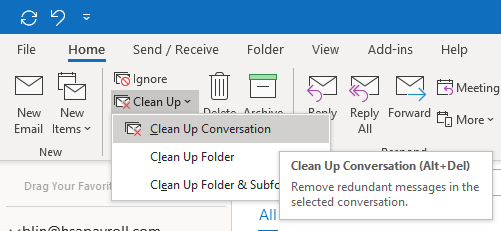
You can also use Conversation Clean Up to delete redundant messages. Here is how.
On the Home tab, in the Delete group, click Clean Up.
2. You have these options:
Clean Up Conversation The current Conversation is reviewed, and redundant messages are deleted.
Clean Up Folder All Conversations in the selected folder are reviewed, and redundant messages are deleted.
Clean Up Folder & Subfolders All Conversations in the selected folder and any folder that it contains are reviewed, and redundant messages are deleted.
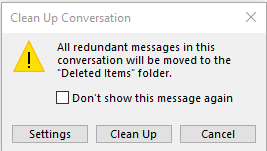
3. When clicking Clean up Conversation, this message will popup. You have an option to run Settings. Or just click Clean Up to clean the redundant messages
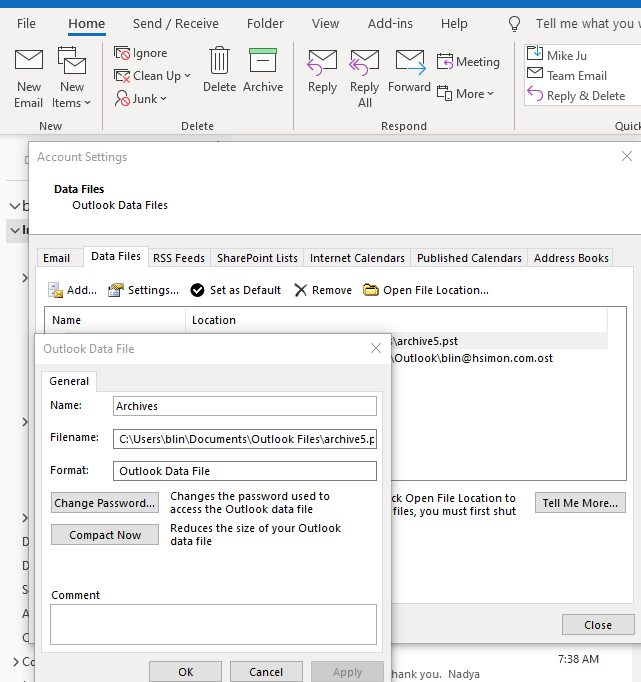
3. If you use a POP or IMAP account, you can reduce the size of your Outlook Data File (.pst) by compacting the data file. Here is how.
a. Delete any items that you do not want to keep and empty the Deleted Items folder. b. Click File > Account Settings >Account Settings. c. Click Data Files, and then click Settings. d. Click Compact Now and then click OK.