To create SSL Certificate, you need
to generate Certificate Signing Request (CSR) on your server and send it to a
Certificate Authority. This video shows how to generate CSR on Windows Server
2019.
1. Open IIS Manger
* You can open Internet Information Services (IIS) Manager from the Server Manager>Tools
Or just type iis in
the Start
2. Click on Server name
3. Under IIS, click Server Certificates.
4. In Server Certificates, click Create Certificate Request.
5. In Distinguished Name Properties, enter the info such as Command name, Organization, Organization unit, City/locality,
State/province, Country/region.
6. In Cryptographic Service Provider Properties, select Bit length, 2048 in our example.
7. Save the CSR.txt file and send
it to a Certificate Authority.
In some situations, you may want to configure a pass through on Paloalto Firewall for a test. In our case, the client has a problem to establish the SFTP connection. They would like to configure the pass through the firewall for a test. This video shows how to setup a test policy that allows the computer IP address 10.0.220.19 pass through the firewall.
1. Go to Policies>Security.
2. Click on Add.
3. Type the Name, SFTP test in our
example, and keep others as default.
4. In the Source tab, make sure the
Source Zone is trust, and Source Address is 10.0.220.19, the local computer IP address which will be used to test SFTP
connection.
5. Keep other setting as default or Any.
6. Commit.
7. Now, test.
If Monitor shows Application
incomplete, Session End Reason aged-out, Byes Sent successfully, but Received
is 0, it
may be not
firewall issue. This could other end issue.
You can also check the Detailed Log
View, which shows Packets Received is 0.
Note: remember to disable the policy after the test.
Microsoft System Center Operations Manager agent is a service that is installed on a SCOM Server for configurating data, collecting information, reporting, and measuring the health state of monitored objects such as a SQL database or logical disk, any errors on a server. This article shows you how to install the SCOM agent.
1. With Microsoft System Center Operation Manager open, click Administration on the left pane.
2. At the bottom of the navigation
pane, click Discovery Wizard.
3. In the Computer and Device Management Wizard, click on the Discovery Type page, and then Windows computers.
4. On the Auto or Advanced? Page, you have two options: Automatic computer discovery and Advanced discovery.
5. We select Advanced discovery because we want to discover servers
only.
6. In How do you want to discovery
computers, check Scan Active Discovery, and
then Configure.
Note: you can also select Browse for.
7. Type the server hostname, and
then OK
8. It shows the serer and click Next to continue.
9. In Administrator account, click Discover.
10. Select the server under Discovery Results and then click on Next.
11. In the Summary page, keep the default settings and click Finish.
12. It starts process to install the Agent.
13. Now, the SCOM is monitoring the server just installed the agent.
The Office Deployment Tool (ODT) is a command-line tool that help you to download and deploy Click-to-Run versions of Office, such as Microsoft 365 and Office Apps. This article shows you how to download and configure ODT so that you can install Office Apps on a computer or multiple computers.
* After extracting ODT,
you may have 3 the configuration files, configuration-Office365-x64.xml,
configuration-Office354-x86.xml, and
configuration-Office2019Enterprice.xml.
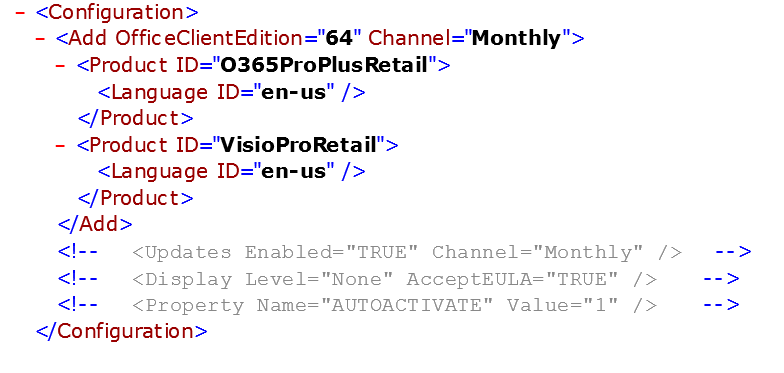
For example, this is for Office
365-x64 bit configuration file
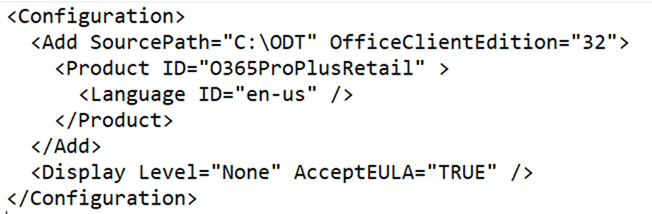
Assuming we downloaded
ODT in C:\ODT
folder and want to install Office 365 x86
bit, we re-configure the configuration-32bit.xml as shown below.
Note: 1) SourcePath
could be a network drive, for example \\servername\odt.
2) OfficeClientEdition=”32″
is 32
bit
version.
3) Product ID can be found step 5.
3. Download Office for installing multiple computers without accessing the Internet again.
* Run This command line to download
Office 365 to a local computer so that you can install it locally without the
Internet.
setup.exe /download
configuration-32bit.xml
Note: That will create a Office
folder and download installation files.
4. Install Office
* Now run this command line to
install office 365.
setup.exe /configure
configuration-32bit.xml
Note: if you want to install ODT on
multiple computer, you can copy the ODT folder or share it from the network
drive. Then run the command line.
Note: You can install Office
without download it first. Just run the same command:
setup.exe /configure
configuration-32bit.xml
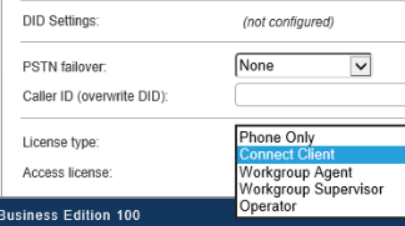
5. Check Office Product IDs
If you have different Office 365vplan and
would like to
know their Product IDs, please check this web page:
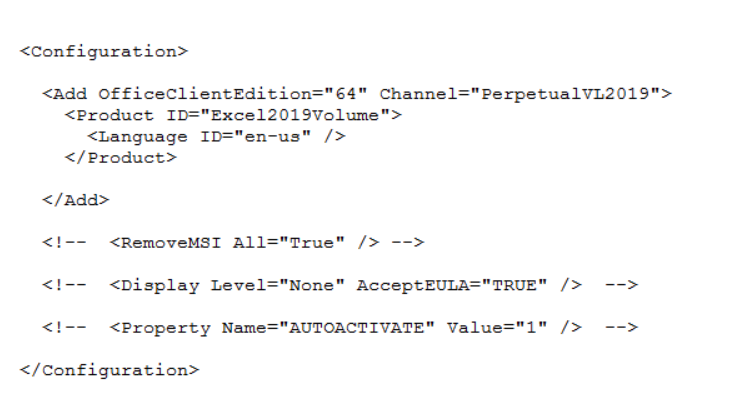
For example, to install Excel 2019
Volume license app on a computer. Modify the configuration file, check the
product IDs web site first.
The ID for Excel 2019 Volume license is Excel2019Volume
Edit the configuration file by modifying
the Product ID=Excel2019Volume.
Microsoft System Center Operation Manager (SCOM) is a part of System Center suite. You can use SCOM to monitor health, capacity, and usage across applications, workloads, and infrastructure. This article shows you how to install Operation Manager based on SCOM 2019.
A.SCOM 2019 System Requirements
•Supported Server OS – Windows Server 2016 and 2019
•SQL Server Requirements – SQL Server 2016, 2017, and 2019
•SQL_Latin1_General_CP1_CI_AS
•SQL Server Full Text Search
•SQL Reporting Service
•IIS, ASP.NET 4 for Web console.
•Hardware requirement: Microsoft Azure, Virtual Machines, Physical Servers with minimum 4-core 2.66 GHz CPU, 8GB RAM, 10GB disk spaces.
If you don’t meet the reequipments,
you may receive these message when install SCOM.
B. SCOM Installation
1.Log on to administrative account
2.Run Operations Manager Setup.exe, and then click Install
3. On the Getting Started, check features you want to install, and then Next.
4. Select installation location,
and then click Next.
5. On the Prerequisites page,
review and resolve any warnings or errors.
If all requirements are met, click Next.
6. On the Configuration, Specify an
installation option page, select Create the first Management server in a new
management group, type a name for your management group, and then click Next.
7. On the Configuration, Configure the operational database. Enter the Server name and
instance name box. The default instance name
is MSSQLSERVER.
Note: If you installed SQL Server by
using the default instance, you only must type the server’s name.
8. Enter Database name, Data File folder,
and then click on Next.
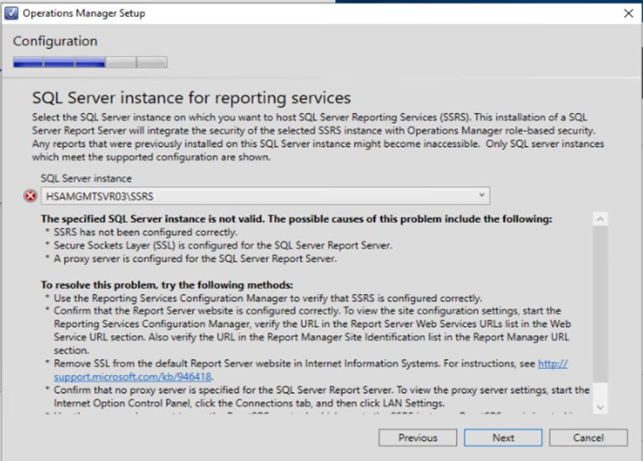
9. In SQL Server instance for reporting services,
click Next to continue.
If you didn’t install SQL reporting service, you will need to download
and install it first.
10. In Report Server Configuration Manager, setup service account.
11. Setup Database by clicking on Change Database.
12. On Change Database, check Create a new report server database, and
then Next.
13. Configure Database Server.
14. You may want to Test Connection.
15. Configure Credentials and click Next.
16. Confirm the Change Database.
17. Process and Finish.
18. Configure web site.
19. Select an authentication mode
for use with Web console.