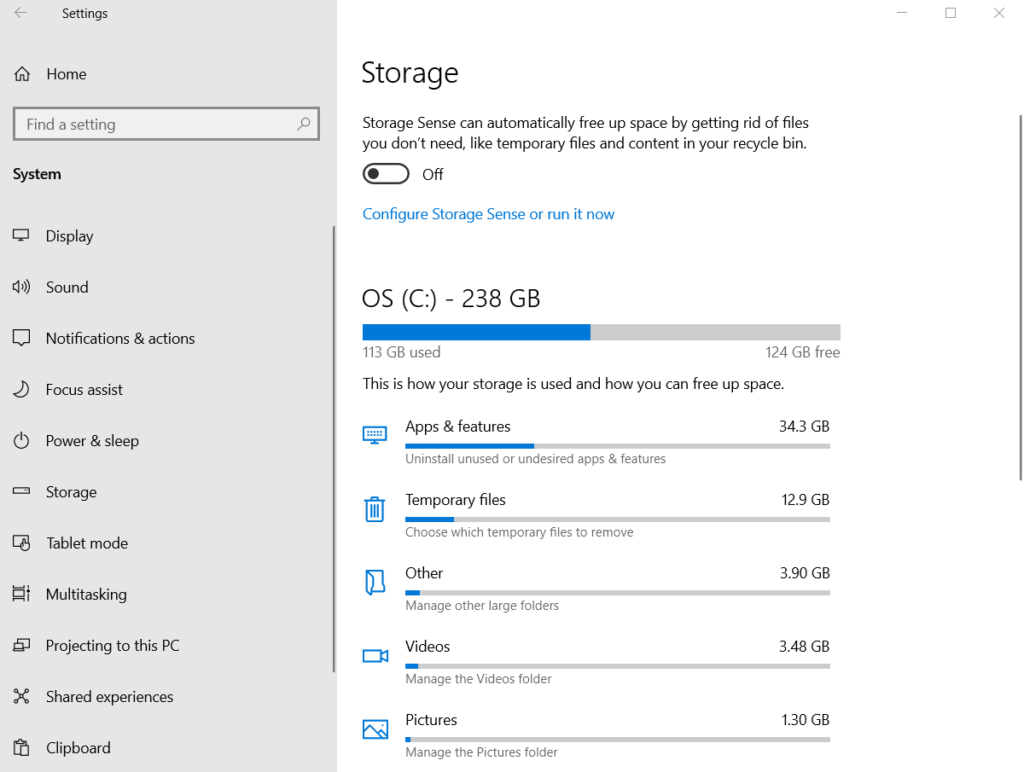
Configure Storage Sense or run it: In windows 10, click Settings>System>Storage. If it is off, turn it on.
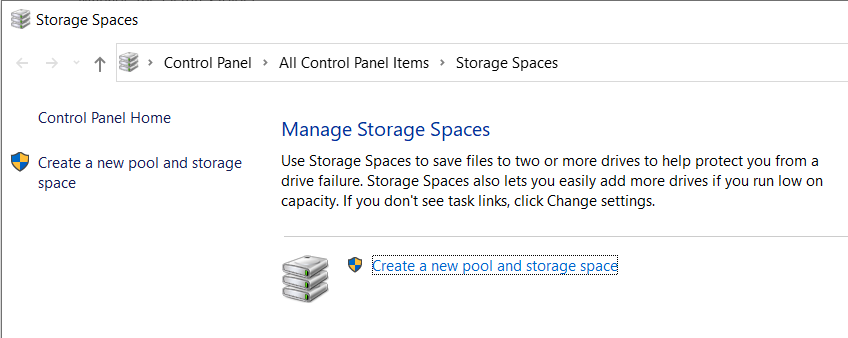
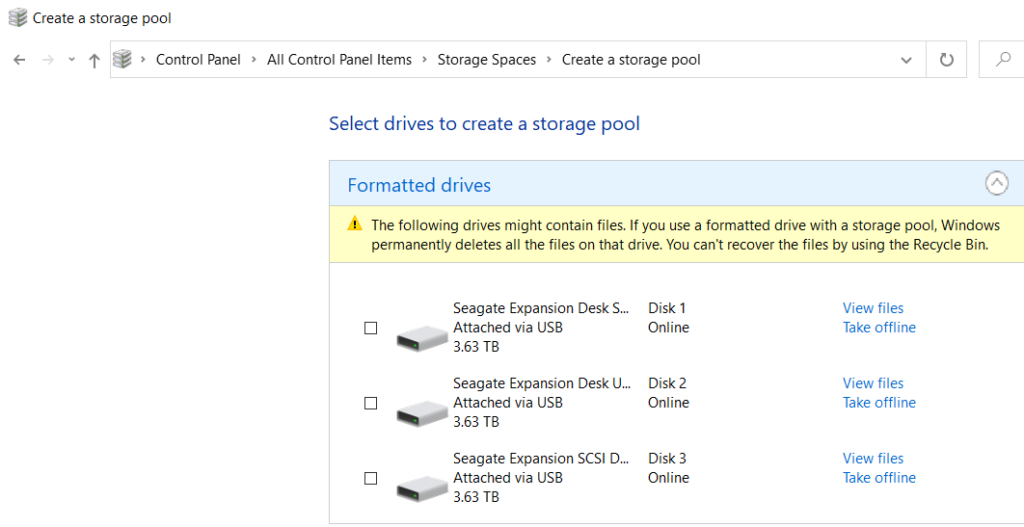
2. Manage Storage spaces: In Settings>System>Storage, you have an option to manage Storage space.
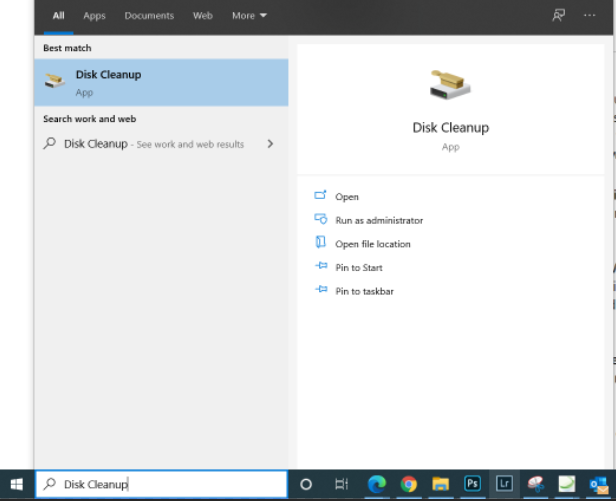
3. Run Disk Cleanup. Type cleanup in search bar and run it.
4. Delete Personal files or move them to different drive:
Open File Explorer.
Under This PC in the menu on the left, check these folders: Videos, Music, Pictures, and Downloads.
To see the size of the files in a folder, select View > Details. Right-click in the open space and then select Sort by > Size to show the largest files at the top of the list.
If there are files you no longer need on your device, you can either delete them or move them to an external storage device like a USB drive or an SD card.
5. Uninstall apps you don’t use anymore: Open the Start menu and select Settings > Apps > Apps & features. Highlight the program and click on uninstall.
6. Move files to another drive
Connect your removable media to your device.
Open File Explorer from the taskbar and find the files you want to move.
Select the files, go to the Home tab, and then select Move to > Choose location.
Select your removable media from the location list, and then select Move.
With Microsoft teams, we can chat, meet, call, collaborate, video conferencing, screen sharing, file sharing, and more. There are many ways to share your computer screen with Teams. This article will show you how to share screen with external people.
1. With the Teams open, click on Calendar.
2. Click on New meeting.
3. In the New meeting window, enter the info such as Title, attendees, date, time and message. You also have options to repeat, add channel, location. Then click Send.
4. Now, the meeting should display in your calendar. Click Join to start the meeting.
5. Attendees will receive meeting
email. Click Join Microsoft Teams Meeting to process.
6. In the meeting room, you have options to modify video, audio, add a room. If you click setting icon, you will have more settings. now, click on Join.
7. Now, you should have a screen
showing Waiting for other to join.
8. As Attendees, you click Join Microsoft Teams Meeting from the email received, you may have 3 options:
• Download the windows app
• Continue on this browser
Open your Teams app
9. After you open Teams, you have options to enter your name, setup video/audio, and other settings. Click Join Now to join the meeting.
10. You will have message: We’ve
let people in the meeting know you’re waiting.
11. On the owner computer, you
click on Admit to allow the people to get in.
12. To share the screen, click on
share Tray icon.
13. Select the screen you want to
share and click Screenshare.
14. You also have options to share entire screen, Application window, Chrome tab. Click Share when you are ready.
15. Now, you should be able to see
the shared screen.
16. Give control or request control, move the mouse to the top, click Give control username. Now, you are controlling the remote computer.
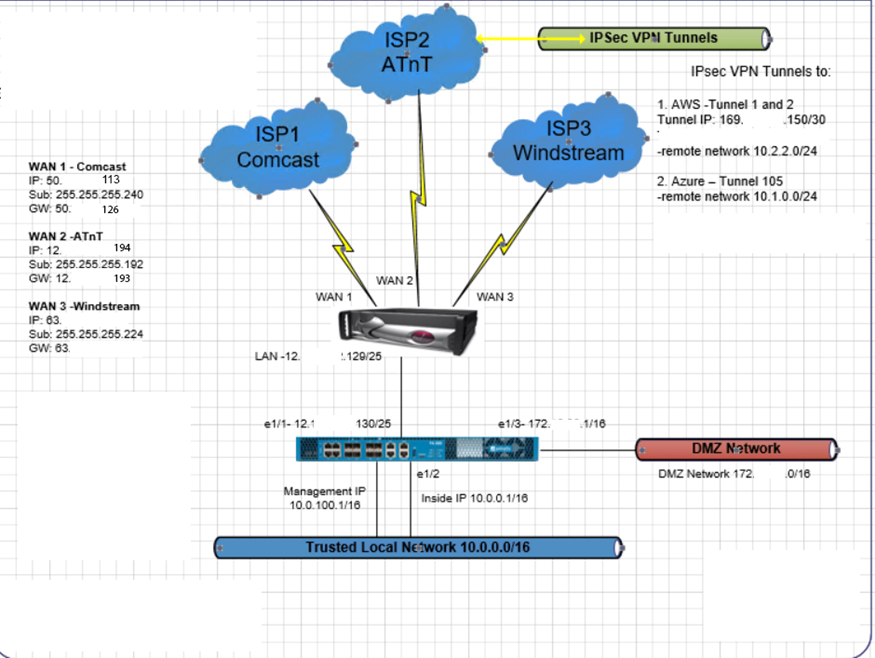
Situation: The client configures dual site to site VPN connecting to AWS using two ISPs, AT&T and Comcast. They configure both Active-active load balance and failover. They would like to know how to switch between Balance and Failover.
Resolution: assuming both configuration are correct and they are using Active-active balance, you just need to check Fail Over under Monitor Profile by going to Network>Network Profile>Monitor.
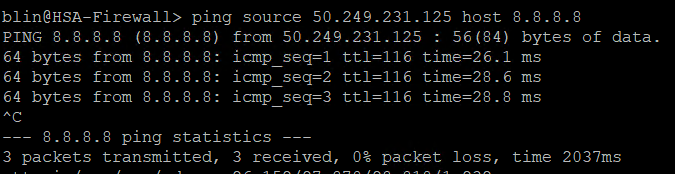
Q: We configure dual site to site VPN connecting to AWS using two ISPs, AT&T and Comcast. This is Active-Active load balance Tunnels. How can I test to make they are working?
A: You may have many options.
Use Paloalto firewall command: ping source IP host IP. For example if the AT&T local IP is 12x.x.130 and AWS private host IP is 10.2.2.35, run this command: ping source 12x.x.130 host 10.2.2.35. If the comcast local IP is 50.x.x.125, run this command ping source 50.x.x.125 host 10.2.2.35
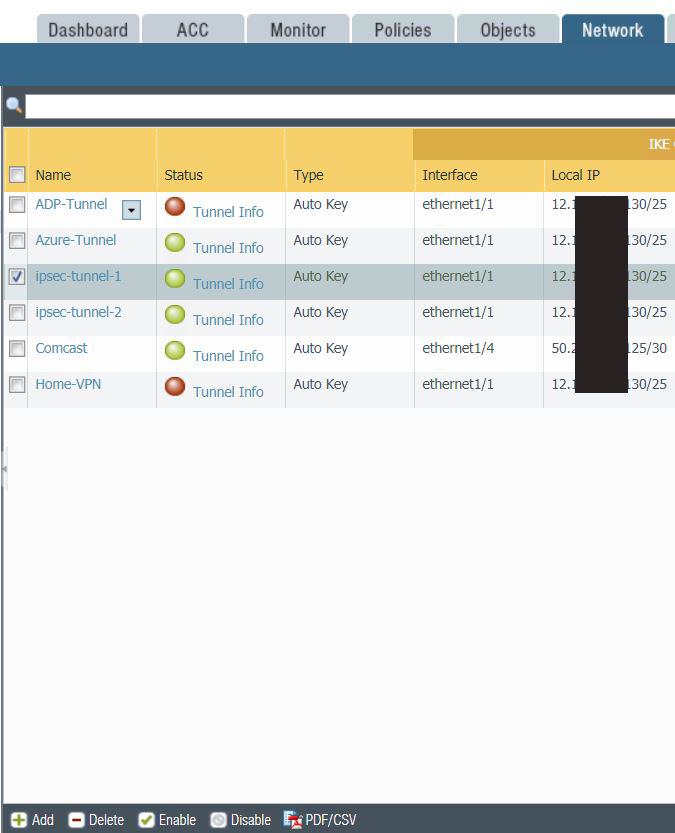
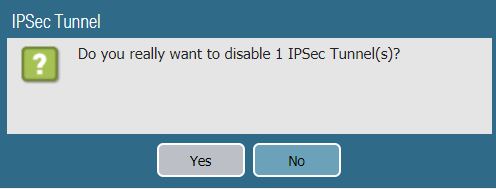
You can disable one tunnel for testing another tunnel. Go to Network>IPSec Tunnel. Highlight one of tunnel, for example AT&T to AWS tunnel 1.
Click Disable. Click Yes to confirm disable the tunnel.
Commit to save the change.
Ping the AWS private IP address, 10.2.2.35. If it works, you are connecting the AWS using the different tunnel.
Q: Is there a way to add Public Calendar into Favorites? I try it but the public Calendar doesn’t show up in the top of Favorites.
A: If you right click on the Public Calendar, you do have an option to add the Public Calendar ton the Favorites. However, it will show up in Public Folder Favorites, not the top Favorites which is Mail favorites.
You may drop the Public Calendar to the calendar if that will be easy for you to navigate.
The client has two ISP, AT&T and Comcast. They would like to configure fialover site to site VPN connecting to AWS. This article will show you how to configure dual IPSec VPN failover using Tunnel Monitoring on Paloalto Firewall.
The configuration is based on this topology.
1. Make sure you have Tunnels
configured. Please refer another video for IPSec Tunnel Configuration.
* Login Paloalto
firewall and go to Network
> Interface > Tunnel
* Network > IPSec Tunnels
2. There are two ways to do VPN
tunnel traffic automatic failover:
1) Failover using Tunnel Monitoring
– is used to make sure the VPN tunnel is passing traffic. If the primary VPN
tunnel (1) in our example) goes down or if there are traffic issues over the
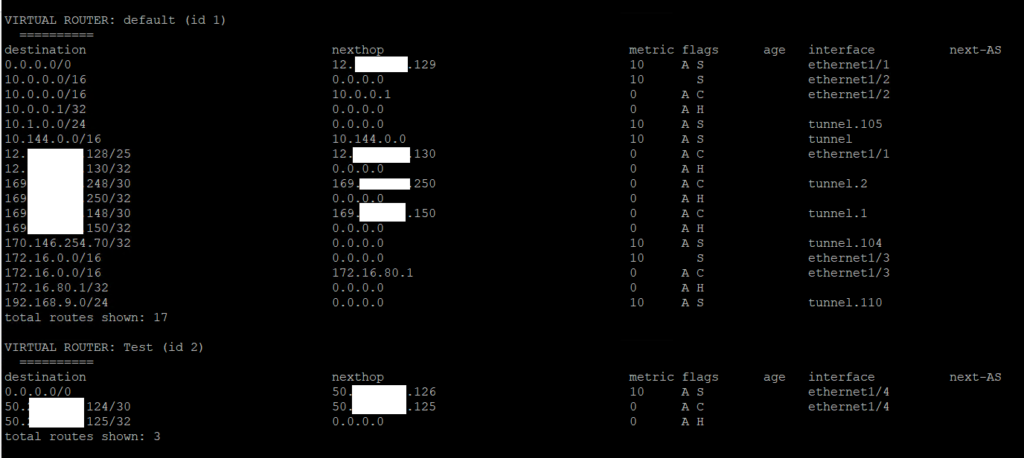
VPN, the tunnel monitoring will detect it and will bring the primary tunnel
interface down. Thus the route through the Primary tunnel interface tunnel 1
will be removed from the Forwarding table and the route through the Secondary
Tunnel interface tunnel 100 will take over.
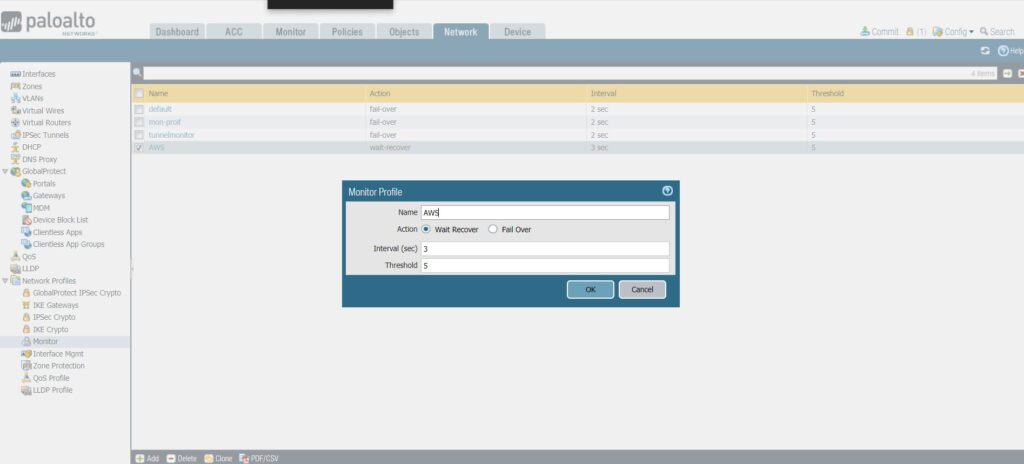
* To configure a Monitoring
Profile.
Network > Network Profiles > Monitor > Add
Make sure “Fail Over”
Option is selected.
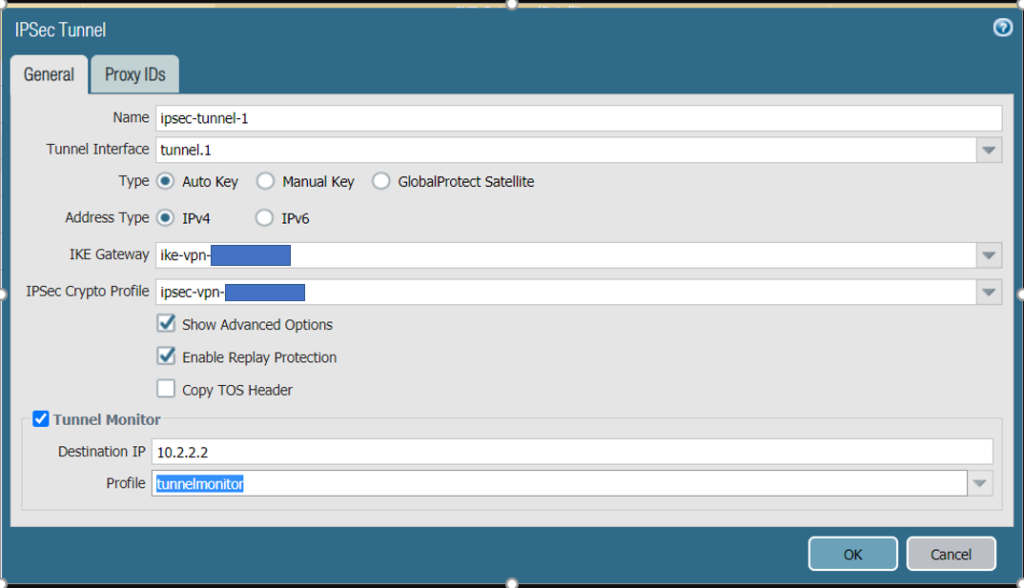
* To enable Tunnel Monitor on the IPSec
Tunnels
Network > IPSec Tunnels > Primary-Tunnel (1), make sure Enable is checked for Tunnel Monitor.
Configure the destination IP to be monitored and select the configured Monitor Profile “tunnelMonitor”. Note: if you don’t see Tunnel Monitor, click on “Show Advanced Options”.
Repeat above to configure the
destination IP to be monitored and select the configured Monitor Profile “tunnelMonitor“ on
Secondary Tunnel 100.
Note : For Tunnel monitoring to
work the Tunnel Interface will have to be configured with an IP
address.
Once the Primary Tunnel monitoring on the Primary tunnel fails, the tunnel
interface status is forced to Down. Network > IPSec Tunnels.
Once
the Traffic through the Primary Tunnel recovers, the tunnel monitoring will
come up and the route through tunnel.1 will be installed in the Forwarding
table.
Once
the Tunnel monitor is goes DOWN or UP the below logs can be
seen under System logsMonitor > Logs > System
2) For configuring Failover using Static Route Path monitoring, please view another article.
As you may know, Homegroup has been discontinued with the release of Windows 10 1803 and later version. This video will show you how to setup home network to share files.
1.Setup
network
Assuming you have an internet router/modem with DHCP/DNS. It is ready to assign IP address to each computer and connect to the Internet. If you see the network icon in the bottom right, your computer is ready to access home network resources and the Internet.
2. Setup the same workgroup on all home computers.
Type “this pc” in the search bar.
Click on Open.
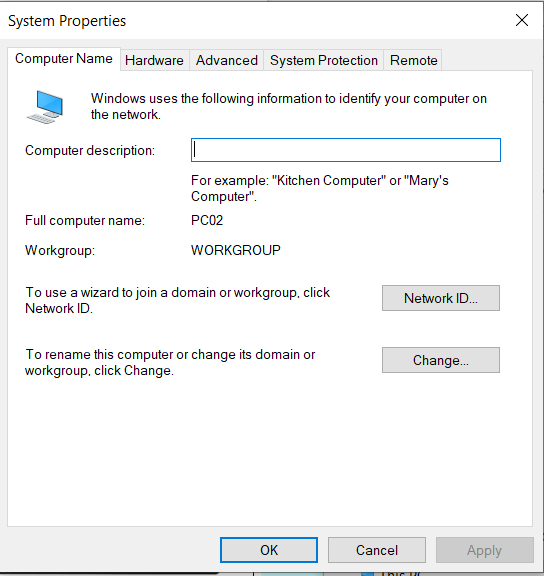
* Right click on This PC and select Properties.
* Make sure all computers’ workgroup name is the same. If not, click on Advanced System Settings.
* Click on Computer Name. Then Click Change.
* Change the Workgroup name to match all other computers’ Workgroup name, for example workgroup. Then click all OKs to save the settings and close the System Properties.
3. Create a user with the same
password on all home computers. It is recommended to create a user account with
the same password in all home computers so that you can share files.
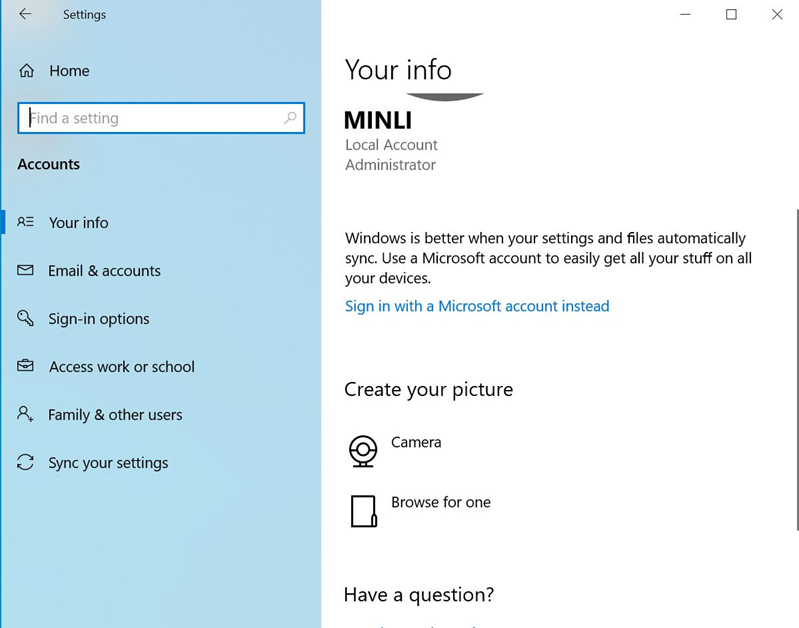
Click Star>Settings.
In Settings, click Accounts.
To add a new account, click on Family & other users.
In Family & other users, you have options to add a family member to Sign in with a Microsoft account and Add other users to sign in this PC without a Microsoft account.
Alternatively, you can reset the Administrator’s password for all computers. To reset the password, hold and press Ctrol+Alt+Del keys. Click change a password.
4. Share a folder or drive with other
computers.
With File Explorer open, right click on the folder or drive you want to share and click on Properties.
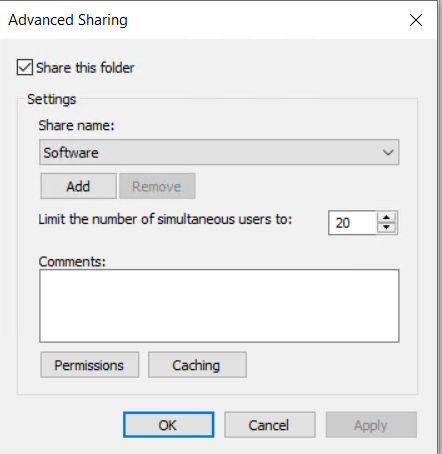
Click on Sharing tab and then Advanced Sharing.
Check “Share this folder” and click on Permissions.
Highlight Everyone and check Change and Read.
Click all Oks to save the settings.
5. Access shared folders or drives.
You may have many ways to access
shared folders.
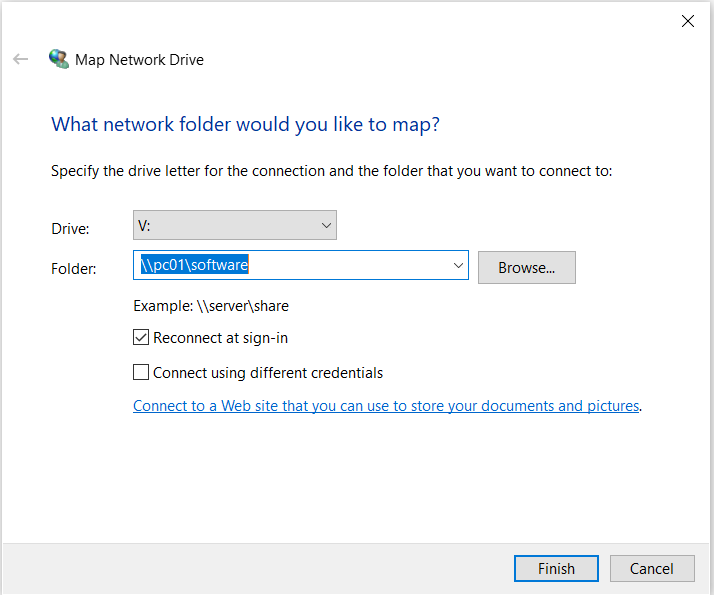
Map network drive. Right click on “This PC” and select Properties.
In Map Network Drive, choose Drive, for example V, Folder, \\pc01\software in our example. You may check Reconnect at sign-in. Click Finish.
If you login the same username and password you created, it will map the shared drive. If you login a different user account, windows will popup for the credentials. Enter the username and password you created before. You may want to check remember my credentials so that it won’t popup next time. Click OK.
Now, you should be able to access
the shared software folder.
Alternatively, you can type the remote computer name to see all shared folders. For example type \\pc02 in the Search bar. Then click Open.
You will see all shared folders or drives.
Note: to access a shared folder and shared printer, all computers, printers must be in the same network, for example 192.168.0.# network. If your wired computer and Wi-Fi laptops are in the different IP range, they may not be able to see each other.
Troubleshooting tips for home
network.
●
1.Most
computer issues can be fixed by restarting the computer.
2.Are all
home computers in the same group, for example workgroup?
3.Are
all computes in the same IP range? Use ipconfig /all command to check the IP
address.
4.Can
all computers see each other? Use PING command.
5.If
the computer can’t access the Internet, make sure it is connecting to the
network with correct IP address and DNS. Use ipconfig /all command.
6.If you have a problem to access a shared folder, it could be permission issue.
7.If
you can access shared folder but not internet, reset modem/router may fix the
problem.
8.If you can ping the