In Microsoft 365, the self-service password reset feature is available with Azure Active Directory Premium P1 or P2 licenses. These licenses allow users to reset their passwords by using the Microsoft 365 login screen or the Azure AD self-service portal.
With one-way sync, you can still enable self-service password reset for your synchronized users, but you’ll need to configure password writeback feature. Password writeback allows changes made in Azure AD to be written back to your on-premises Active Directory, including password resets.
To use password writeback, you’ll need to have an Azure AD Connect server that is configured with a service account that has permissions to write passwords to your on-premises Active Directory. You’ll also need to enable password writeback in the Azure AD portal.
Once you have password writeback enabled, your synchronized users can use the self-service password reset feature in Microsoft 365, and their new password will be written back to your on-premises Active Directory.
Please note that self-service password reset feature also requires Azure AD Premium P1 or P2 licenses, so you’ll need to ensure that your users have the appropriate licenses assigned to them.
If you’re using Office 365 E3, you can reset your password using the self-service password reset (SSPR) feature. Here’s how to do it:
Go to the Microsoft 365 sign-in page and click the “Can’t access your account?” link.
Select the “Work or school account” option and enter your Office 365 E3 email address.
Complete the security verification process by either entering a verification code sent to your mobile phone or email address, or by answering security questions.
Once you’ve completed the security verification process, you’ll be prompted to enter a new password.
Enter your new password twice to confirm it, and then click the “Finish” button.
Your Office 365 E3 password has now been reset.
If you have any issues with the SSPR process, you should contact your IT administrator for assistance.
Self-service password reset (SSPR) is a feature available in various Microsoft 365 plans that allows users to reset their own passwords without having to contact their IT administrator. Here are the Microsoft 365 plans that include SSPR:
Microsoft 365 Business Basic: This plan includes basic email hosting and web-based Office applications, as well as SSPR.
Microsoft 365 Business Standard: This plan includes the same features as the Business Basic plan, as well as desktop versions of Office applications and Microsoft Teams. It also includes SSPR.
Office 365 E3: This plan includes advanced email hosting, Office applications, and collaboration tools like Microsoft Teams. It also includes advanced security features and SSPR.
Microsoft 365 E3: This plan includes the same features as Office 365 E3, as well as additional security and compliance features. It also includes SSPR.
Microsoft 365 E5: This plan includes all the features of Microsoft 365 E3, as well as additional security and compliance features, advanced analytics tools, and more. It also includes SSPR.
Note that SSPR may not be enabled by default in all Microsoft 365 plans. IT administrators will need to configure SSPR settings in the Microsoft 365 admin center to make the feature available to users.
Azure Premium P1 is a subscription plan offered by Microsoft Azure, which is a cloud computing service provider. It is a higher-tier plan compared to the standard Azure Active Directory (Azure AD) Free and Basic plans.
Azure Premium P1 provides additional features and capabilities for managing identities and access to cloud resources. Some of the key features of this plan include:
Self-service password reset: Users can reset their own passwords without requiring help from IT administrators.
Multi-Factor Authentication (MFA): This feature adds an extra layer of security to the authentication process by requiring users to provide additional verification, such as a fingerprint or a code sent to a mobile device.
Conditional Access: This feature allows organizations to set policies that control access to resources based on various conditions, such as the user’s location, device, or risk level.
Dynamic Groups: This feature allows administrators to create groups based on dynamic criteria, such as job title, department, or location.
Azure Premium P1 also includes access to advanced reporting and monitoring capabilities for better visibility into user and device activities. It is designed to provide organizations with a more comprehensive and secure solution for managing identities and access in the cloud.
If you are looking to modify the synchronization interval of Microsoft Azure DirSync, you can follow these steps:
We can try the following steps to adjust the time interval (It is 3 hours by default): 1. Navigate to the Windows Azure Active Directory Sync directory (C:\Program Files\Windows Azure Active Directory Sync) on the server where the Directory Sync tool is installed. 2. In this folder open up the file Microsoft.Online.DirSync.Scheduler.exe.config file. 3. Adjust the setting “SyncTimeInterval” value=”3:0:0″ /> 4. Close and Save the file and then restart the
Or
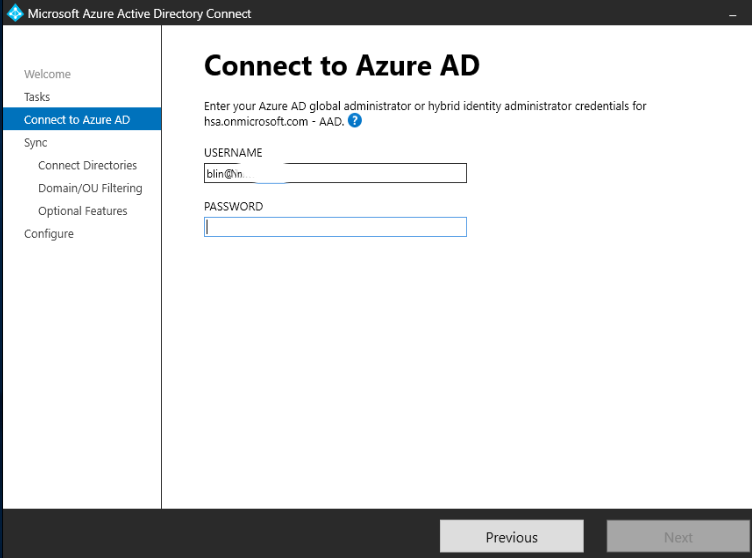
Log in to your Azure AD Connect server using an account with administrative privileges.
Open the “Azure AD Connect” application from the Start menu.
Click on the “Configure” option to launch the Azure AD Connect wizard.
4. On the “Configure” page, click on the “Customize synchronization options” link and then Next
5. Enter your password.
6. Continue to Configuration page.
7. On the “Synchronization frequency” page, select the “customize” option.
In the “Synchronization schedule” section, you can modify the synchronization interval according to your requirement.
You can choose to run a full synchronization or a delta synchronization, and you can also set the synchronization interval in minutes or hours.
Once you have made the necessary changes, click on the “Next” button to complete the configuration.
Note: Keep in mind that changing the synchronization interval can impact the performance of your Azure AD Connect server and the synchronization process. Therefore, it is recommended to carefully consider the impact of any changes before making them.
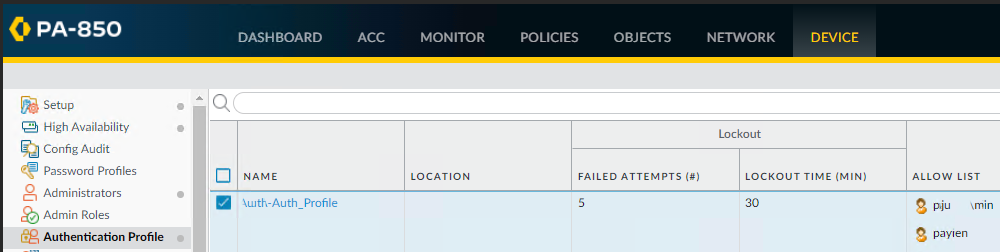
Situation: The client would like to add an AD user to manage their Palo Alto Firewall. This article shows how to add the AD user for login the Firewall.
After login the PA firewall, go to DEVICE>Authentication Profile. Add the user to the Authentication Profile.
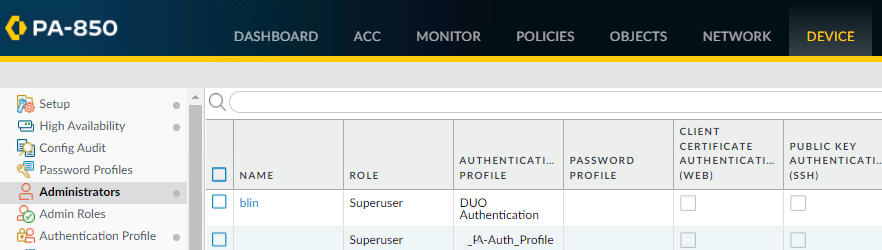
2. Go to DEVICE>Administrators. Add the user to the authentication profile accordingly.
To change your Office 365 user password, you’ll need to have administrator privileges. Here’s how you can change your password using the Office 365 admin center:
Go to the Office 365 admin center by signing in with your administrator account at https://admin.microsoft.com.
From the dashboard, click “Users” in the left-hand menu.
Select the user whose password you want to change from the list of users. You can use the search box at the top of the page to find the user quickly.
Click on the user’s name to open their profile.
Click the “Reset password” button at the top of the page.
In the “Reset password” window that appears, enter a new password for the user in the “New password” field.
Re-enter the password in the “Confirm new password” field to ensure that it’s correct.
Optionally, you can select the checkbox next to “Make this user change their password when they first sign in” to force the user to change their password the next time they log in.
Click the “Reset” button to save the new password and apply the changes.
Inform the user of their new password and advise them to change it again to something they can remember.
That’s it! You’ve now successfully changed the password for a user in Office 365.
Yes, you can have multiple email accounts on the Outlook app for Android. Here’s how you can set up a second email address on the Outlook app:
Open the Outlook app on your Android phone.
Tap the three horizontal lines in the top left corner of the screen.
Tap the gear icon in the bottom left corner of the screen to access the app’s settings.
Tap the “Add Account” button.
Choose the type of account you want to add (Outlook.com, Office 365, Gmail, Yahoo, etc.) and follow the on-screen instructions to enter your email address and password.
Once you’ve entered your account information, tap “Sign In” to add the account to the app.
If you want to add more accounts, repeat steps 4-6 for each additional account.
Once you’ve added multiple email accounts to the Outlook app, you can switch between them by tapping the three horizontal lines in the top left corner of the screen, then tapping the account you want to use.