Summary of Migrating Microsoft Tenant issues

Migrating Microsoft tenants can be a complex process, and several common problems and challenges can arise during such migrations. Here is a summary of some key issues and considerations:

  1. Data Migration Challenges:
    • Data Loss: During migration, there’s a risk of data loss or corruption, especially if not all data is properly backed up and transferred.
    • Data Mapping: Ensuring that data is mapped correctly from the source to the target tenant can be challenging, particularly if the data structures differ.
  2. User Identity and Access Issues:
    • User Authentication: Managing user identities and ensuring a smooth transition for user authentication can be complex.
    • Access Controls: Permissions and access settings may need to be recreated in the new tenant, which can be time-consuming and prone to errors.
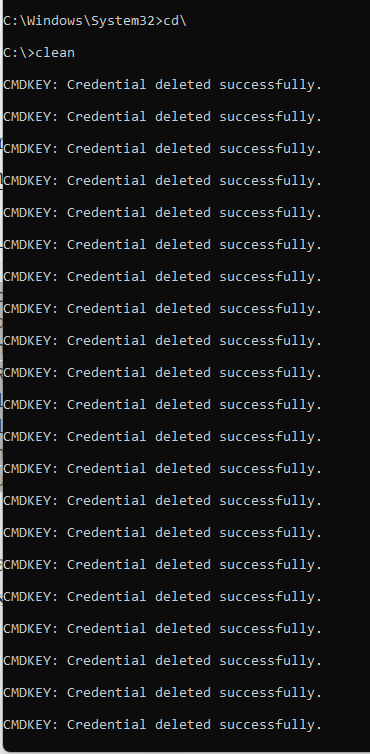
    • Cache: Windows may remember original Office 365 settings and credentials. You may need t clean them from registry, or even worst, creating a new user profile.
  3. Customization and Configuration:
    • Custom Applications: Migrating custom applications and integrations can be problematic if they are tightly coupled with the old tenant.
    • Configuration Settings: Recreating custom configurations and settings in the new tenant may require thorough documentation and testing.
  4. Licensing and Subscriptions:
    • License Management: Transitioning licenses and subscriptions to the new tenant without disruption can be a challenge.
    • Billing and Cost Management: Managing billing and cost allocation across tenants may require careful planning.
  5. Communication and Collaboration Tools:
    • Email and Calendars: Migrating email and calendar data, especially in large organizations, can lead to synchronization and data integrity issues.
    • Teams and SharePoint: Ensuring that collaboration tools like Microsoft Teams and SharePoint work seamlessly in the new tenant is crucial.
  6. Testing and Validation:
    • Testing Environments: Setting up a comprehensive testing environment to validate the migration process is essential to identify and address issues before they impact users.
  7. Downtime and User Impact:
    • Service Disruptions: Minimizing downtime and disruptions to users during the migration is a significant concern.
  8. Compliance and Security:
    • Data Compliance: Ensuring data compliance and security standards are maintained throughout the migration is vital, especially for organizations in regulated industries.
  9. Documentation and Training:
    • User Training: Providing training and documentation to users for the new environment to ensure a smooth transition.
  10. Vendor Support and Resources:
    • Leveraging Microsoft’s support and resources can be crucial in resolving issues during migration.

Possible resolutions;

  1. Data Migration Solutions:
    • Data Backup: Ensure a comprehensive backup of all data in the source tenant before migration.
    • Data Mapping Tools: Utilize data mapping tools and scripts to ensure accurate data transfer.
    • Data Validation: Implement data validation checks and reconciliation processes to identify and address data integrity issues.
  2. User Identity and Access Solutions:
    • Single Sign-On (SSO): Implement SSO solutions to simplify user authentication across tenants.
    • Access Controls Automation: Use automation scripts or tools to recreate access controls and permissions in the new tenant.
  3. Customization and Configuration Solutions:
    • Documentation: Maintain detailed documentation of custom configurations and applications.
    • Testing: Thoroughly test custom applications and configurations in the new environment before migration.
  4. Licensing and Subscriptions Solutions:
    • License Management Tools: Utilize license management tools to streamline license assignment and tracking.
    • Billing and Cost Analysis: Employ cost management tools to monitor expenses and allocate costs effectively.
  5. Communication and Collaboration Tools Solutions:
    • Migration Tools: Leverage Microsoft’s migration tools for email, SharePoint, and Teams to simplify data transfer.
    • User Training: Provide training to users on using collaboration tools effectively.
  6. Testing and Validation Solutions:
    • Test Environments: Create dedicated test environments that closely mimic the production environment to identify and resolve issues before migration.
  7. Downtime and User Impact Solutions:
    • Migration Scheduling: Plan migrations during non-business hours to minimize user disruption.
    • Communication: Keep users informed about the migration schedule and potential downtime.
  8. Compliance and Security Solutions:
    • Data Encryption: Ensure data encryption during migration to maintain security standards.
    • Compliance Auditing: Perform compliance audits before and after migration to verify regulatory compliance.
  9. Documentation and Training Solutions:
    • User Guides: Develop user guides and training materials to help users adapt to the new environment.
    • Training Sessions: Conduct training sessions or webinars to educate users on the new tools and features.
  10. Vendor Support and Resources Solutions:
    • Microsoft Support: Engage Microsoft’s support services and resources for assistance with technical issues and troubleshooting.

How to add guests to a team in Microsoft Teams

  1. Select Teams  Teams button 
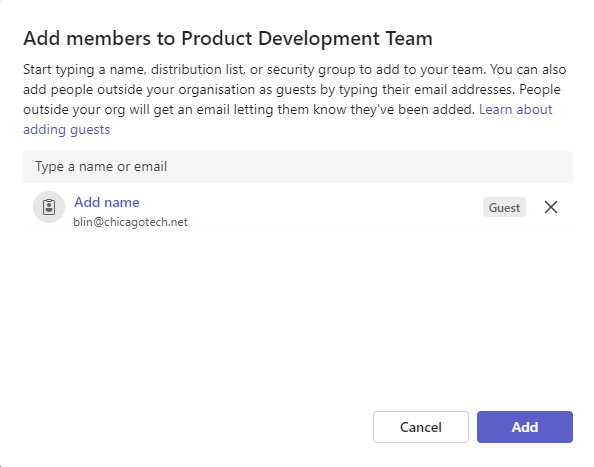
and go to the team in your team list.
  2. Select More options More options button > Add member.

3. Enter the guest’s email address. Anyone with a business or consumer email account, such as Outlook, Gmail, or others, can join your team as a guest.

Note: If you receive a “We didn’t find any matches” error while trying to add a guest, your organization doesn’t allow guests. 

4. Add your guest’s name. Select Edit guest information Edit guest name button 
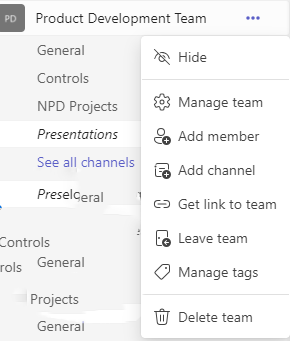
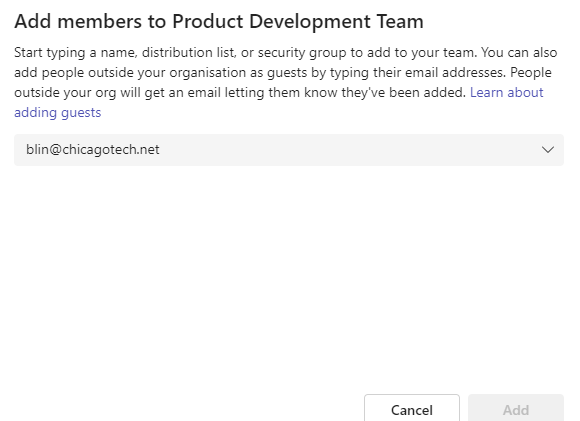
and type a friendly name for them. Be sure to take the time to do this now—you’ll need the help of an IT admin to do it later.

5. Select Add. Guests will receive a welcome email invitation that includes some information about joining Teams

Alternatively, you may add the guest email to Contacts.

Why Word pastes previous copied text instead of the most recent copy

If you’re experiencing this issue, it could be due to a few reasons:

  1. Clipboard History: In some versions of Microsoft Word, there is a feature called “Clipboard History” that allows you to access multiple previously copied items. If you have this feature enabled, Word might paste a previous copy if you accidentally select it from the clipboard history.
  2. Keyboard Shortcuts: Sometimes, keyboard shortcuts can lead to unintended results. Make sure you’re using the standard Ctrl+C (copy) and Ctrl+V (paste) shortcuts and not accidentally triggering other shortcuts that paste different clipboard items.
  3. Clipboard Manager: If you have a third-party clipboard manager or clipboard enhancement tool installed on your computer, it may interfere with the normal copy and paste functions in Word. Check if any such software is running and causing the issue.
  4. Software Glitch: Occasionally, Word or your operating system may experience glitches or bugs that result in unexpected behavior. In such cases, restarting Word or your computer might help resolve the issue.
  5. Document-Specific Issue: It’s also possible that the issue is specific to the document you’re working on. Try copying and pasting text in a new document to see if the problem persists.
  6. Updates: Ensure that your Microsoft Word and operating system are up to date. Software updates often include bug fixes that can address such issues.

To fix it,

you can try the following steps to resolve the problem:

  1. Restart Microsoft Word: Sometimes, simply closing and reopening Microsoft Word can resolve minor glitches.
  2. Check Clipboard History: If you’re using a version of Word that has a Clipboard History feature, make sure you are selecting the correct item from the clipboard history when pasting. It’s possible that you accidentally selected a previous copy.
  3. Use Standard Keyboard Shortcuts: Ensure that you are using the standard keyboard shortcuts for copying (Ctrl+C) and pasting (Ctrl+V). Avoid any custom keyboard shortcuts or third-party keyboard utilities that may interfere with these functions.
  4. Disable Third-Party Clipboard Managers: If you have third-party clipboard manager software installed on your computer, try disabling it temporarily to see if it’s causing the issue.
  5. Check for Software Updates: Make sure that both Microsoft Word and your operating system are up to date. Software updates often include bug fixes that can resolve issues.
  6. Test in a New Document: Create a new Word document and try copying and pasting text in it to see if the issue persists. If it doesn’t occur in the new document, the problem may be specific to your original document.
  7. Restart Your Computer: Sometimes, issues with clipboard functionality can be resolved by restarting your computer.
  8. Repair Microsoft Office: If the problem persists, you can try repairing your Microsoft Office installation. You can do this by going to the “Apps & Features” or “Programs and Features” section in your computer’s settings, selecting Microsoft Office, and choosing the option to repair or modify the installation.
  9. Check for Macros and Add-Ins: If you use macros or add-ins in Word, they could potentially interfere with copy and paste operations. Try disabling them temporarily to see if the issue goes away.
  10. Contact Microsoft Support: If none of the above steps resolve the problem, you may need to reach out to Microsoft Support for more specialized assistance.

Can I remove all credentials from credentials manager at one time?

Clear all credentials from Credential Manager

While you can individually clear or remove credentials, you can create this batch file sourced from Github and run it to clear all credentials from Credential Manager. Here’s how:

  • Press Windows key + R to invoke the Run dialog.
  • In the Run dialog box, type notepad and hit Enter to open Notepad.
  • Copy and paste the code below into the text editor.
@echo off
cmdkey.exe /list > "%TEMP%\List.txt"
findstr.exe Target "%TEMP%\List.txt" > "%TEMP%\tokensonly.txt"
FOR /F "tokens=1,2 delims= " %%G IN (%TEMP%\tokensonly.txt) DO cmdkey.exe /delete:%%H
del "%TEMP%\List.txt" /s /f /q
del "%TEMP%\tokensonly.txt" /s /f /q
echo All done
pause
  • Save (to the desktop, preferably) the file with a name and append the .bat file extension – eg; ClearCREDS.bat and on the Save as type box select All Files.

To clear all credentials, simply run the batch file with admin privilege (right-click the saved file and select Run as Administrator from the context menu).

You can also schedule the batch file to run automatically in Windows 11/10 if you want.

You can use scripting or command-line tools to automate the removal of credentials. One way to do this is by using the cmdkey command in Command Prompt or PowerShell. Here’s how you can do it:

  1. Open Command Prompt or PowerShell with administrative privileges:
    • Press Win + X and select “Windows Terminal (Admin)” or “Command Prompt (Admin)” if you’re using Windows 10 or earlier.
    • For Windows 11 or later, search for “Command Prompt” or “PowerShell” in the start menu, right-click on the result, and choose “Run as administrator.”
  2. Use the cmdkey command to list and remove credentials. For example, to list all stored credentials, you can run:batchCopy codecmdkey /list To remove a specific credential, you can use:batchCopy codecmdkey /delete:TargetName Replace TargetName with the name of the credential you want to remove.
  3. Automate the removal: If you have a lot of credentials to remove, you can create a script to remove them all one by one. Here’s an example PowerShell script that removes all generic and Windows credentials:powershellCopy codeGet-WmiObject -Class Win32_NetworkAdapterConfiguration | ForEach-Object { cmdkey /delete:$($_.Description) } Save the script as a .ps1 file and execute it with administrative privileges in PowerShell.

How to Delete your Office Document Cache

  1. Perform a clean boot: This step is necessary to make sure the cache files don’t get loaded during startup. If they did, they would be locked and you couldn’t delete them.Important: You must have administrator rights on the computer before you can perform a clean boot.
  1. To open the Office Upload Center, do one of the following, depending on your version of Windows:
    • In Windows 10, click the Windows button, type Microsoft Upload Center in the Search box, and then double-click the Microsoft Upload Center app in the search results (it may say 2010 or 2013, depending on your Office version).
    • In Windows 8 or 8.1, point to the lower-right corner of the screen, click Search, then type Microsoft Upload Center in the Search box, and then double-click the Microsoft Upload Center app in the search results (it may say 2010 or 2013, depending on your Office version).
    • In Windows 7, click Start, point to All Programs, then point to Microsoft Office, then point to Microsoft Office Tools, and then click Microsoft Office Upload Center.
  2. In the Upload Center, click Settings, and then click Delete Cached Files.
  1. Delete cache files: Often, this step fixes the problem. Office typically repairs the document cache files if it detects problems. If the cache files are corrupt and irreparable, deleting them allows Office to repair itself by replacing the corrupt files.

  1. Reboot and sync: This step is when Office repairs the cache. After the cache is repaired, a sync operation should clear up any “stuck” files.

How to remove an old OneDrive from the local File Explorer

Situation: After the tenant migration, the client map their new OneDrive to the File Explorer. They would like to know how to remove the old OneDrive from file Explorer.

Resolution 1:

  1. Open File Explorer.
  2. Click on OneDrive in the left-hand column.
  3. Navigate to the file or folder in question.
  4. Right-click on the file/folder.
  5. Click on Free up space.

Resolution 2: Mass-Delete Local Copies on OneDrive

  1. Launch the OneDrive app.
  2. Head to Settings > Sync and back up.
  3. Expand the Advanced settings menu.
  4. From the Files On-Demand section, click the Free up disk space option.

Resolution 3: You may remove the OneDrive Folder From File Explorer by Editing the Registry

HKEY_CLASSES_ROOT\CLSID\{018D5C66-4533-4307-9B53-224DE2ED1FE6}

Double-click the System.IsPinnedToNameSpaceTree option in the right pane. Set it to 0 and click “OK”.

HKEY_CLASSES_ROOT\Wow6432Node\CLSID\{018D5C66-4533-4307-9B53-224DE2ED1FE6}

Double-click the System.IsPinnedToNameSpaceTree option in the right pane. Set it to 0 and click “OK”.

How to bulk import Office group members

Steps in this article may vary slightly based on the portal you start from. Content will be updated to reflect the Microsoft Entra admin center over the next few months.

1.            Sign in to the Azure portal with a User administrator account in the organization. Group owners can also bulk import members of groups they own.

2.            In Azure AD, select Groups > All groups.

3.            Open the group to which you’re adding members and then select Members.

4.            On the Members page, select bulk operations and then choose Import members.

5.            On the Bulk import group members page, select Download to get the CSV file template with required group member properties.