Replace “ServiceName” with the name you want to give to the service and “C:\Path\To\Executable.exe” with the path to the executable file of your application.
Once the service is created, you can start it with the following command:
sqlCopy codesc start ServiceName
Replace “ServiceName” with the name you gave to the service.
To ensure that the service starts automatically when the computer starts, you can run the following command:
arduinoCopy codesc config ServiceName start= auto
This sets the startup type of the service to automatic.
Note: If you want to delete the service, you can run the following command:
arduinoCopy codesc delete ServiceName
Replace “ServiceName” with the name of the service you want to delete.
Scroll to the desired app, select More options on the right edge of the window, then select Advanced options.
In the Background apps permissions section, under Let this app run in the background, select one of the following options:
Always—The app runs in the background, receiving info, sending notifications, and staying up-to-date even when you’re not actively using it. This option may use more power.
Power optimized—Windows decides what will save the most power while still allowing the app to receive notifications and update periodically. This option may limit an app that uses a lot of power.
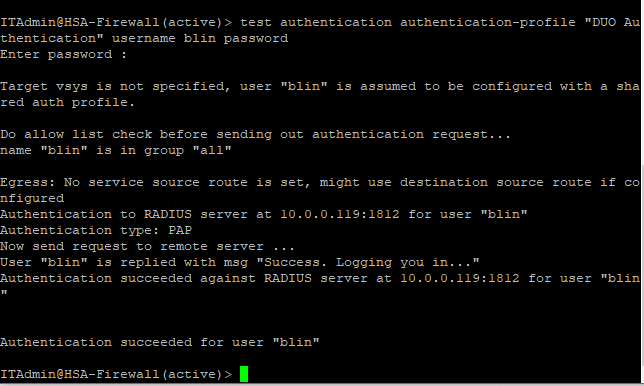
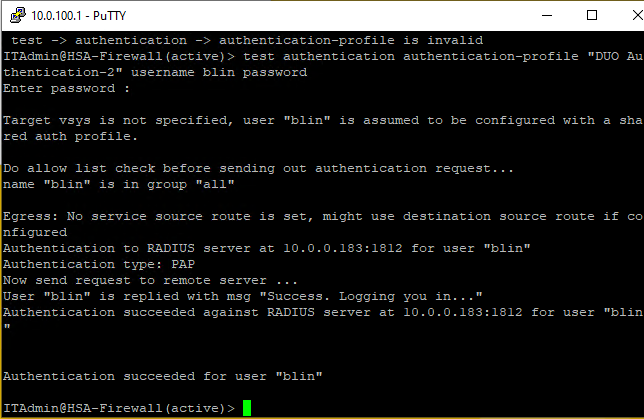
test authentication authentication-profile <authentication-profile-name> username <username> password

If the authentication profile has space, you may use quotation, For example,

test authentication authentication-profile "DUO Authentication" username blin password
Above is for IP 10.0.0.119. Below is for IP 10.0.0.183.
Install the Duo Proxy software: Install the Duo Proxy software on two separate servers. The installation instructions can be found on the Duo Security website.
Configure the first Duo Proxy: Open the Duo configuration file on the first server and configure it with the appropriate settings, including the API hostname, integration key, and secret key provided by Duo. Also, configure the appropriate settings for your authentication sources, such as Active Directory or LDAP.
Configure the second Duo Proxy: Open the Duo configuration file on the second server and configure it with the same settings as the first Duo Proxy.
Configure the load balancer: Set up a load balancer to distribute traffic between the two Duo Proxy servers. Configure the load balancer to use a health check to ensure that each Duo Proxy server is healthy and able to process authentication requests.
Test the configuration: Test the configuration by attempting to log in to a service that is protected by Duo. Verify that the load balancer distributes traffic evenly between the two Duo Proxy servers.
That’s it! You have successfully configured two Duo proxies to provide redundancy and load balancing for your authentication traffic.
To configure Multi-Factor Authentication (MFA) using DUO for Palo Alto firewall, follow these steps:
Sign up for a DUO account: Go to the DUO Security website and sign up for an account. After creating your account, navigate to the DUO Admin Panel.
Add Palo Alto Networks as an application: In the DUO Admin Panel, go to Applications > Protect an Application > Palo Alto Networks. Then, select the type of Palo Alto Networks application you are using, such as GlobalProtect or Panorama.
Configure Palo Alto Networks in DUO: In the DUO Admin Panel, go to Palo Alto Networks > Configuration. Enter the API hostname, integration key, and secret key provided by DUO.
Configure Palo Alto Networks for MFA: In the Palo Alto Networks web interface, go to Device > Authentication Profile > DUO. Enter the same API hostname, integration key, and secret key provided by DUO.
Enable MFA for Palo Alto Networks: In the Palo Alto Networks web interface, go to Device > Multi-Factor Authentication. Enable the checkbox for DUO.
Test the MFA configuration: Try logging into Palo Alto Networks and verify that you are prompted for MFA authentication.
That’s it! You have successfully configured MFA using DUO for your Palo Alto firewall.
Situation: The client has been using DUO for Palo Alto firewall MFA. They would like to add the secondary DUO Proxy server for the redundancy. However, they can’t find any article on PA support.
Suggestion:
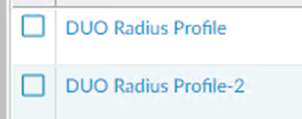
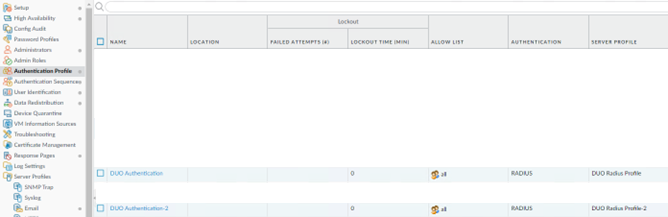
Create two MFA server profiles
Go to the Authentication profile > select the profile > Go to the factors > add that two MFA profiles and test. (Check on the DUO server which profile is hitting)
Change the priority of the MFA server profile (In the factors tab) and test. (Check on the DUO server which profile is hitting)
With the Outlook running, in the folder pane on the left, choose the Sent Items folder.
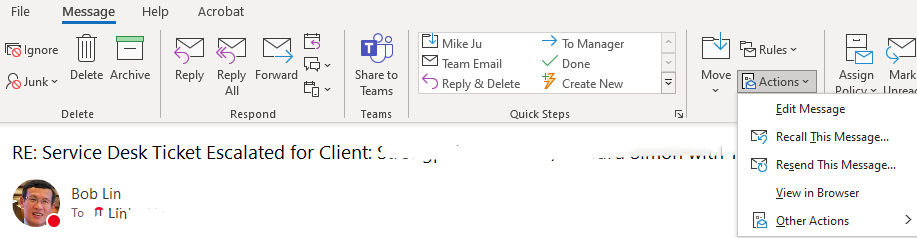
2. Open the message that you want to recall. From the Message tab, select Actions > Recall This Message.
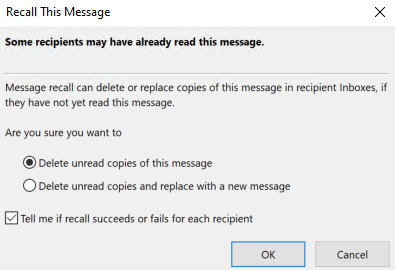
3. Select Delete unread copies of this message or Delete unread copies and replace with a new message, and then select OK.
4. Click OK to recall the email.
5. After submitting a recall request, usually less than 30 seconds later, you will get an email notification with the subject “Message Recall Report for message [original message subject]”.
Dell SupportAssist Enterprise is a server-based version of Dell SupportAssist designed for IT administrators managing large numbers of Dell devices in an enterprise environment.
It provides automated support and management capabilities for Dell servers, storage, and networking devices. With Dell SupportAssist Enterprise, administrators can remotely monitor the health and performance of their Dell devices, receive alerts and notifications for potential issues, and proactively address problems before they impact the organization’s operations.
Dell SupportAssist Enterprise can perform automated updates, patch management, and firmware upgrades to ensure devices are running with the latest software and security patches. It also includes reporting and analytics capabilities that allow administrators to monitor device performance over time and identify trends or patterns that may indicate issues that require further investigation.
Overall, Dell SupportAssist Enterprise is a powerful tool that helps IT administrators streamline device management and ensure the optimal performance of Dell devices in enterprise environments.
The Windows Protection Users group is a built-in group in the Windows operating system that is used for running certain system services and processes with reduced permissions. The purpose of this group is to improve the security and stability of the operating system by restricting the access of these services and processes to system resources.
By default, members of the Windows Protection Users group have limited permissions and cannot perform certain actions that can potentially harm the system. For example, they cannot install or remove software, modify system settings, or access sensitive data.
This group is commonly used for running services such as Windows Defender Antivirus, Windows Firewall, and the Windows Update service. By using the Windows Protection Users group to run these services, Windows can ensure that they are running with the minimum necessary permissions, reducing the risk of security vulnerabilities and system crashes.
It’s worth noting that the Windows Protection Users group is not intended for end-users or administrators to be added to. Doing so can result in unintended consequences and may compromise the security and stability of the system.
Note: 1. Set up the second Duo proxy server with the same configuration.
Note 2: The second DUO proxy server can setup different host IP address which could be the second Domain Controller for redundancy.
B. Configure Palo Alto Firewall to intergrade with the two DUO Proxy servers for redundancy
Configure the Palo Alto Firewall to use both Duo proxy servers in the RADIUS profile. This ensures that if the primary Duo proxy server is down, the Palo Alto Firewall will automatically use the backup server to authenticate users.
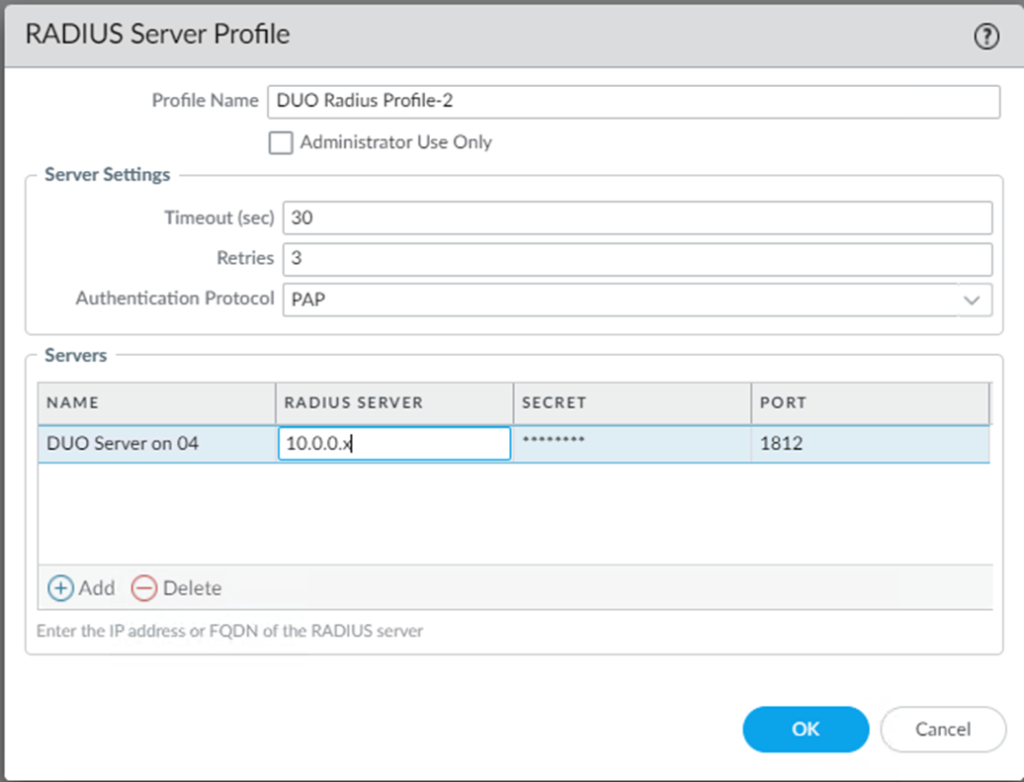
Go to DEVICE>Server Profile>RADIUS.
Click on Add
Enter the info such as profile Name, Timeout (Note: 120 sec Is by default. We recommend reducing it to 30 sec. Otherwise, failover may not work because the GlobalProtect may be timeout before 120 sec), Radius Server IP address, Secret key which must match DUO Secret key.
Create two for redundancy.
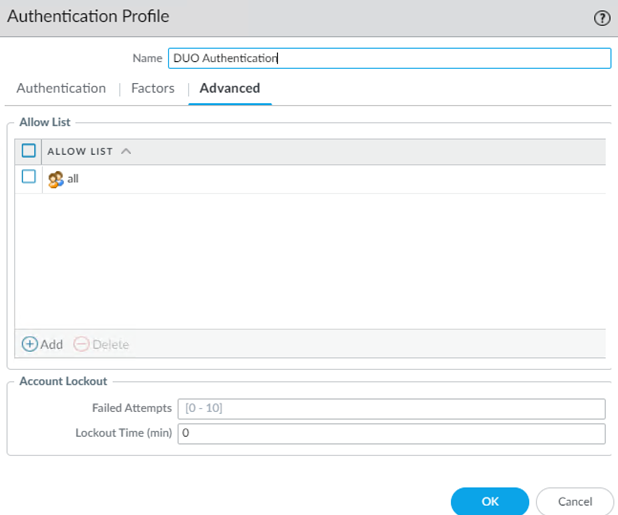
Create two MFA server profiles
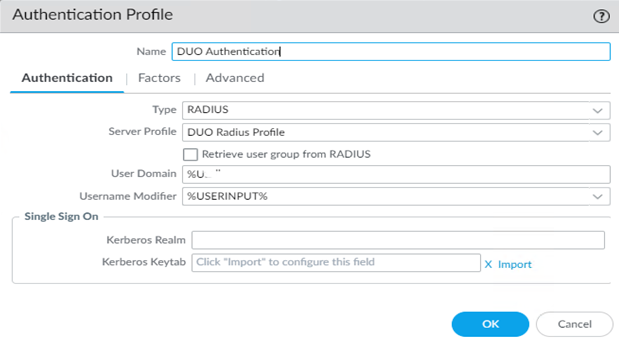
Go to the DEVICE>Authentication Profile
Click on Add
Enter the Authentication Profile information.
Click on Advanced and select the AD group for accessing Gloableprotect VPN.
Create two Authentication Profiles for redundancy.
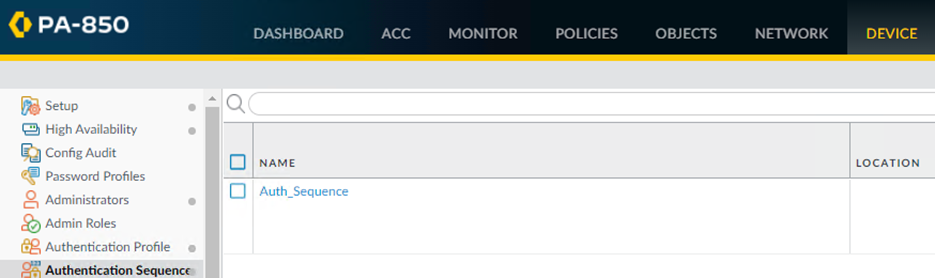
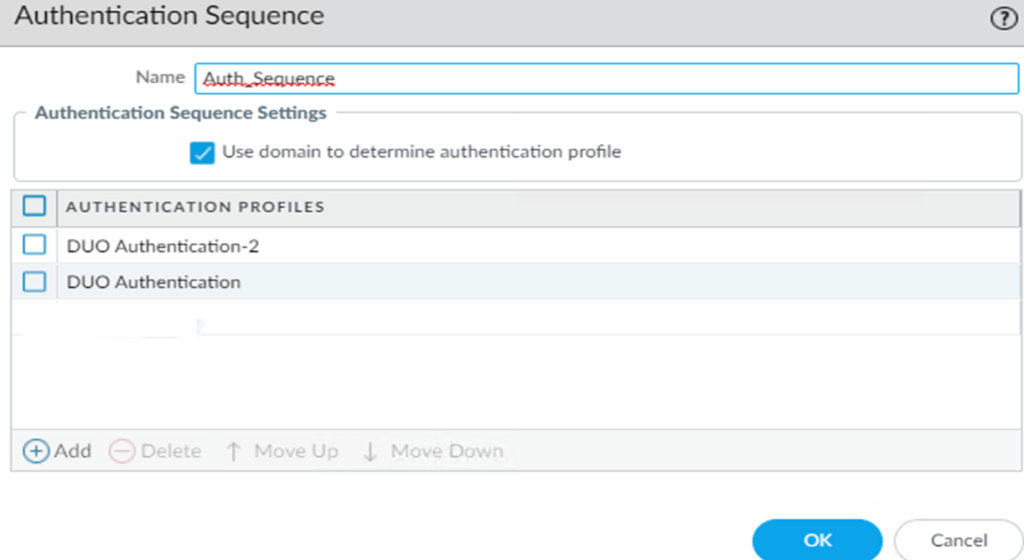
3. Configure Authentication Sequence for redundancy
Go to DEVICE>Authentication Sequence
Click Add.
Add two Authentication Profiles you created before.
Removing Microsoft Exchange from Active Directory can be a complex process and should only be performed by someone who is familiar with the Exchange server architecture and Active Directory. Before proceeding with the removal process, it’s important to understand the potential impact on your organization and to plan accordingly.
Here are the general steps to remove Exchange from Active Directory:
Verify that all mailboxes have been moved: Before removing Exchange, all mailboxes should be moved to another email system or archived. This ensures that no email data is lost during the removal process. You can use the Exchange Management Console or Exchange Admin Center to check the mailbox status and move them to a different server.
Uninstall Exchange: To uninstall Exchange, log on to the Exchange server with an account that has administrative privileges. Open the Control Panel and select Programs and Features. From the list of installed programs, select Microsoft Exchange and click Uninstall. Follow the prompts to complete the uninstallation process.
Remove Exchange Server objects from Active Directory: Once Exchange is uninstalled, you need to remove the Exchange Server objects from Active Directory. This can be done using the ADSI Edit tool. Open the tool and navigate to the Configuration container in Active Directory. Expand the Services container and delete the Microsoft Exchange container. You may also need to delete other Exchange-related objects, such as address lists and connectors.
Remove Exchange-related attributes from Active Directory user accounts: Exchange-related attributes may be attached to user accounts in Active Directory. These attributes need to be removed in order to complete the removal process. You can use the Active Directory Users and Computers console or PowerShell to remove these attributes.
5. Here is how to remove Exchange Server with ADSI Edit
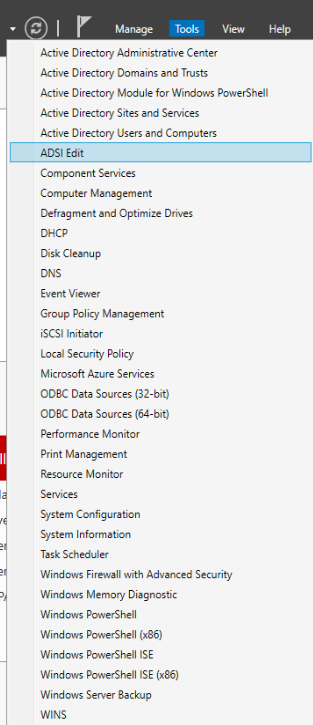
a. Sign in to the Domain Controller and navigate to the Start menu. Open Administrative Tools and start ADSI Edit.
b. Remove Exchange Server attributes
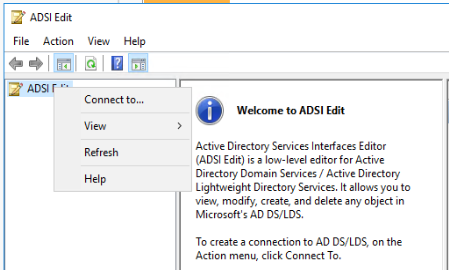
Once opened, right-click ADSI Edit and click Connect to…
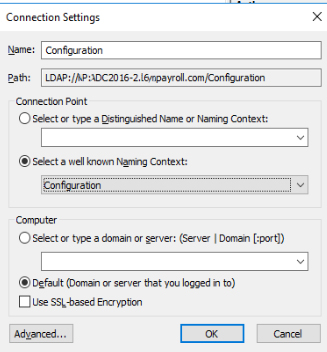
c. Select Configuration and click OK.
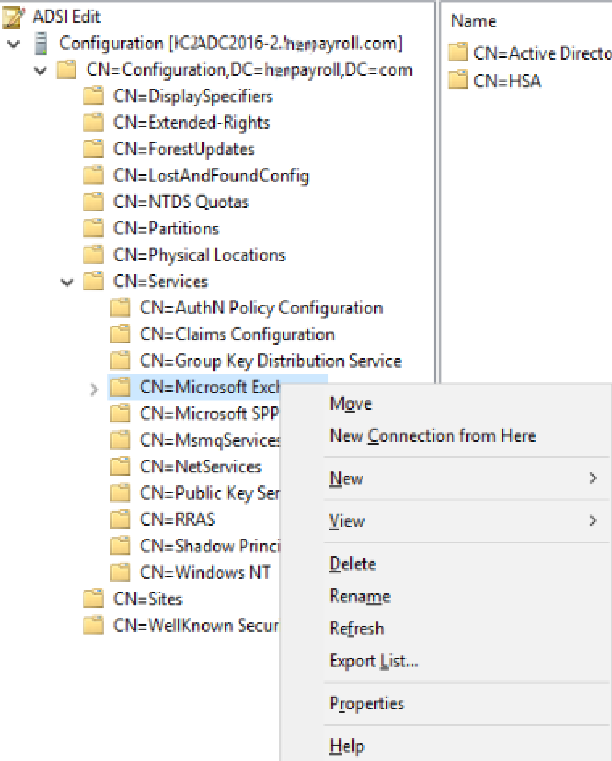
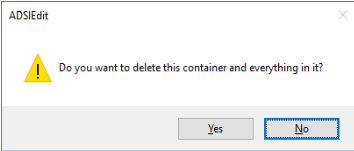
d. Expand CN=Configuration, DC=xxxx, DC=com and expand CN=Services. Right-click on CN=Microsoft Exchange and click delete. A warning will show if you are sure to delete this object, confirm with Yes. Do the same with CN=Microsoft Exchange Autodiscover, right-click and click delete.
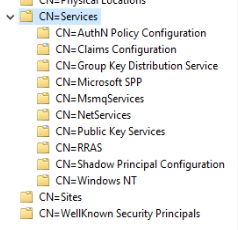
e. After removing both the objects in ADSI Edit. The screen will look like the following.
6. Remove Exchange Server security groups and system objects attributes
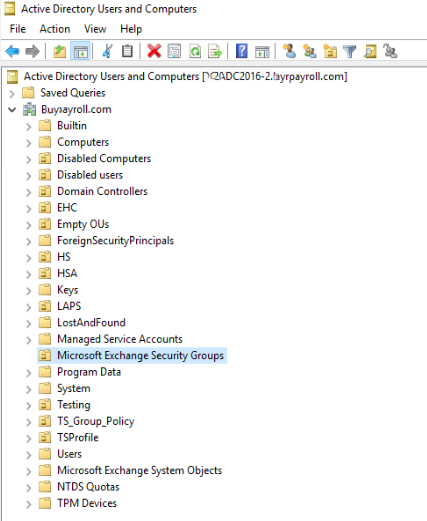
a. Start Active Directory Users and Computers (ADUC).
b. Expand the domain and verify that the Organizational Unit (OU) Microsoft Exchange Security Groups and Microsoft Exchange System Objects are present. We can remove it from here or from ADSI Edit. We are going to use ADSI Edit.
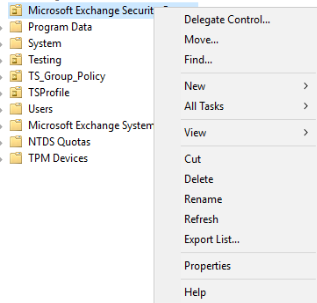
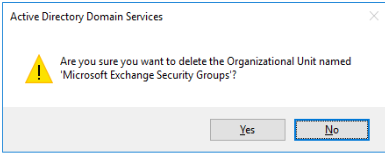
c. Right click on Microsoft Exchange Security Groups, and then Delete.
d. Confirm it.
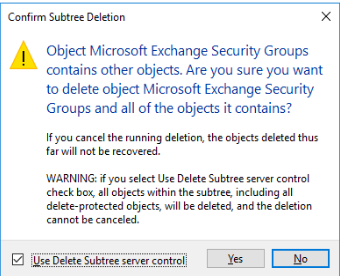
e. Click Yes to confirm to delete Object Microsoft Exchange Security Groups…
7. Delete OU=Microsoft Exchange Security Groups using ADSI Edit
a. Right-click ADSI Edit and click Connect to…
b. Select Default naming context and click OK.
c. Expand DC=xxxx, DC=com. Right-click on OU=Microsoft Exchange Security Groups and click delete. A warning will show if you are sure to delete this object, confirm with Yes. Do the same with CN=Microsoft Exchange System Object, right-click and click delete.
d. We can confirm in ADUC that both the OUs are deleted.
8. Remove Exchange from Active Directory
Remove the Exchange Server if it’s showing in Active Directory Users and Computers (ADUC). Right-click the Exchange Server and click Delete.
9. Remove automatically generated Exchange user accounts
There are a few Active Directory users that are generated automatically by Exchange. Some serve as Discovery services, others are used to monitor the health of the Exchange system. These will no longer be needed if you have permanently removed Exchange from your organization.
Go to Active Directory Users and Computers and open the Users container. Right-click the following users and click delete.