If you setup multiple email accounts in Outlook and wonder how to setup different signature for each email account, here is how.
In Outlook, click file>Option.
2. In Outlook Options, click Mail, and then Signature.
3. In Choose default signature, select the email address you want to assign the signature. In New message, select the signature you want to use. In Edit signature, you can edit the signature. To create a new signature, click on New in Select signature.
4. To add another signature for a different email account, repeat above procedure.
Note 2: If your device recommends or defaults to port 465, it does not support SMTP AUTH client submission.
Option 2: Direct send. Quoted from Microsoft
Settings for direct send
Enter the following settings on the device or in the application directly.
Device or application setting
Value
Server/smart host
Your MX endpoint, for example, contoso-com.mail.protection.outlook.com
Port
Port 25
TLS/StartTLS
Enabled
Email address
Any email address for one of your Microsoft 365 or Office 365 accepted domains. This email address does not need to have a mailbox.
We recommend adding an SPF record to avoid having messages flagged as spam. If you are sending from a static IP address, add it to your SPF record in your domain registrar’s DNS settings as follows:
DNS entry
Value
SPF
v=spf1 ip4:<Static IP Address> include:spf.protection.outlook.com ~all
Option 3: Configure a connector to send mail using Microsoft 365 or Office 365 SMTP relay. Quoted from Microsoft:
Settings for Microsoft 365 or Office 365 SMTP relay
Device or application setting
Value
Server/smart host
Your MX endpoint, e.g. yourdomain-com.mail.protection.outlook.com
Port
Port 25
TLS/StartTLS
Enabled
Email address
Any email address in one of your Microsoft 365 or Office 365 verified domains. This email address does not need a mailbox.
Please refer to Microsoft “How to set up a multifunction device or application to send email using Microsoft 365 or Office 365”
7. To setup Recipient account, click System Notification Rules on the left.
8. In the Edit Rule for Event Notifications, enter Recipient info.
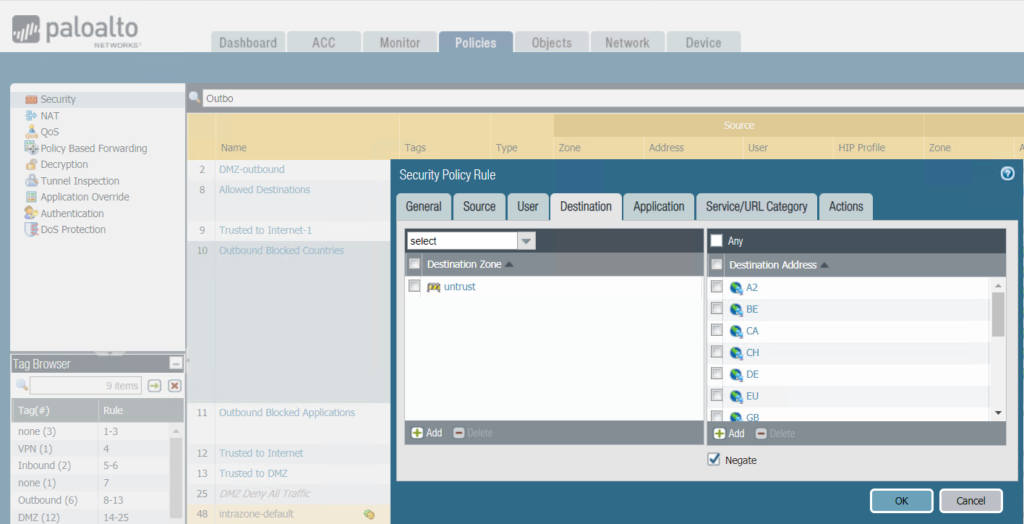
Situation: The company has a policy blocking their internal users to access foreign countries in the Palo Alto firewall. Now, they want to allow accessing a foreign country.
Here is how.
In paloalto firewall, go to Policies>Security.
2. Find the policy which blocks all countries IP addresses except USA, Outbound Blocked Countries in our example.
3. In Destination, click on Add to add the country code, for example TW for Taiwan.
Double click on the device, all drivers for the device will display.
In Device Manager right click on the device you want to upgrade.
You will have options to upgrade, disable or uninstall it.
If you click upgrade, you will have two options: search for the driver software and browse my computer for driver software.
Click on one of them, it will start to find the latest driver.
It may take a few minutes to install it.
If you don’t see the device, right click on your computer in the Device Manager. Click on Scan for hardware change. All installed devices will show up.
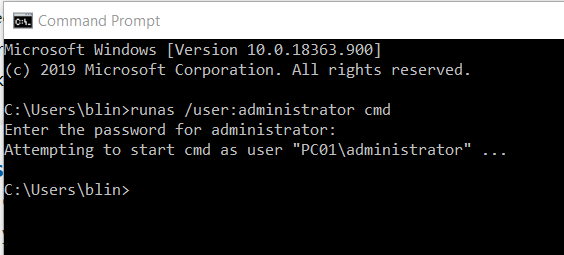
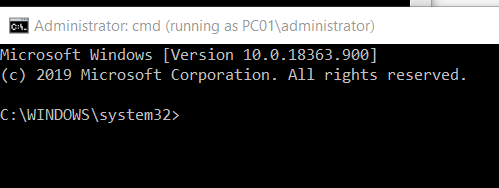
If you get BSOD, or some Windows functions aren’t working or Windows crashes, you may run Deployment Image Servicing and Management (DISM) and the System File Checker (SFC) to scan Windows and restore your files. Here is how.
1. Open an elevated command prompt by typing cmd in the search bar and then run Command Prompt as administrator.
2. Run this command which uses Windows Update to provide the files that are required to fix corruptions :
DISM.exe /Online /Cleanup-image /Restorehealth
3. Run this command to replace the C:\RepairSource\Windows placeholder with the location of your repair source.
4. Run this command that will scan all protected system files, and replace corrupted files with a cached copy that is located in a compressed folder at %WinDir%\System32\dllcache.
sfc /scannow
5. After the process is finished successfully, restart your computer an check if that fixes the problem.
Press enter when you see this message: Press any key to boot from CD or DVD…
In Windows Setup screen, chose your Language, Time and Keyboard method then click Next.
Click Install now
If you have a Windows 10 product key, enter here. If you upgrade from Windows 7 or Windows 8 click the option ‘I don’t have a key’ and ‘Do this later’ .
Select Windows 10 Edition.
Check Accept the license terms then click Next .
Click Custom: Install Windows only (advanced) to continue.
Credential Manager in Windows 10 lets you view and delete your saved credentials for signing in to websites, connected applications, and networks. Here is how.
In the search bar, type credential manager, and click on Credential Manager Control panel.
You have two options: Web Credentials and Windows Credentials to access the credentials you want to manage.
You can Remove, Back up, Restore, Add a credential.