If you have a problem to install Windows 10 updates automatically, you may onside to Download Windows 10 update from Microsoft website and and install it manually. Here is how.
After enabling Multi-Factor Authentication (MFA) on Office 365, you may need to manage MFA for a user. This article shows you how to enable/disable, enforce and manager user settings.
1. Sign into the Microsoft 365 admin center with global admin credentials.
2. Click on Users.
3. In the Multi-factor Auth status, select the options such as Any, Enable, Forced.
4. Check the username you want to manage.
5. You will have options to Disable/Enable, Enforce and Manager user settings.
6. If you click on Manage user settings, you will have these options: Require selected users to provide contact methods again, Delete all existing app passwords by the selected users, and Restore multi-factor authentication on all remembered devices.
To enable or disable Office 365 Multi-Factor Authentication (MFA) is just turning Security default on or off. You will do that on Azure portal. This article shows you how to do so.
1. Sign into the Microsoft 365 admin center with global admin credentials.
2. In the left pane choose Show All and under Admin centers, choose Azure Active Directory.
3. It redirect you to Azure Active Directory admin center. Alternatively, you just login Azure portal. Now, click on Azure Active Directory.
4. In In the Azure Active Directory admin center choose Azure Active Directory > Properties.
5. At the bottom of the page,
choose Manage Security defaults.
6. Choose Yes to enable security defaults or No to disable security defaults, and then choose Save.
Note: If you have been using
baseline Conditional Access policies, you will be prompted to turn them off
before you move to using security defaults.
Palo Alto Firewall not only allows you to monitor activity on your network, but also is a useful troubleshooting tool. This article shows you how to monitor and troubleshoot related to Host Traffic.
To access Monitor, login admin account. Click Monitor.
In the left , you have these Filter options:
3. Examples.
Example 1: To shows all traffic
from host which ip
address is 10.0.200.15, use this command: (addr.src in
10.0.200.15) .
Pay attention to these important
info such as From zone, To zone, Destination IP, Port, Application, Action,
Rule in next page.
Example 2: To show all traffic to a
destination which IP address is 52.242.211.89, use this command:
(addr.dst in
52.242.211.89 ) .
Pay attention to these important
info such as From zone, To zone, Destination IP, Port, Application, Action,
Rule in next page.
Example 3: to shows all traffic
coming from a host with an IP address of 10.0.200.35 and going to a host
destination address of 52.242.211.89.
Example 4: To shows all traffic
coming from addresses ranging from 10.0.200.10 – 10.0.200.100, use this
command: (addr.src in
10.0.200.1/30).
Note: you cannot specify an actual
range but can use CIDR notation to specify a network range of addresses.
Example 5: To shows all traffic
with a source OR destination, use this command: (addr in
10.0.200.15).
Case 1: The client can’t access
some websites.
Situation: the client has a problem
to install Office 365. It takes a long time, sometimes 24 hours to install
office 365.
Troubleshooting: We feel it is firewall blocking to access Office websites. ( addr.src in 10.0.200.15 ) and ( subtype eq deny ) command confirms it as shown next page. Note: Most those IP addresses are located outside of USA, which we block.
Situation: The client has a server running Windows 2019. The server comes with one disk (Disk0) with two drives C and D. The C drive is out of the spaces and you want to extend it since the disk has enough spaces. here show.
If you has Unallocated space, you can right click on the current drive to extend it. If all drives are allocated, the Extend Volume is grayed.
2. If one of volumes has more free spaces, you can Shrink Volume for extending other volume by right-clicking on the volume and then click Shrink.
3. In Shrink window, Enter the amount of spaces to shrink. Then click on Shrink.
4. After shrinking, you will have unlocated volume.
5. Now, right click on the volume you want to extend, click on Extend Volume.
6. In Extend Volume Wizard, click Next.
7. Select the amount to extend and click Next.
8. In Completing the Extend Volume Wizard, click Finish.
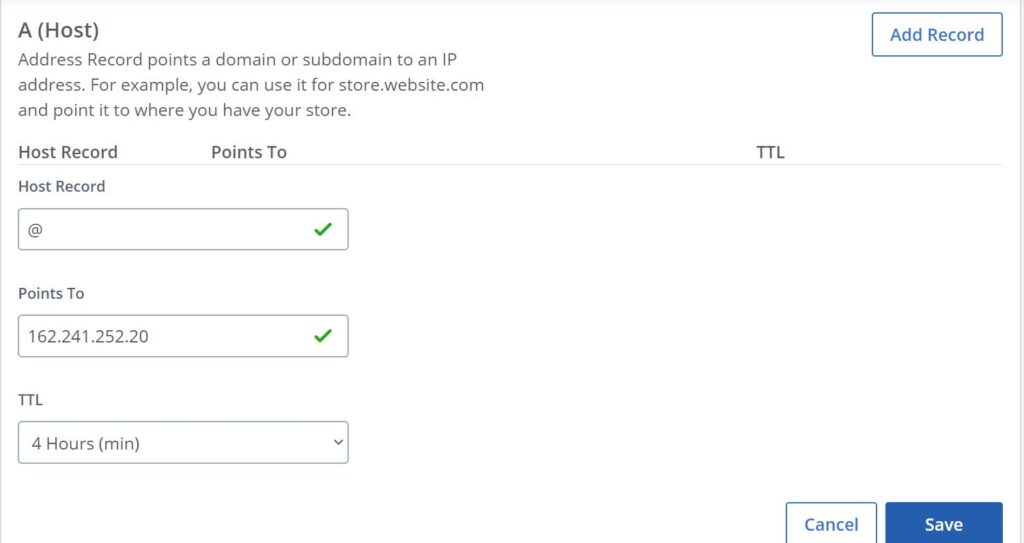
A Canonical Name (CNAME) records can be used in the Domain Name System (DNS) to alias one domain name to another domain name. A common example is a subdomain aliasing to the root domain name, for example, users accessing “ mail.chicagotech.net” are referred to the root domain “chicagotech.net”. Another example is pointing from several websites owned by the same organization to a primary website.
To cerate a CNAME, You must cerate A record first and point it to the server IP address. For example, create root domain name, chicagotech.net points to its IP address 162.241.252.20.
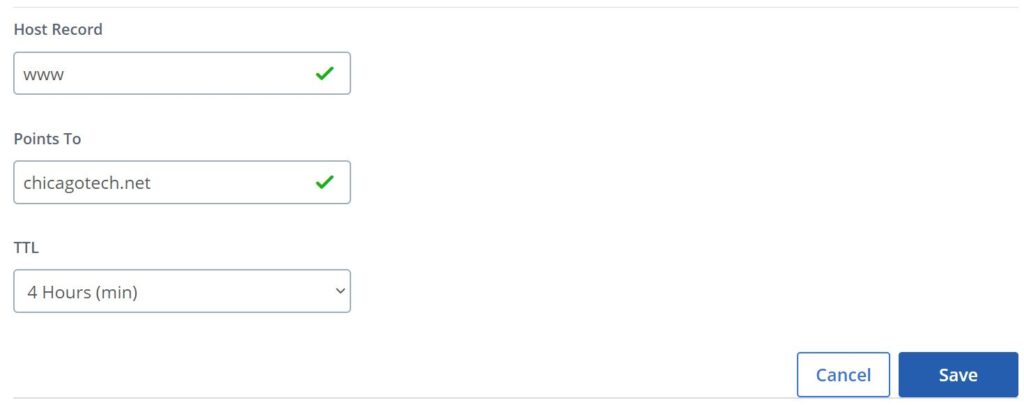
Then create a CNAME record pointing to A Record or Root domain name. For example points subdomain name www to the root domain name.
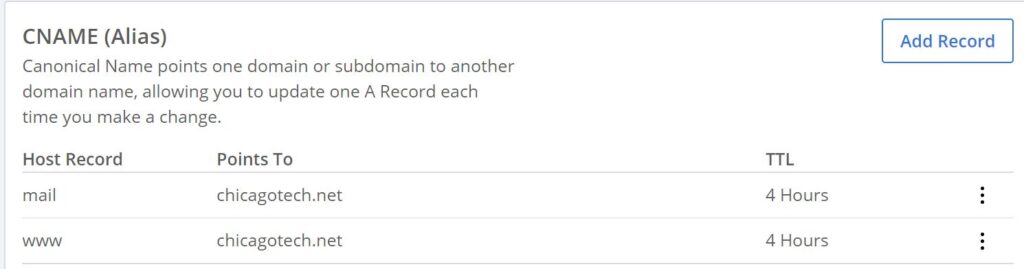
You can create more CNAME as shown below.
Notes: 1. A CNAME record must always point to another domain name, never directly to an IP address.
2. A CNAME cannot be placed at the root domain level, because the root domain is the DNS Start of Authority (SOA) which must point to an IP address.
3. CNAME record cannot co-exist with another record for the same name. It’s not possible to have both a CNAME and TXT record for www.chicagotech.net.
4. A CNAME can point to another CNAME, although this configuration is generally not recommended for performance reasons.
5. MX and NS records must never point to a CNAME alias.
6. An A Record maps a hostname to one or more IP addresses, while the CNAME record maps a hostname to another hostname.
7. The ALIAS Record, like CNAME, also maps a hostname to another hostname. However, the ALIAS Record makes it possible to have other DNS records on the same hostname, while CNAME does not.