Can palo alto firewall do balance the network traffic?

Yes, Palo Alto Networks firewalls have the capability to balance network traffic across multiple Internet Service Provider (ISP) connections. This feature is known as ISP link balancing or WAN link balancing.

Palo Alto firewalls support the use of multiple ISP connections simultaneously and can intelligently distribute network traffic across those connections. This helps optimize bandwidth utilization, provide redundancy, and improve overall network performance.

To configure ISP link balancing on a Palo Alto firewall, you typically need to follow these steps:

  1. Set up multiple ISP connections: Connect each ISP connection to the appropriate interface on the firewall.
  2. Configure interface and IP addressing: Configure the firewall interfaces and assign IP addresses to them, ensuring each ISP connection is properly recognized.
  3. Configure ISP link monitoring: Specify the monitoring method to determine the availability and health of each ISP link. The firewall can use techniques such as ICMP ping, TCP/UDP port monitoring, or session monitoring to check the link status.
  4. Define ISP link profiles: Create ISP link profiles that define the characteristics and parameters of each ISP connection, such as bandwidth, quality, and priority.
  5. Configure ISP redundancy and load balancing: Define the desired load balancing algorithm and failover behavior. The firewall can distribute traffic based on factors like link availability, link quality, or traffic volume.
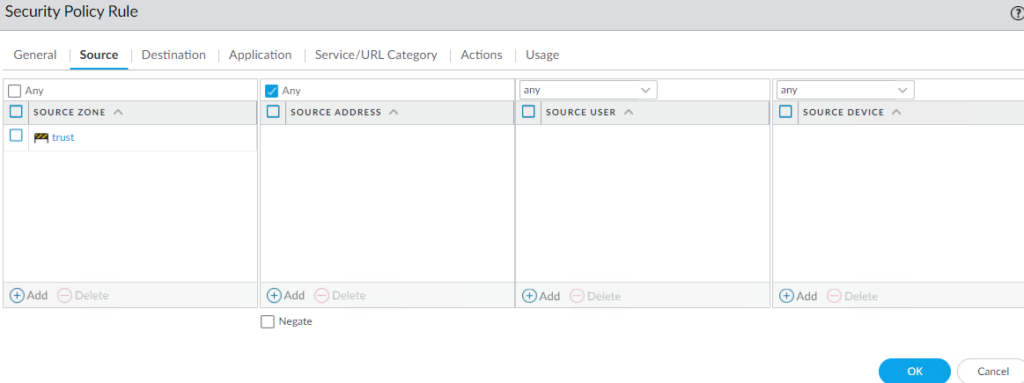
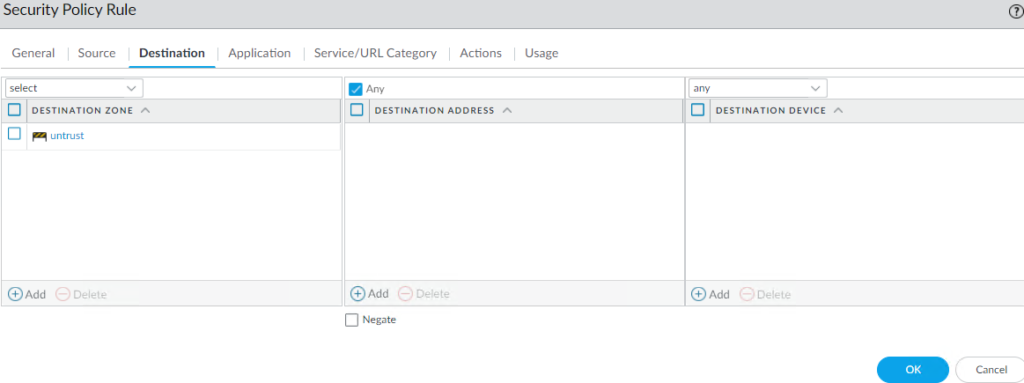
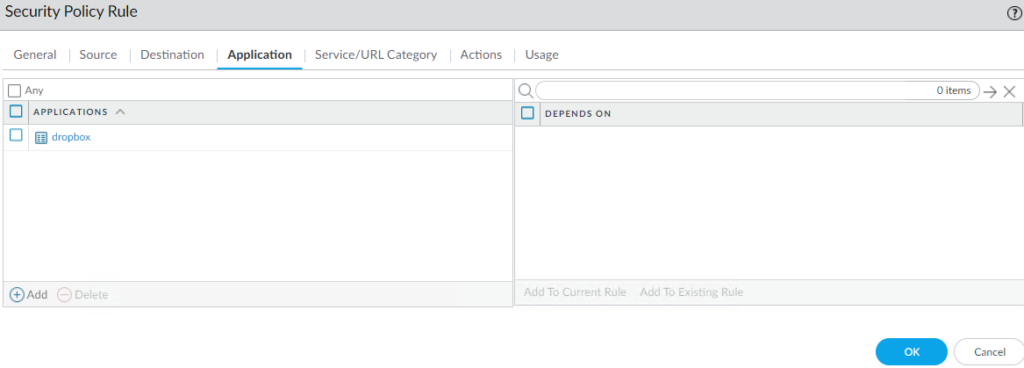
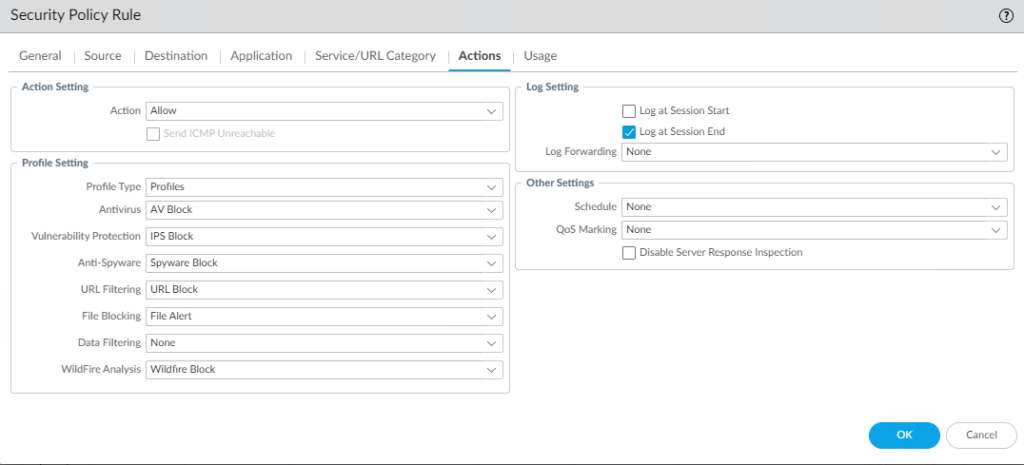
  6. Apply policies: Create or modify security policies to control how traffic is handled by the firewall. You can specify the desired ISP link profile or load balancing behavior for different types of traffic or applications.

By configuring ISP link balancing on your Palo Alto firewall, you can effectively distribute network traffic across multiple ISPs, improving overall performance, availability, and resilience of your network connectivity.

Can we increase the Internet speed by having two ISPs?

In general, having two ISPs (Internet Service Providers) does not automatically increase your internet speed beyond the maximum bandwidth provided by each ISP individually. Each ISP provides a specific speed, and you cannot combine them directly to achieve a higher total speed.

However, there are certain routers or devices that can utilize both ISPs simultaneously to distribute network traffic intelligently. These devices are known as dual-WAN routers or multi-WAN routers. They allow you to connect multiple internet connections and balance the network traffic across them.

With a dual-WAN router, you can allocate different types of traffic to different ISPs or use both connections simultaneously to distribute the load. This can provide benefits such as load balancing, increased network availability, and improved performance for multiple users or applications.

When using a dual-WAN router, it’s important to note that a single connection or download cannot exceed the maximum bandwidth of a single ISP. However, the router can intelligently distribute traffic across the available connections, potentially providing improved overall performance and responsiveness.

It’s worth mentioning that the effectiveness of a dual-WAN router depends on various factors, including the router’s capabilities, the specific configuration, and the type of traffic being handled. Additionally, network performance can still be subject to the limitations and variations of each ISP.

Before investing in a dual-WAN router, carefully research and consider the specific features, compatibility with your ISPs, and user reviews to ensure it meets your requirements.

Import Users from CSV on DUO

To add users to Duo Admin Panel, you can use Duo’s Import Users tool imports user information from a properly formatted comma-separated values (CSV) file. CSV import values can include username aliases, email addresses, full names, groups, notes, and multiple phones or mobile devices. Duo’s Import Users tool differs from the Bulk Enroll Users tool, in that those entries are initially limited to username and email address, and those users cannot be managed in Duo until they’ve completed self-enrollment.

The CSV file can include multiple data fields for each Duo user.

Allowed Fields

The fields allowed in this CSV file are:

  • username
  • realname
  • alias[1…8]
  • email
  • phone[1…n]
  • platform[1…n]
  • group[1…n]
  • status
  • notes
  • token[1…n]
  • type[1…n]

Only the username field is mandatory; all other fields are optional, and can be arranged in any order (as shown in the CSV File Format section below). Duo usernames and username aliases should have unique values for each user.

CSV File Format

The first line of the CSV file (the header) specifies the fields to import. For example:

username,realname,alias1,email,status,phone1,platform1,phone2,group1,group2

Here are some examples of possible user entries in a CSV file using the example header. Notice that when there is no value for a field, the field is left blank.

username,realname,alias1,alias2,email,status,phone1,platform1,phone2,platform2,group1,group2,notes,token1,type1 jason,Jason Liu,jason@example.com,smithj3,jason@example.com,active,734-555-1234,iphone,734-555-3232,mobile,StdUsers,,,, sally,Sally Jones,sally@example.com,joness5,sally@example.com,disabled,(734)-555-1235,android,(734)-555-4343,landline,StdUsers,,activate account after Dec 4,, jack,Jack Cruz,jack@example.com,,jack@example.com,bypass,+17345554322,smartphone,,,StdUsers,NetAdmins,,101222,h6 sarah,Sarah James,sarah@example.com,,sarah@example.com,active,(734) 555-2235,iphone,(734) 555-3302 x3243,landline,StdUsers,,,, bob,Bob Rogers,bob@example.com,rogersb,bob@example.com,active,734 555 3444,landline,734 223 9836,smartphone,StdUsers,,,, mary,,,,,delete,,,,,,,,,

Here is the step by step how to importing Users

  1. Log in to the Duo Admin Panel and click Users in the left sidebar. Click the Import Users 

2. Click the Choose File button, browse to your CSV file.

3. Click Upload to start the import process.

If the CSV file contains any errors, the import attempt fails and you are shown a red error message like the one below. If you see an error message, then the attempt has failed and none of your users were imported. Correct the indicated errors and try the import again.

4. After the CSV import is finished, a success message at the top of the Duo Admin Panel reports the results:

5. You should those usess.

6. Now, you need to send the new users an activation link.

How to Schedule a meeting in Teams

When you schedule a meeting in Outlook, it’ll show up in Teams, and vice versa. Note: Up to 1,000 invitees can join a Teams meeting and interact by using chat, audio, and video.

Schedule a meeting

There are several ways to schedule a meeting in Teams:

  • Select Schedule a meeting Schedule a meeting button 
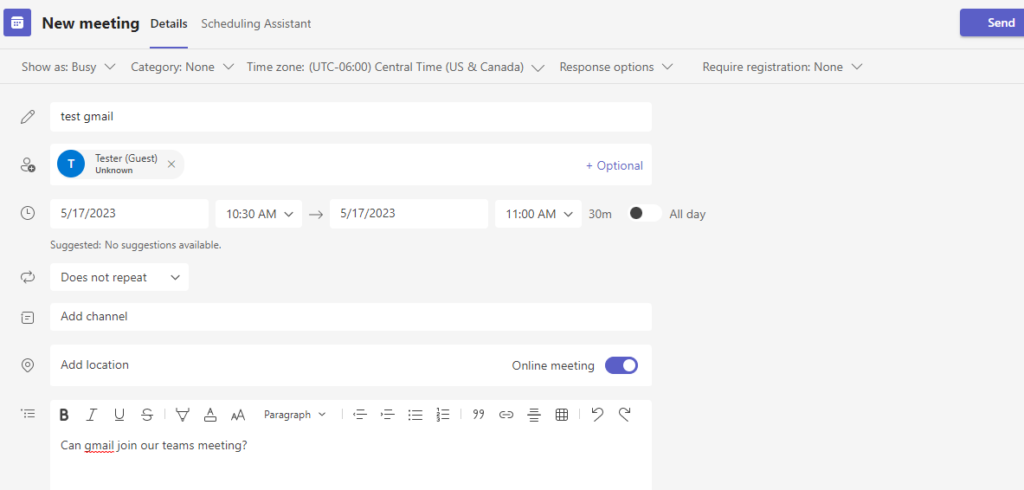
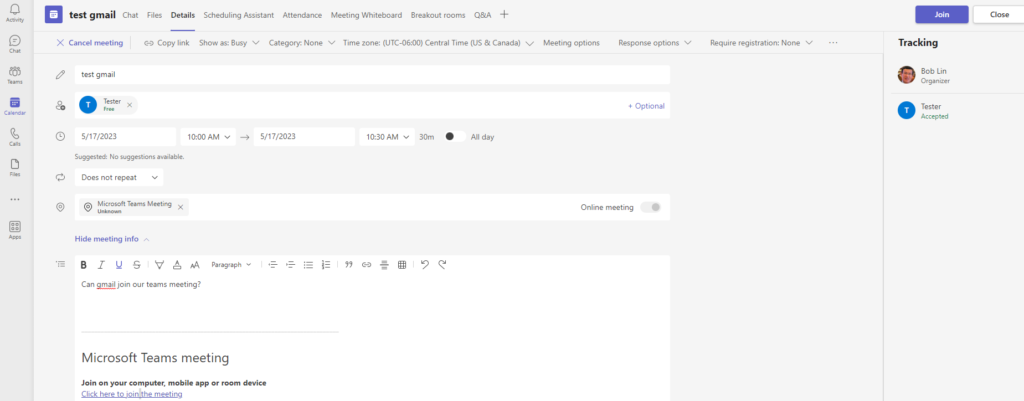
in a one-on-one or a group chat (below the box where you type a new message) to book a meeting with the people in the chat. You can’t schedule a meeting from a meeting chat.
  • Go to Calendar Meetings button on the left side of the app and select New meeting in the top right corner.
  • Select a range of time in the calendar. A scheduling form will pop open.

Here is how to use Calendar Meetings button to schedule a meeting.

  1. Click on Calendar Meetings button on the left side of the app and select New meeting in the top right corner.

2. The scheduling form is where you’ll give your meeting a title, invite people, and add meeting details. Use the Scheduling Assistant to find a time that works for everyone.

3. The Teams’ meeting has been added to the Calendars.

How to invite people who are not from the organization to Teams meetings

If you need to invite by e-mail that these people are not from the organization,
Please follow on the steps below..

  1. Select Schedule a meeting Schedule a meeting button in a chat (below the box where you type a new message) to book a meeting with the people in the chat.

Go to Calendar Meetings button on the left side of the app and select New meeting in the top right corner.

Select a range of time in the calendar. A scheduling form will pop open.

The scheduling form is where you’ll give your meeting a title, invite people, and add meeting details. Use the Scheduling Assistant to find a time that works for everyone.

Teams lets you invite people outside your organization, including those who don’t have a Teams license. You’ll need their full email address to invite them.

Go to where it says Add required attendees. If anyone is an optional attendee, select Optional instead.

Type the person’s full email address (ex: *** Email address is removed for privacy ***).

Select Invite. They’ll receive an email with a link to the meeting.

https://support.microsoft.com/en-us/office/sche…

How to Sync Android Galley with OneDrive

To begin using OneDrive to sync your photos, you may need to download the Microsoft OneDrive app on your device and add your Microsoft account. Here is how.

  1. Open the Gallery app, and then Tap Gallery Settings

2. Turn on “Sync with OneDrive”.

3. If you’ve signed in to your Microsoft account, but it hasn’t been linked to your Samsung account, the option will be Cloud sync. If you aren’t signed in to a Microsoft account or haven’t connected it yet, you will be prompted to do so.

4. Follow any on-screen instructions.

5. After login, tap Done.

6. Login your OneDrive account, you should see the pictures synced from the phone on the folder Pictures>Gallery (Samsung Gallery in our example).

Create a Policy to allow accessing Dropbox on PA Firewall

by default, Palo alto firewall blocks downloading files from Dropbox. If your users need to download files from Dropbox, you may want to create a policy rule. Here is how.

  1. Login PA Firewall.
  2. Go to POLICIES>Security.
  3. Click Add.
  4. in General, enter the Name, Rule type, Description, Tags, group Rules by Tage.

5. In Source, select trust in SORSE ZONE

6. In Destination, select untrust in DESTINATION ZONE

7. In Application, Add dropbox in APPLICATIONS.

8. in Actions, select Allow in Action, configure Profile as show below as example.

9. Click OK to save the settings, and then Commit.