How to Install and Configure Windows, VMware, Virtualization and Cisco on
Author: Bob Lin
Bob Lin, Chicagotech-MVP, MCSE & CNE
Data recovery, Windows OS Recovery, Networking, and Computer Troubleshooting on
http://www.ChicagoTech.net
How to Install and Configure Windows, VMware, Virtualization and Cisco on
http://www.HowToNetworking.com
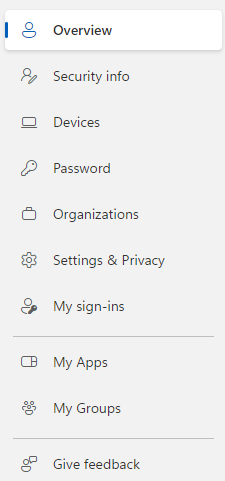
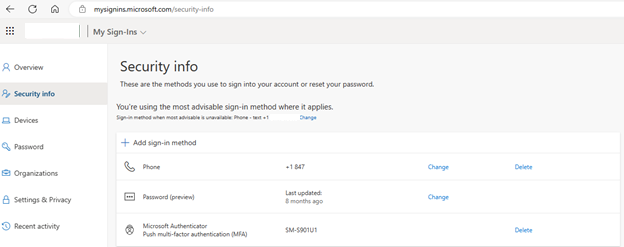
Each user can manage his/her own office 365 settings by accessing https://aka.ms/MFASetup. You have these options: Security info, Devices, Password, Organizations, my sigh-ins and more.
Under Security info, you can manage your Microsoft Authenticator.
Use Email Client’s Built-in Tools: Many email clients have built-in features to detect and eliminate duplicate emails. Explore your email client’s settings or preferences to see if it offers such functionality.
Sort Emails by Sender or Subject: Sometimes, duplicate emails might have slight variations in content but come from the same sender or have similar subjects. Sorting emails by sender or subject can help you identify and remove duplicates more easily.
Manually Delete Duplicates: If your email client doesn’t have built-in tools, you may need to manually review your inbox and delete duplicate emails. This can be time-consuming, but it’s an effective way to ensure duplicates are removed.
Use Third-Party Software: There are third-party software programs and plugins available that can scan your mailbox for duplicate emails and help you remove them efficiently. Research and choose a reputable tool that is compatible with your email client.
Check Email Filters: Sometimes, email filters or rules can inadvertently create duplicate copies of emails. Review your email filters and ensure they are not causing duplicates to be created.
Avoid Email Forwarding Loops: If you frequently forward emails to multiple recipients, be cautious to avoid creating forwarding loops that generate duplicate copies of emails. Check the recipients list before forwarding emails to ensure you’re not inadvertently creating duplicates.
Regularly Clean Up Your Inbox: Make it a habit to regularly clean up your inbox by deleting unnecessary emails and organizing your messages. This can help prevent the accumulation of duplicate emails over time.
Consolidate Email Accounts: If you use multiple email accounts, consider consolidating them into one primary account. This can help reduce the chances of receiving duplicate emails across different accounts.
Delete Unnecessary Emails: Go through your mailbox and delete emails you no longer need. This could include old newsletters, promotional emails, or outdated messages.
Archive Old Emails: Instead of deleting important emails, consider archiving them. Most email clients have an archive feature that moves emails out of your inbox but keeps them accessible if needed.
Use Folders and Labels: Organize your emails into folders or labels based on categories or projects. This can help you find emails more easily and reduce clutter in your inbox.
Empty Trash and Spam Folders: Make sure to regularly empty your trash and spam folders. These folders can accumulate a lot of unnecessary data over time.
Reduce Email Attachments: Large email attachments can quickly consume storage space. Consider saving attachments to your computer or cloud storage and then deleting them from the email.
Optimize Attachments: If you need to keep attachments in emails, consider compressing them or using file-sharing services instead of attaching large files directly to emails.
Limit Automatic Downloads: Some email clients automatically download attachments or images, which can increase mailbox size. Check your settings to see if you can limit automatic downloads.
Set Up Email Filters: Use email filters to automatically organize incoming emails and reduce the number of messages that end up in your inbox.
Use Online Storage Services: Instead of storing large files as email attachments, use online storage services like Google Drive, Dropbox, or OneDrive to share files and free up space in your mailbox.
Regular Maintenance: Make mailbox size reduction a regular part of your email management routine. Set aside time every few weeks or months to review and clean up your mailbox.
Situation: The client would like to forward emails sent to Microsoft group to an external email address. However, Microsoft group doesn’t have forwarding feature.
Resolution 1: Create an internal mailbox using Exchange online license.
Created an internal mailbox using Exchange online license, for example username@chicaotech.net with Exchange online license.
Access Microsoft 365 Admin Center: Log in to the Microsoft 365 Admin Center using your administrator credentials.
Access Exchange Admin Center (EAC): Once logged in, navigate to the Exchange Admin Center (EAC). This is where you can manage email settings for your organization.
Create a Mail Contact: You need to create a mail contact for the external email address to which you want to forward emails. To do this:
Go to the Recipients section in the Exchange Admin Center.
Choose Contacts and click on the plus sign to add a new mail contact.
Fill out the necessary information, including the external email address.
Save the changes.
Create a Mail Flow Rule: Now, you’ll create a mail flow rule to forward emails sent to the Microsoft Group to the external email address:
Go to the Mail Flow section in the Exchange Admin Center.
Click on the plus sign to create a new rule.
Set up the conditions for the rule. You would typically specify the Microsoft Group as the recipient.
Configure the action to forward the emails to the mail contact you created earlier.
Save the rule.
Testing: Send a test email to the Microsoft Group to ensure that emails are being forwarded to the external email address successfully.
By following these steps, you should be able to forward emails sent to a Microsoft Group to an external email address. Make sure you have the necessary administrative privileges to perform these actions within your Microsoft 365 environment.
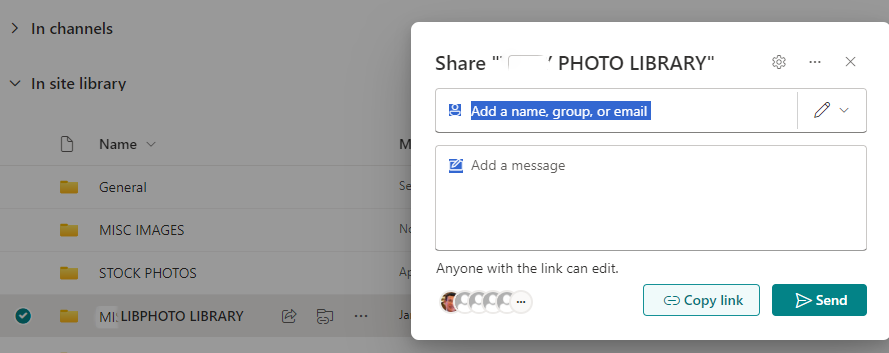
if you would like to share a SharePoint folder with an external guest with full permissions, you should select “Share People you specify can edit” instead of “Anyone with the link can edit”. Here is how.
With SharePoint open, click Share on the folder you want to share.
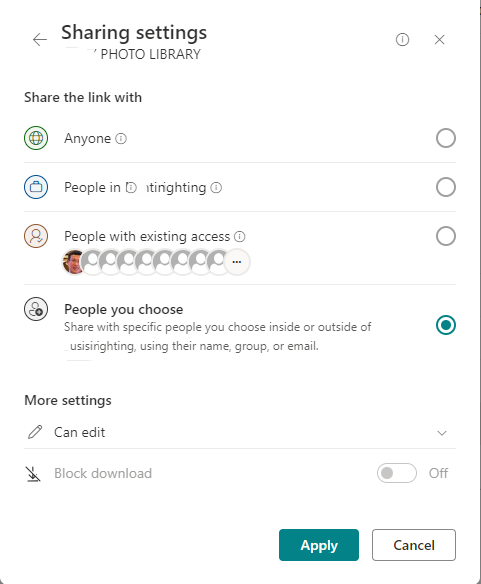
2. By default, it is Anyone with the link can edit. Click on it. You should have an option to “Share People you specify can edit” and select it.
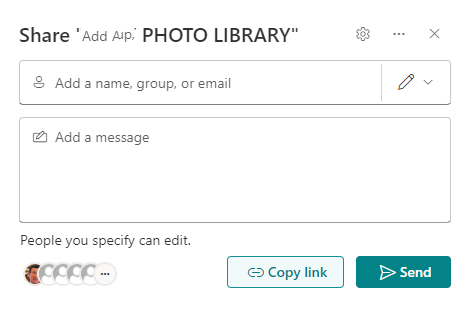
3. After Apply, type the guest email address and then Send.
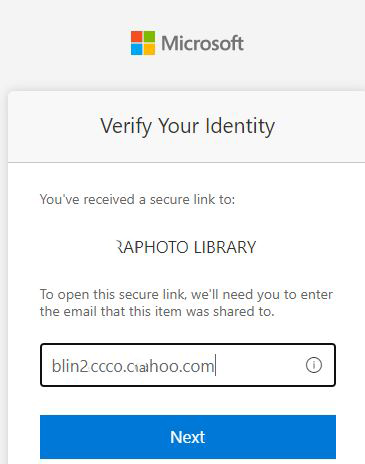
4. The guest should receive an email with the link. Open it and Microsoft will request verify Your Identity.
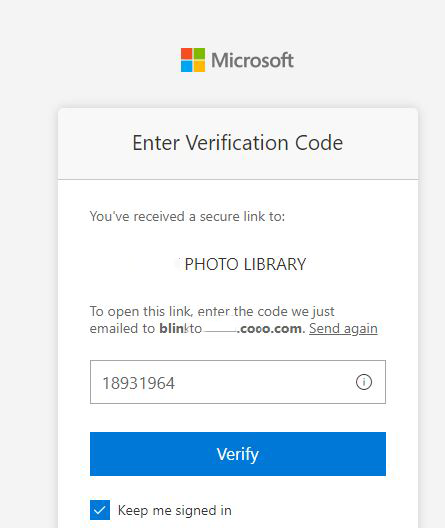
5. Enter the Verification Code and click on Verify.
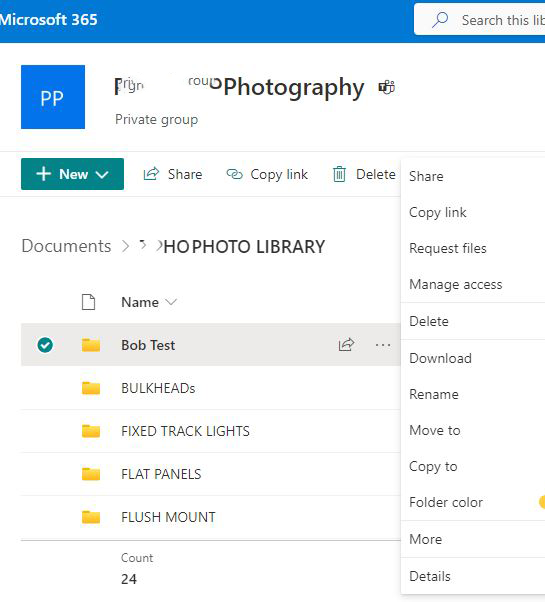
6. After login, you should be able to upload, delete and rename files, folders.
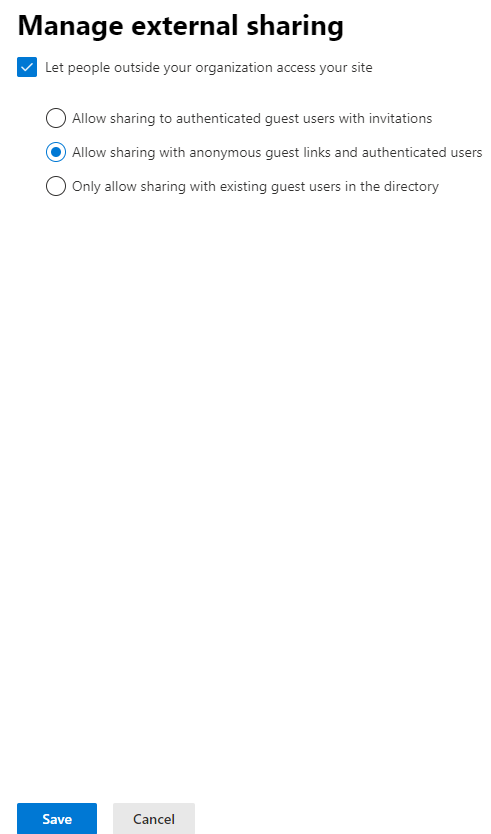
In SharePoint, “Anyone with the link can edit” and “Share People you specify can edit” are two different options for controlling access to documents or files within SharePoint sites or document libraries:
“Anyone with the link can edit”: This option allows anyone who has the link to the document or file to access it and edit it. It is a more open sharing option and is often used when you want to share a document with a wide audience without requiring specific permissions or user accounts. However, it can also pose security risks if the link falls into the wrong hands or is shared inadvertently. Also, a guest with “Anyone with the link can edit” permissions can only upload files, create subfolders, but can’t delete files and rename folders.
“Share People you specify can edit”: This option allows you to specify specific individuals or groups who have permission to edit the document or file. When you choose this option, you typically enter the email addresses or usernames of the people you want to grant edit access to. This option provides more control over who can access and edit the document, limiting it to only those individuals or groups that you explicitly specify. For example, a guest with “Share People you specify can edit” can upload files/folders, delete and rename files/folders. Also, you may e requested to login Microsoft to access the shared SharePoint.
Here is the example how to share a SharePoint using “Share People you specify can edit”.
With SharePoint open, click Share on the folder you want to share.
2. By default, it is Anyone with the link can edit. Click on it. You should have an option to “Share People you specify can edit” and select it.
3. After Apply, type the guest email address and then Send.
4. The guest should receive an email with the link. Open it and Microsoft will request verify Your Identity.
5. Enter the Verification Code and click on Verify.
6. After login, you should be able to upload, delete and rename files, folders.
In summary, the “Anyone with the link can edit” option is more open and accessible, while the “Share People you specify can edit” option provides more control and security over who can access and edit the document. The choice between these options depends on the level of access control and security requirements for the document or file in question.