Situation: The client’s active Palo Alto Firewall failed and they would like to active the Standby Firewall to replace the failed firewall. Here is how.
install all software and Applications to match the active firewall. Please refer to this post:
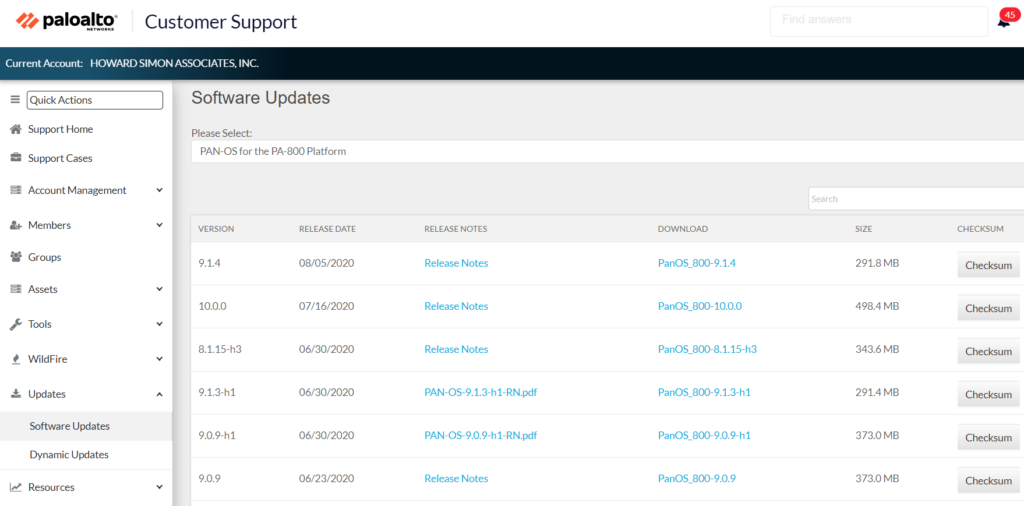
Situation: The client has a Palo Alto Firewall. They just add one Standby PA Firewall as backup. When they try to upgrade the software and applications on standby firewall to match the software and applications on Active firewall, they can’t because the version is too old. This article shows you how to upgrade Software and Applications on a standby Palo Alto Firewall.
Resolution: 1. Login Palo Alto network support portal.
2. Navigate to Update>Software Updates to download the version you need. Note: If you need old version, you may contact support to get for you.
3. To upgrade the software, go to Device>Software.
4. Click Update in the bottom.
4. In Import Software Package, click Browse.
5. After uploading, click on Install to install the Software.
6. To install Applications, navigate to Device>Dynamic Update.
7. Select the Type, for example Application and Threats. Then Browse the application file you downloaded before.
8. Select Package Type, Application and Threats in our example.
9. The installation may take a few minutes.
10. When completing the installation, click Close.
11. Now, the the new Application shows up as Currently Installed.
12. Now, send Submit and restart the Firewall. Then check the Software and Application status.
The answer is no. Currently, there is no option of making video calls to friends or relatives using Telegram. You can send video messages. to send video messages go to chat mic swish into camera. then hold camera and record video and send.
Alternatively, IF YOU INSTALL VIDOGRAM YOU WILL BE ABLE TO DO VIDEO CALLS
JUST ENSURE YOU USE THE SAME PHONE NUMBER WHICH YOU USED FOR TELEGRAM
Telegram is popular and more secure messaging app like WhatsApp and WeChat. You can create a group chat with up to 200, 000 members and it runs faster than WeChat. This how to shows you how to install and setup.
Install Telegram is easy as other mobile apps. Just search on the store such as Apple Store and Play Store.
After downloading and installing, enter your phone number.
Telegram will send you a code after entering your phone number. Enter the code and go to Next.
It may popups this message: Telegram needs to access to your contacts so that you can connect with your friends across all your device. Your contacts will be continuously synced with Telegram’s heavily encrypted cloud servers. You can tap NOT NOW or CONTINUE.
Now, the Telegram is ready to use with Welcome to Telegram message.
To setup Profile, Group, Secret Channel, Contact and other settings, tap menu icon.
After tapping menu icon, you will have these options: New Group, New Secret Chat, New Channel, Contacts, Calls, Saved Messages, Settings, Invite Friends, Telegram FAQ.
Or you can tap Edit icon to create New Group, New Secret Chat, New Channel.
To send a message to a group or an individual, tap the name.
You have options to send GIF, send text or Audio, attach photos, Locations, Files, Poll, and Music.
LINE is a freeware messenger app for instant communications on electronic devices such as Mobile phones, tablet, and PC. The service is operated by Line Corporation, a subsidiary of Korean internet search engine company, Naver Corporation.
LINE Features:
Line Friends: characters that are shown in stickers of the application.
Line Pay: allows users to request and send money from users in their contact list and make mobile payments in store
Line Taxi: users can request a taxi and automatically pay for it when they connect their account to Line Pay in Japan.
Line Wow: allows users to instantly access delivery services for registered food or products and services.
Line Man: On-demand assistant for food and messenger delivery services in Bangkok.
Line Today: A news hub integrated in the Line app.
Line TV: A video on demand service operating in Taiwan and Thailand.
Line Shopping: or online shopping.
Stores: physical stores in Japan, South Korea, China, Taiwan, Hong Kong, Thailand, U.S. and a Korean online store to purchase LINE Friends merchandise.
Telegram is a multi-platform messaging service founded by Russian entrepreneur Pavel Durov. Telegram’s headline feature is privacy, and to ensure this it employs end-to-end encryption. It doesn’t allow advertising or data collection and sharing.
The pros of Telegram: Speed, security, large file size and simplicity.
The cons of Telegram: Can’t make video calls; Offline status functionality problem; lacks the Stories feature.
Features of Telegram
The most important and the best feature of the Telegram app is its security.
Chat Folders allows you to categorize your chats into different labels and Telegram sort things out for you. Telegram gets super clean and much easier to manage.
Edit Sent Messages
Copy a Part of Text from a Message
Delete Sender’s Message
Turn Off Notifications for Individual Contacts
Stop Being Added to Random Groups
Send Silent Messages
Schedule Messages
Set Reminders
Self-destruct Medias and messages in Secret Chats
Add Nearby People and Group. This comes really handy when you want to add someone to your Telegram without sharing your mobile number. For example, if you are going to conferences, campuses or festivals, you can find several groups related to the place and event just like that.
Edit Photos/Videos
Quick GIF and YouTube Search
Add Animated Stickers to Images/Videos
Slow Mode
Polls and Quiz Mode
Create Timestamp for Videos
Send Uncompressed Media without Changing the File Extension
With Barracuda Backup, you have two options to restore data: Restore and Download. Instead of restoring data to a restore target, download provides the ability to save backup files directly to your workstation. Here is how.
Login Barracuda Backup Cloud Control. You can login from https://login.barracudanetworks.com/ . However, we recommend to login local device which restore will be faster.
Navigate to Backup>Main>your company name.
Click on Restore and then Restore Browser.
Navigate to company name>Server name>Backup Agent.
If you would like to restore the server, click Restore.
If you want to restore a file or folder, click on the File Systems.
If you have different drives, click on the one you would like to restore until you see the file or folder.
You have two options: Restore or Download.
If you click on Restore, you have an option to restore them to original location or different location. You also have an option to restore them to original path or different path.
You also have an option to Download them to your local computer. With download, you can browse to the location you want to download. By default, it will be download to the Download folder.