Microsoft System Center Operation Manager (SCOM) is a part of System Center suite. You can use SCOM to monitor health, capacity, and usage across applications, workloads, and infrastructure. This article shows you how to install Operation Manager based on SCOM 2019.
A.SCOM 2019 System Requirements
•Supported Server OS – Windows Server 2016 and 2019
•SQL Server Requirements – SQL Server 2016, 2017, and 2019
•SQL_Latin1_General_CP1_CI_AS
•SQL Server Full Text Search
•SQL Reporting Service
•IIS, ASP.NET 4 for Web console.
•Hardware requirement: Microsoft Azure, Virtual Machines, Physical Servers with minimum 4-core 2.66 GHz CPU, 8GB RAM, 10GB disk spaces.
•Firewall configuration: Inbound ports: TCP 1433, 1434, 135/443.
If you don’t meet the reequipments, you may receive these message when install SCOM.
B. SCOM Installation
1.Log on to administrative account
2.Run Operations Manager Setup.exe, and then click Install
3. On the Getting Started, check features you want to install, and then Next.
4. Select installation location, and then click Next.
5. On the Prerequisites page, review and resolve any warnings or errors.
If all requirements are met, click Next.
6. On the Configuration, Specify an installation option page, select Create the first Management server in a new management group, type a name for your management group, and then click Next.
7. On the Configuration, Configure the operational database. Enter the Server name and instance name box. The default instance name is MSSQLSERVER.
Note: If you installed SQL Server by using the default instance, you only must type the server’s name.
8. Enter Database name, Data File folder, and then click on Next.
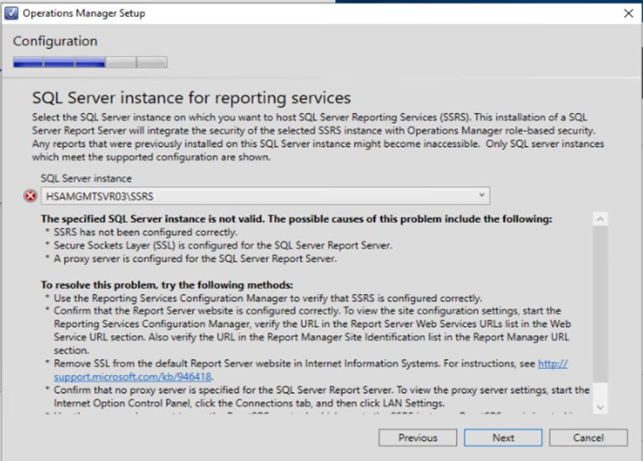
9. In SQL Server instance for reporting services, click Next to continue.
If you didn’t install SQL reporting service, you will need to download and install it first.
10. In Report Server Configuration Manager, setup service account.
11. Setup Database by clicking on Change Database.
12. On Change Database, check Create a new report server database, and then Next.
13. Configure Database Server.
14. You may want to Test Connection.
15. Configure Credentials and click Next.
16. Confirm the Change Database.
17. Process and Finish.
18. Configure web site.
19. Select an authentication mode for use with Web console.
20. Configure Operation Manager accounts
21. Diagnostic and usage Data
22. Click Install on Installation Summary.
23. Process the installation.
24. Complete the installation.
25. The SCOM is ready and running.
Please view this step by step video: