To add untrusted computers to SCOM 2019 for monitoring, you need deploy CA and Client Certificate on a domain server. Then install Certificates and SCOM Agent on Untrusted Computers. This article will show you how to Configure CA and Client Certificate on Managed (SCOM in our example) Server.
A. Install Certification Authority in Windows Server 2019
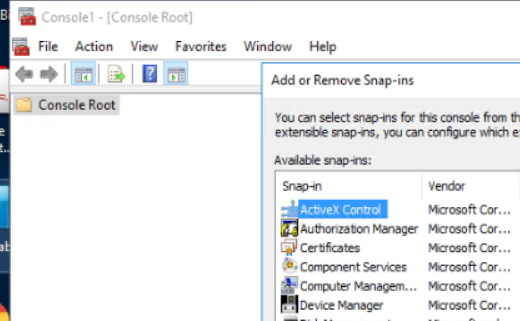
Situation: when attempting to open Certification Authority in Windows MMC, you don’t see Certification Authority and Certificate Templates.
Step 1: Install certification Authority
1.With the Server Manager open, go to Dashboard.
2.Click Add roles and features.
3. Click Next.
4. Make sure Role-based or feature-based Installation is checked, and click Next.
5. Select the server which will be installed Certification Authority.
6. Check Active Directory Certificate Services.
7. In the popup, click Add features and the follow the wizard to complete the installation.
Step 2: Post-deployment Configuration
1. Click yellow exclaim icon
2. Click Configure Active Directory Certificate Services.
3. Specify credentials to configure role services.
4. In Select Role Services to configure, check Certification Authority.
5. Specify the setup type of the CA, Enterprise CA in our example.
6. Specify the type of the CA, Root CA in our example.
7. Specify the type of private key, Create a new private key.
8. Specify the cryptographic options, keep the default and click on Next.
9. Specify the name of the CA, keep the default and click on Next.
10. Specify the validity period, 10 in our example.
11. Specify the database locations, keep the default and click on Next.
12. To confirm the settings, click Configure.
13. You will see Configuration succeeded after the configuring. Click Close.
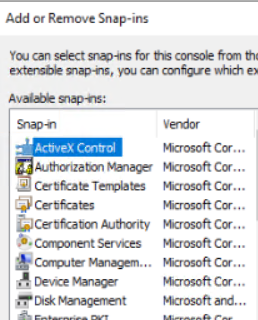
You should have Certification Authority and Certificate Templates in MMC
B. Create a certificate template and import it on all the managed Server and untrusted computers
When you install Microsoft System Center Operation Manager (SCOM) Agent on untrusted computers, you do not only need to add the CA to SCOM Server, Gateway Servers (communication between management servers and untrusted computers), untrusted computers, but also create a Certificate Template for them so that you can install Client Certificate to the managed server and the untrusted computer.
Step 1: Create a Certificate Template
1.Log on to the server which acts as an Issuing Enterprise Certification Authority, in our case it is SCOM server.
2.Type mmc in Search bar and click mmc icon to open it .
3. In the Console1 page, click File, and then Add/Remove Snap-in.
4. Highlight Certificates Templates, and then click Add.
5. In the Certificate Templates, locate the template named Computer.
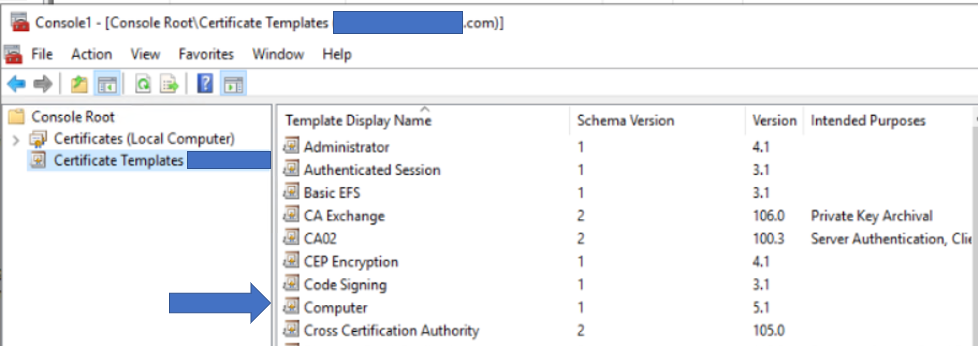
6. Right-click on Computer and select Duplicate Template
7. In Properties of New Template page, click in General and type template name.
8. Click on Subject Name tab and check Supply in the request.
9. In Security tab, assign Read and Enroll permissions to Certification Authority managers or Certification Authority administrators.
10. Click Ok to save changes to the template and close Certificate Templates window.
Step 2: Enable new template to Issuing Enterprise CA
1. Log on to the server which acts as Issuing Enterprise CA.
2. Go to Server Manager>Tools and select Certification Authority
3. Expand your Certification Authority name and right click on Certificate Templates>New>Certificate Template to Issue.

4. In the Enable Certificate Templates page, locate custom template you just created (CA02 in out example) and click Ok.
Step 3: Request Certificate Template
1.Log on to the server which acts as Issuing Enterprise CA.
2.Type notepad in Search bar and open it.
3. Paste the following info with the managed server name and template name into the notepad:
[NewRequest]
Subject=”CN=scomsvr.mydomain.com”
KeyLength=2048
KeySpec=1
KeyUsage=0xf0
MachineKeySet=TRUE
[RequestAttributes]
CertificateTemplate=“CA02″
4. Save the file with an .inf file name extension, for example CA02.inf.
5. Run Command Prompt as administrator by typing cmd in the Search bar.
6. In the Command Prompt window run the following command:
CertReq -New -f path\savedconfig.inf path\OpsMgr_%computername%.req
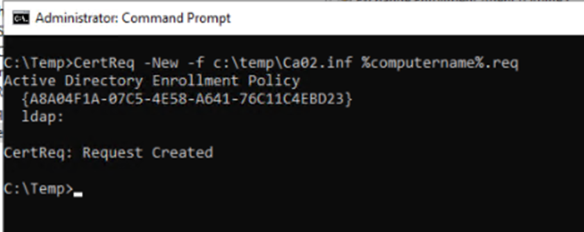
7. Close Command Prompt window.
8. You should see created OpsMgr_%computername%.req file in the folder you saved.
Step 4: Submit the request file to Enterprise Certification Authority
1.Log on to the server which acts as Issuing Enterprise CA.
2.Go to Server Manager>Tools and select Certification Authority
3. In the Certification Authority page, right on Certification Authority name, click All Tasks and then Submit new request.
4. In the Open request file, locate CA02.req file created previously and click Open.
5. Save Certificate page will appear. Save certificate to a file, for example CA02.cer.
Step 5: Install issued certificate to managed computer
1.Log on to the server which acts as Issuing Enterprise CA.
2.Run Command Prompt as administrator by typing cmd in the Search bar.
3. In the Command Prompt window run the following command:
Certreq -accept path\%computername%_cert.cer
In our example
Certreq -accept c:\temp\CA02.cer
4. Copy MOMCertImport.exe from SCMO SupportTool\i386 folder to the CA02.cer location, Temp folder in our example..
5. Then run this command:
MOMCertImport /SubjectName %computername%

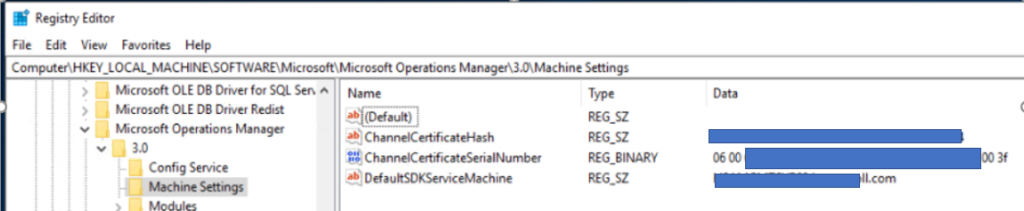
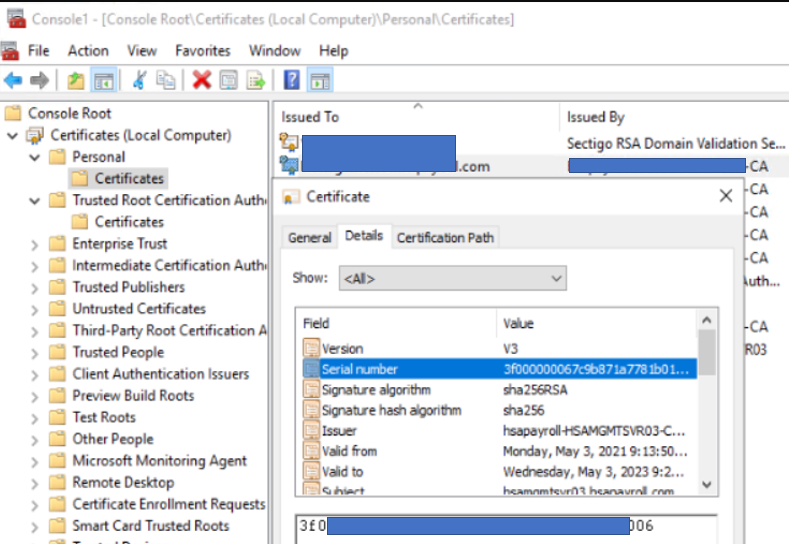
6. To confirm that it imported successfully, open Regedit. Go to HKLM>Software>Microsoft>Microsoft Operations Manager>3.0>Machine Settings. The ChannelCertificateSerialNumber will be reversed pairs of the Personal>Certificate in the MMC console
C. Generate SCOM Client Certificate and install it on all managed server and Untrusted computer(s)
To trust an untrusted computer, we need to create the client Certificate for both managed server and untrusted computer.
Step 1: Request and Enroll New Certificate
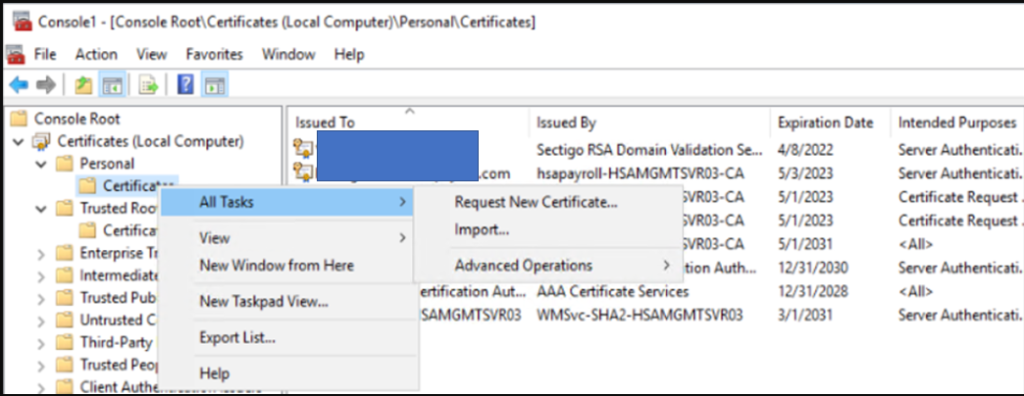
1.On the Managed or SCOM Server, go to MMC>Certificate (local computer)>Personal.
2.Right click on Certificate and select All Tasks>Request New Certificate.
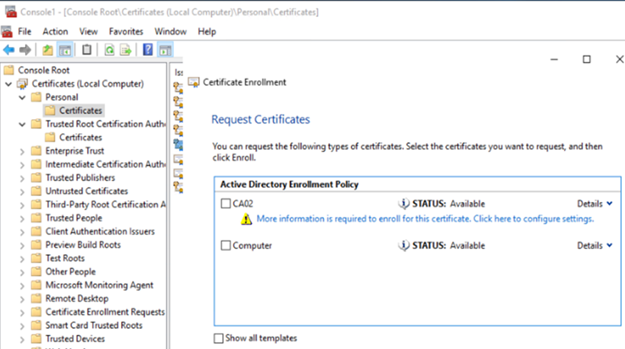
3. In Certificate Enrollment, highlight the Policy, and click on Next.
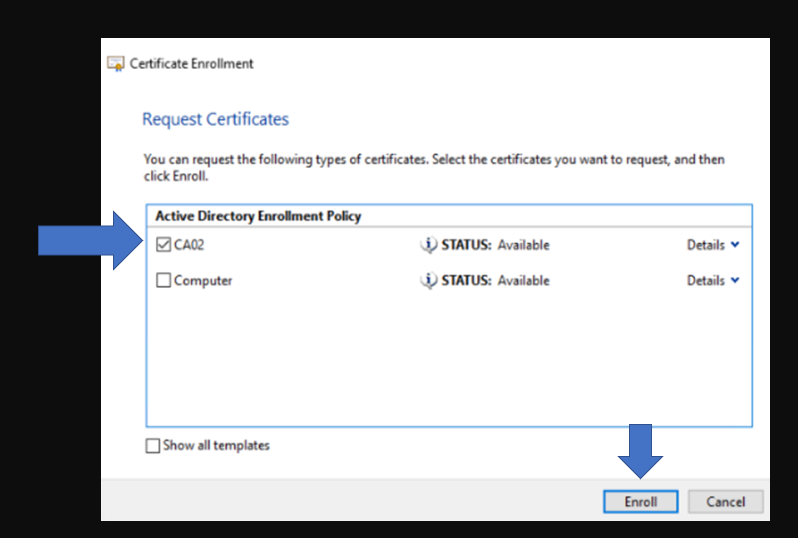
4. In Request Certificates, click blue text under the policy, CA02 in our example.
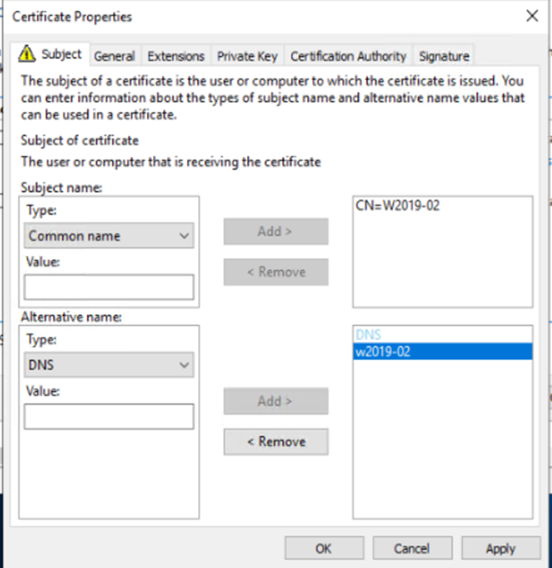
5. On the Certificate Properties window under the Subject page, select Common Name and DNS name and add your server’s name, in my case “W2019-02”
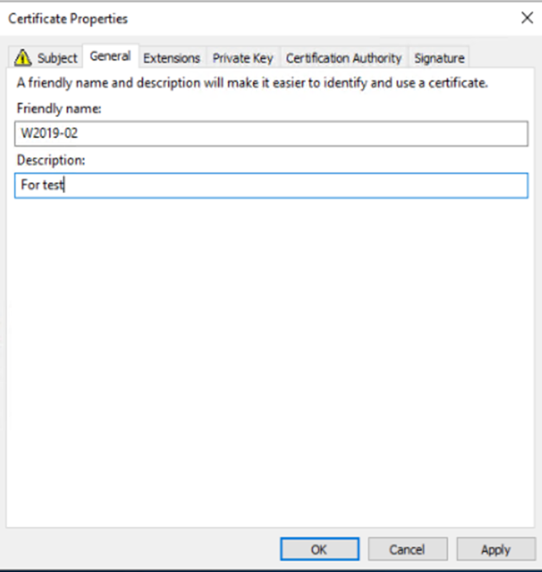
6. Select the General Page and add your server’s name there as well.
7. Click OK, then finish the wizard with defaults
8. Highlight the Active Directory Enrollment Policy and click Enroll.
9. The Status should shows Succeeded. Click on Finish.
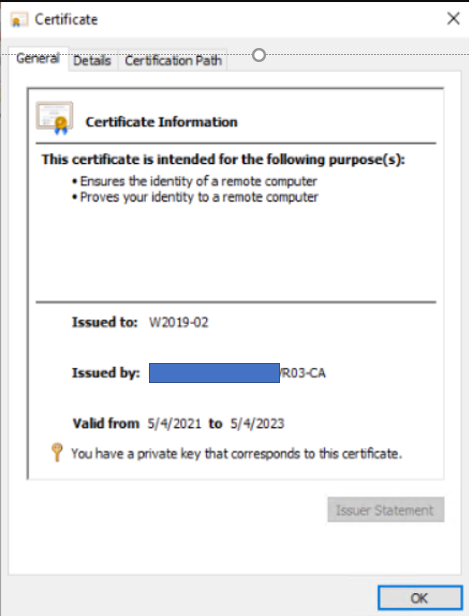
9. Under Personal Certificates you should now have a certificate named after your server’s name, in my case “W2019-02”

10. Double click on the Certificate you juts enrolled to check the status.

Step 2: Export Client Certificate for Untrusted Computer
1. Right click the certificate you just enrolled and click export
2. Select Yes, export the private key, and then click Next.
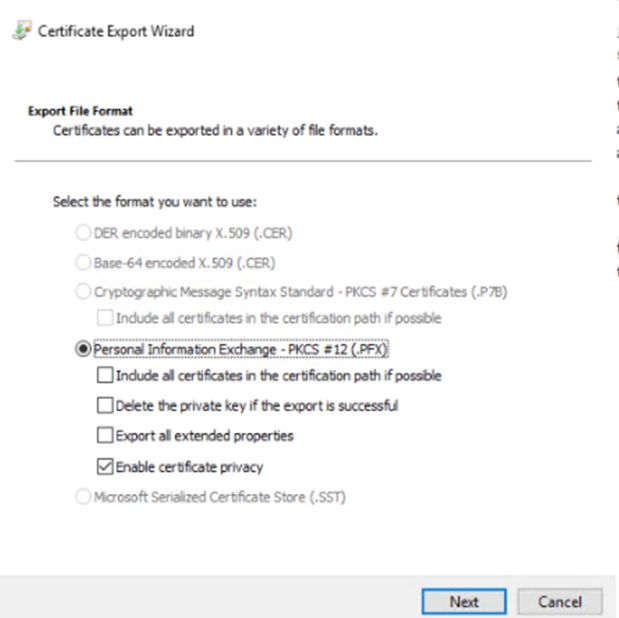
3. In Export File Format, check Personal Information Exchange – PKCS #12(.PFX) with Enable certificate privacy. Others are the options.
4. In Security, enter the password, and then click on Next.
5. Save it somewhere that is accessible from the untrusted server.
6. Click Finish.
Step 3: import SCOM Client Certificate to Untrusted Computer
1.On the untrusted computer, copy the certificate you just created to the local computer.
2.Open MMC and load the Certificates snapin for local computer.
3.On Personal right click and select All Tasks -> Import
5. Browse and select the certificate you just exported on Managed Server.
6. Select Next and enter your password on the Private key protection.
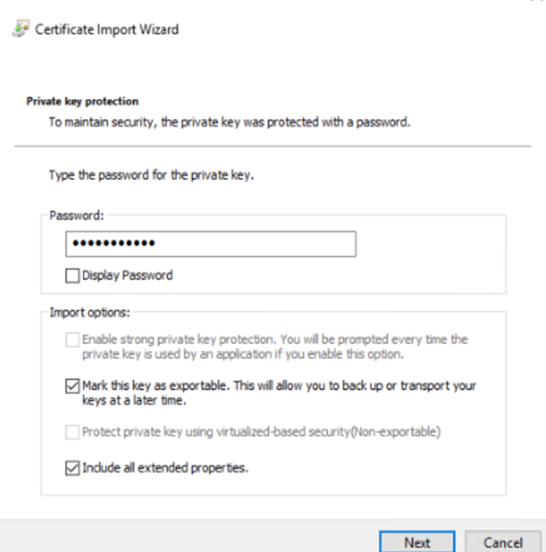
7. Check Place All Certificates in the following Store, and make sure Certificate store is Personal.
8. Click Finish on Completing the Certificate Import wizard.
9. You should have the Certificate installed. Double click on it to check the status.
Please view this step by step video: