How to export and import password from Google Chrome

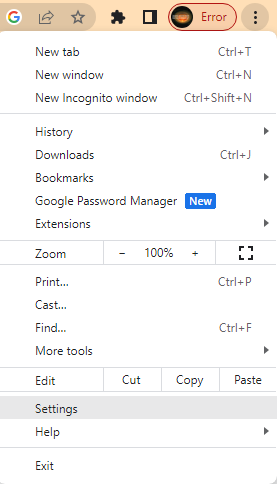
A. On the Device A which is device exporting Chrome password.

  1. With Google Chrome, go to Settings by clicking on 3 dos.

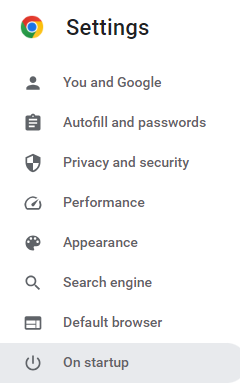
2. Click on Autofill

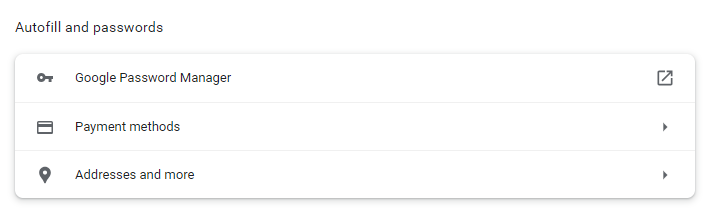
3. Select Password Manager.

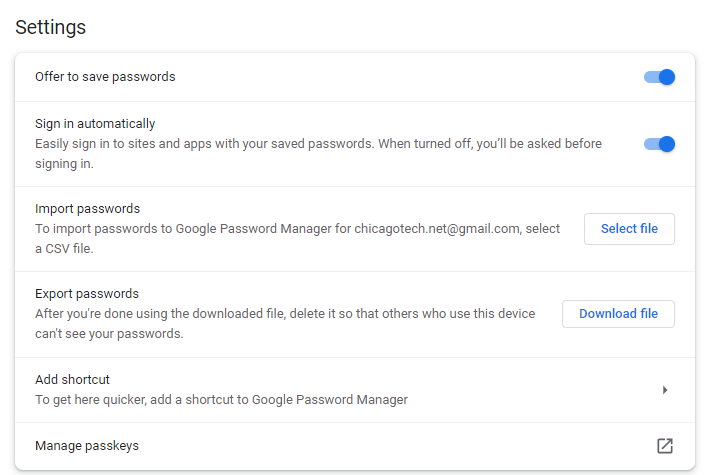
4. Under Password Manager, click on Settings.

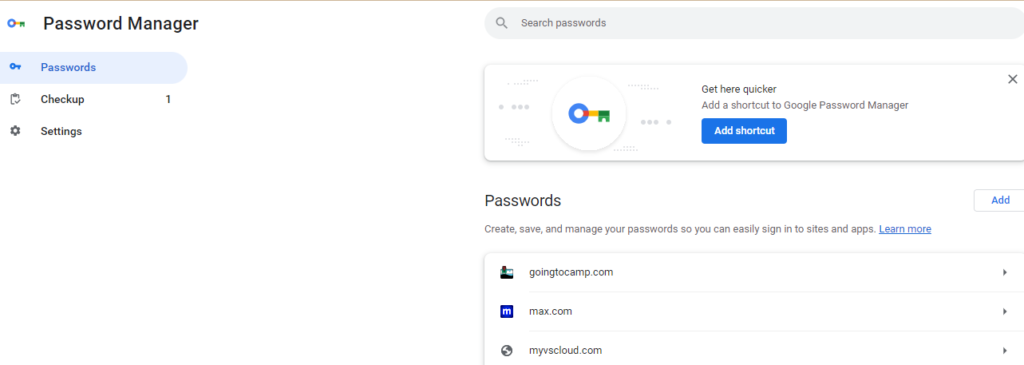
5. Click on Download file under Settings

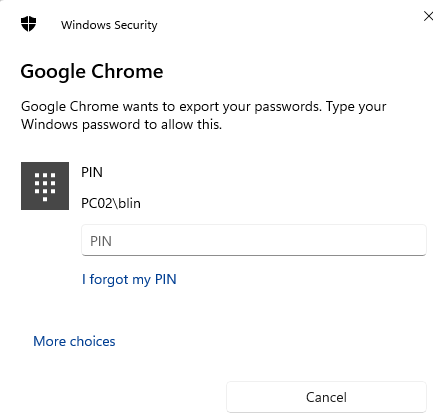
6. Enter your device’s password to export the passwords.

7. Save the .CSV file to your device.

B. On Device B which is the device importing Chrome password.

Repeat above step 1 to 4.

5. Transfer the password file to the device B.

6. Under Import passwords, click on Select file.

This image has an empty alt attribute; its file name is image-13.png

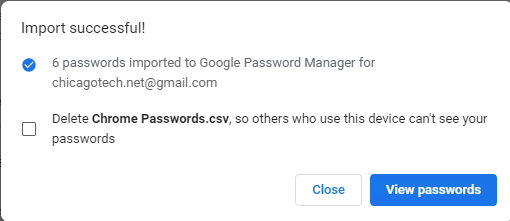
7. You may receive popup like this. To view which apps or websites passwords are imported, click on View passwords. Otherwise, click Close.

8.. You may test to check if your passwords have been imported successfully.

How to recover deleted office 365 group mailbox

If you are the owner of a Microsoft 365 group, you can recover a deleted group by yourself in Outlook.

  1. On the deleted groups page or People – Outlook (office.com), select the Manage groups > Groups > Deleted.

2. Click on the Restore tab.

If you are the Office 365 Global Administrator, Please follow these steps:

1.     Sign in to the Azure portal with a User Administrator account.

2.     Browse to Azure Active Directory > Groups, then select Deleted groups

3. Highlight the deleted you want to restore, and then click on Restore group.

Microsoft Migration Tools

  • Migration Manager. Copy file shares or content from other cloud providers to Microsoft 365. Learn more about migrating content to Microsoft 365.
  • SharePoint Migration Tool. To migrate SharePoint Server sites and content, you can use the SharePoint Migration Tool. For info, see Overview of the SharePoint Migration Tool.
  • Known Folder Move. If your users save most of their files to their Desktop, Documents, and Pictures folders, you can seamlessly move them to OneDrive using Known Folder Move so users can continue working in the locations they’re used to.
  • FastTrack migration benefit. FastTrack provides you with a set of best practices, tools, resources, and experts. Guidance includes migrating content from file shares, Box, or Google Drive source environments, and introducing capabilities at the pace that works for you. The FastTrack data migration benefit will also perform specific data migration activities on your behalf if you have 500 or more licenses. See more details in the FastTrack Center Benefit Overview. To get started, go to FastTrack.Microsoft.Com, review resources, and submit a request for assistance.

Share Files in Microsoft 365 using OneDrive, Teams and SharePoint

Comparison: Teams vs. SharePoint vs. OneDrive

Main UseAdvantagesDisadvantages
Microsoft TeamsOngoing communicationFast, low effortLack of transparency, oversight
SharePointSetting up projects, wikis, etc.Flexible, highly customizableComplex, difficult to use
OneDrivePersonal cloud storageFully integrated into WindowsTied to individual user

SharePoint is a web-based application for sharing and editing documents. SharePoint is based around individual sites, which can contain different subsites and elements similar to a normal website, but with access limited to a pre-defined group of users. This can include members of your organization as well as external partners, contractors, freelancers or guests. Common use cases for SharePoint include internal wikis or knowledge hubs, the use as a company intranet or even SharePoint sites for specific projects, which allow employees from different departments to coordinate and share resources, timetables and documents in one location.

OneDrive provides 1 Terabyte of personal storage for every licensed user in your organization. OneDrive lets users access files regardless of which device they are currently on, as well as allowing them to share documents with others. On a technical level, OneDrive basically acts as a SharePoint site that only one person can access by default.

As a all-in-one communications platform, Microsoft Teams combines a chat feature with meetings and video calls as well as document sharing and embedding. Users can be part of multiple teams at once, such as a company-wide team for general updates and a smaller team for their specific department, allowing them to track tasks or discuss their progress.

The rule of assigning permissions in SharePoint

  1. Assign permissions to groups—never to users directly.
  2. Whenever you change the membership of a SharePoint group, the next time the search passes with an incremental crawl, it will launch a full crawl to recalculate the entire access control list. So only give permissions to SharePoint groups. And the members of the SharePoint groups should be Active Directory groups, not individual users. This is best practice. When you assign permissions, please follow the steps.
  • Give permissions to SharePoint groups so your library gives rights to SharePoint groups.
  • Inside of your SharePoint groups, add Active Directory groups.
  • Then, add your users to an Active Directory group.

3. The best thing to do—as long as you can, for as far as you can—is to leave permission inheritance intact. If you have to break it, try to do so at the site level, if possible. If you’re going to break permission inheritance, try to do it at the document library or folder level.

4. there are a number of important differences between managing NTFS permissions on your file server and managing SharePoint permissions, including the different permission levels and the fact that SharePoint automatically deactivates inheritance when you set custom permissions.

How to Remove Windows Device from Azure AD

Note 1: Please save your data before remove the AAD computer from Azure AD. Otherwsie, you may lose the data.

Note 2: Please remember your local administrator credentials or create a new local administrator account. Otherwise, you may have a problem to login.

Note 3: After you unregister the windows 10/11 device, you will lose device access to school or work resources.

A. Remove Windows Device from Azure AD

  • Login to Windows with your organizational account.
  • Go to Start -> Settings.
  • Select Accounts > Access work or school.
  • Select the connected Azure AD domain account that you want to remove, and click Disconnect.

  • Click Yes to confirm the removal of the account. This will remove your access to resources like email, apps, networks, and all content associated with it. Your organization might also remove some data stored on this device.
  • Click on Disconnect, After disconnecting you won’t be able to sign in to this PC with your organization’s account.

Note: If this PC has BitLocker installed and running, make sure you save a copy of the BitLocker recovery key somewhere other than this PC.

  • Enter the sign-in info for a local administrator account. This can be a Microsoft account or a local account. Here Enter the username and password for an existing account, If you don’t have one, you will need to create a new account, click OK.

  • Click on Restart now or Restart later to remove windows device from Azure AD join, After restarting, your PC won’t be joined to Azure AD. You will need to sign in with another user account.

  • Restart the computer and login. To validate the Join Status, run this command; dsregcmd /status

B. Remove Windows Device from Azure AD using Azure Intune

  • Sign In to Azure Portal https://portal.azure.com/.
  • Navigate to the Azure AD, Select the device from the list which you want to remove.
  • Click Delete con on the top to remove it.

C. Remove Windows Device from Azure AD using Command Line

  • Reseat steps on B and click on the device to copy the device’s Object ID

  • You can use the Azure Active Directory PowerShell module, To Install Azure AD Module, Type the following command in PowerShell.
Install-Module AzureAD
  • You will be prompted to confirm the installation and import of the NuGet provider. Enter Y in all confirmation dialogs. The package installation will take a few minutes, wait for the installation to finish, then close the PowerShell window.
  • Type the Connect-AzureAD cmdlet to connect an authenticated account to use for Azure Active Directory cmdlet requests. You can use this authenticated account only with Azure Active Directory cmdlets.
  • Once you connected,

Type the Remove-AzureADDevice cmdlet to remove a device from Azure Active Directory (AD). This command removes the specified windows device from Azure AD Join.

Remove-AzureADDevice -ObjectId "1c913ae1-ea7f-4589-8b42-b2140a13c304"

-ObjectId
Specifies the object ID of a device in Azure AD.
-Remove-AzureADDevice
Remove Windows device from Azure AD Join. 

How To Remove Windows 11 From Azure AD

. Right click Start Button or press  + X keys and select Settings.

2. In the Settings app, navigate to Accounts > Access work or school.

3. In right pane corresponding to Access work or school, click on your currently connected to Azure AD account and then click Disconnect.

4. Now click on Yes, when the confirmation prompt appears.

5. Then you’ll Disconnect from the organization box, after reviewing the information provided, click Disconnect.

6. Next, you need to enter the existing local or Microsoft account information. You can here simply type your local user account name and its password, like we did.

7. If your account info provided is correct, you’re asked to make a final restart to disconnect from Azure AD. Simply click on Restart now to finish the process.

8. After reboot, your system will no longer be connected to your Azure AD account.

How to change the account email address in Windows 11

To change the account email address in Windows 11, you can follow these steps:

  1. Open the Start menu by clicking on the Windows icon in the taskbar or pressing the Windows key on your keyboard.
  2. Click on your user profile picture or account name located at the top right corner of the Start menu.
  3. In the drop-down menu, select “Settings” to open the Windows Settings app.
  4. In the Settings app, click on the “Accounts” category.
  5. In the left sidebar, select “Your info.”
  6. On the right side, under the “Account info” section, you will see your current email address listed. Click on the “Manage my Microsoft account” link below it.
  7. This will open a browser window and take you to the Microsoft account website. You may be prompted to sign in again for security purposes.
  8. Once you’re signed in, navigate to the “Your info” section of your Microsoft account.
  9. Look for the “Manage how you sign in to Microsoft” option or a similar setting related to account email addresses.
  10. From there, you should have the option to add or change your email address associated with your Microsoft account. Follow the on-screen instructions to complete the process.

Note: The steps above assume you already have a Microsoft account linked to your Windows 11 user account. If you don’t have a Microsoft account yet or want to create a new one, you can do so from the Microsoft account website or during the initial setup of Windows 11.Regenerate response